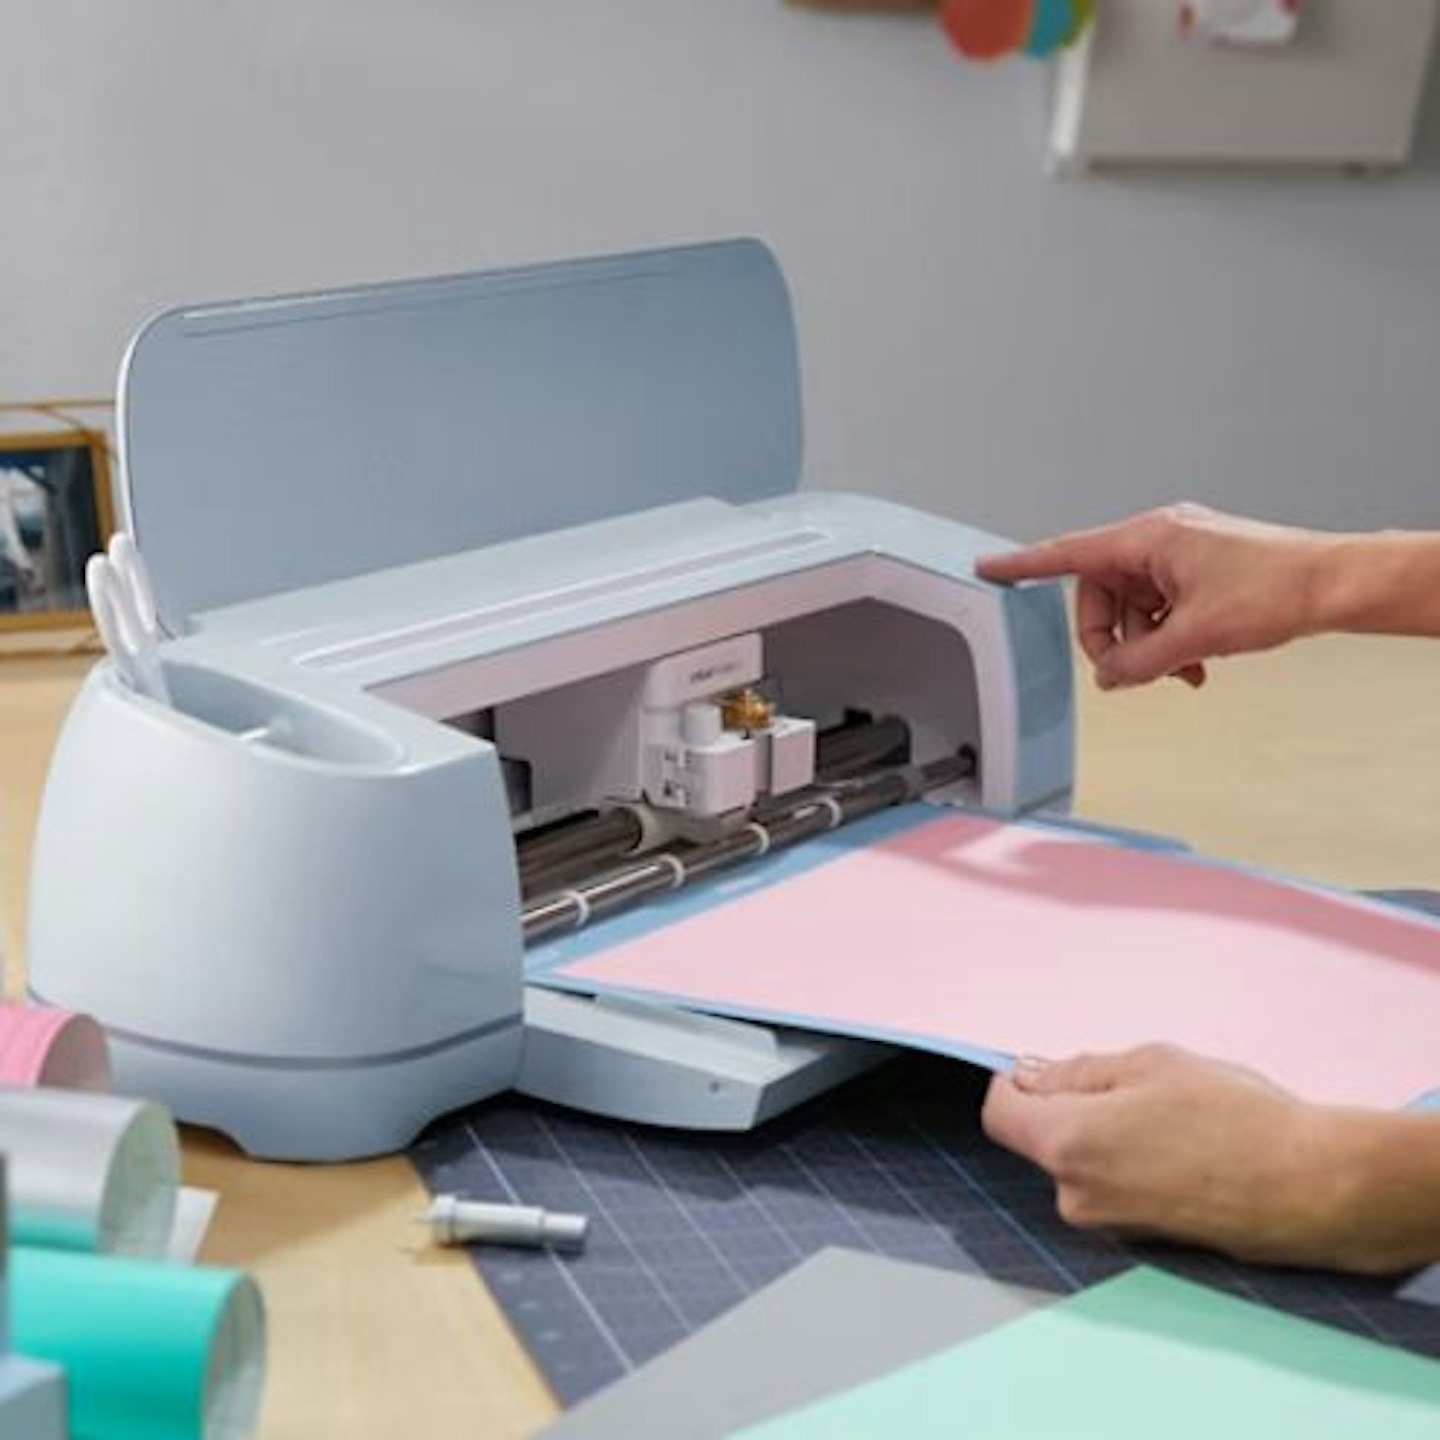
If you're passionate about crafting, the Cricut Maker 4 is an excellent choice—think of it as a multi-tool for creative projects. Similar in size to a home printer, it can cut, draw, score, engrave, emboss, perforate, and more. Plus, the newly released Maker 4 and Explore 4 have been launched at a lower price than previous models.
If you're new to Cricut machines and considering whether you should get one, we're here to tell you that Cricut is a game-changer for small creative businesses, crafters and students—and this is the ideal moment to join the Cricut family.
Best Cricut machine for experienced crafters
 Yours.co.uk/Cricut
cricut.com
Pros
- Extremely versatile crafting tool with Design Space software
- Cuts Smart Materials twice as fast
- More precise with a new optical sensor
- Cuts 300+ materials, including leather and wood
- Supports multiple tools for engraving, embossing, scoring and more
Cons
- If you already have the Maker 3 the improvements don't warrant upgrading to the 4
| Dimensions: | 56.1 x 18 x 15.7cm |
| Maximum cutting size for Smart Materials: | 29.7cm x 3.6m |
| Maximum cutting size with a mat: | 29.2 cm x 59.6cm |
| Design Space software: | iOS, Android, Windows and Mac |
- Cricut Maker 4 smart cutting machine
- Premium Fine-Point Blade + Housing
- Light Grip Machine Mat, 12 in x 12in (30.4 cm x 30.4cm)
- Fine Point Pen (0.4 mm)
- Mini Weeder
- Materials for practice cuts
What is the Cricut Maker 4?
The Cricut Maker 4 is a smart cutting machine that can cut, draw, score, engrave, and more. It cuts over 300 materials using various tools. The machine brings digital designs to life from Cricut Design Space, its companion software.
The Maker 4 makes it easy to create handmade giftware in batches. It handles large projects—such as banners up to 3.65 metres long—and cuts Smart Materials twice as fast as previous Maker models. With Cricut’s Adaptive Tool System, it can also cut tough materials like wood, aluminium and leather up to 2mm thick.
Cricut Design Space is the software where you upload or create designs before sending them to your machine. You can use free designs, purchase premium ones, or upload your own artwork files. A Cricut Access subscription offers a staggering range of projects, fonts and images – it's optional but recommended.
The Cricut Maker 4 was released in Spring 2025 at £399.99. Simultaneously, the Cricut Explore 4 in Seashell was launched at £269.99; it is similar to the Maker, but it lacks the Adaptive Tool System. So, if you want an intermediate digital craft machine that cuts, draws and scores fast and with precision, the Explore is ideal. Like the Maker, it can handle large-scale projects and cut Smart Materials to just over three metres long.
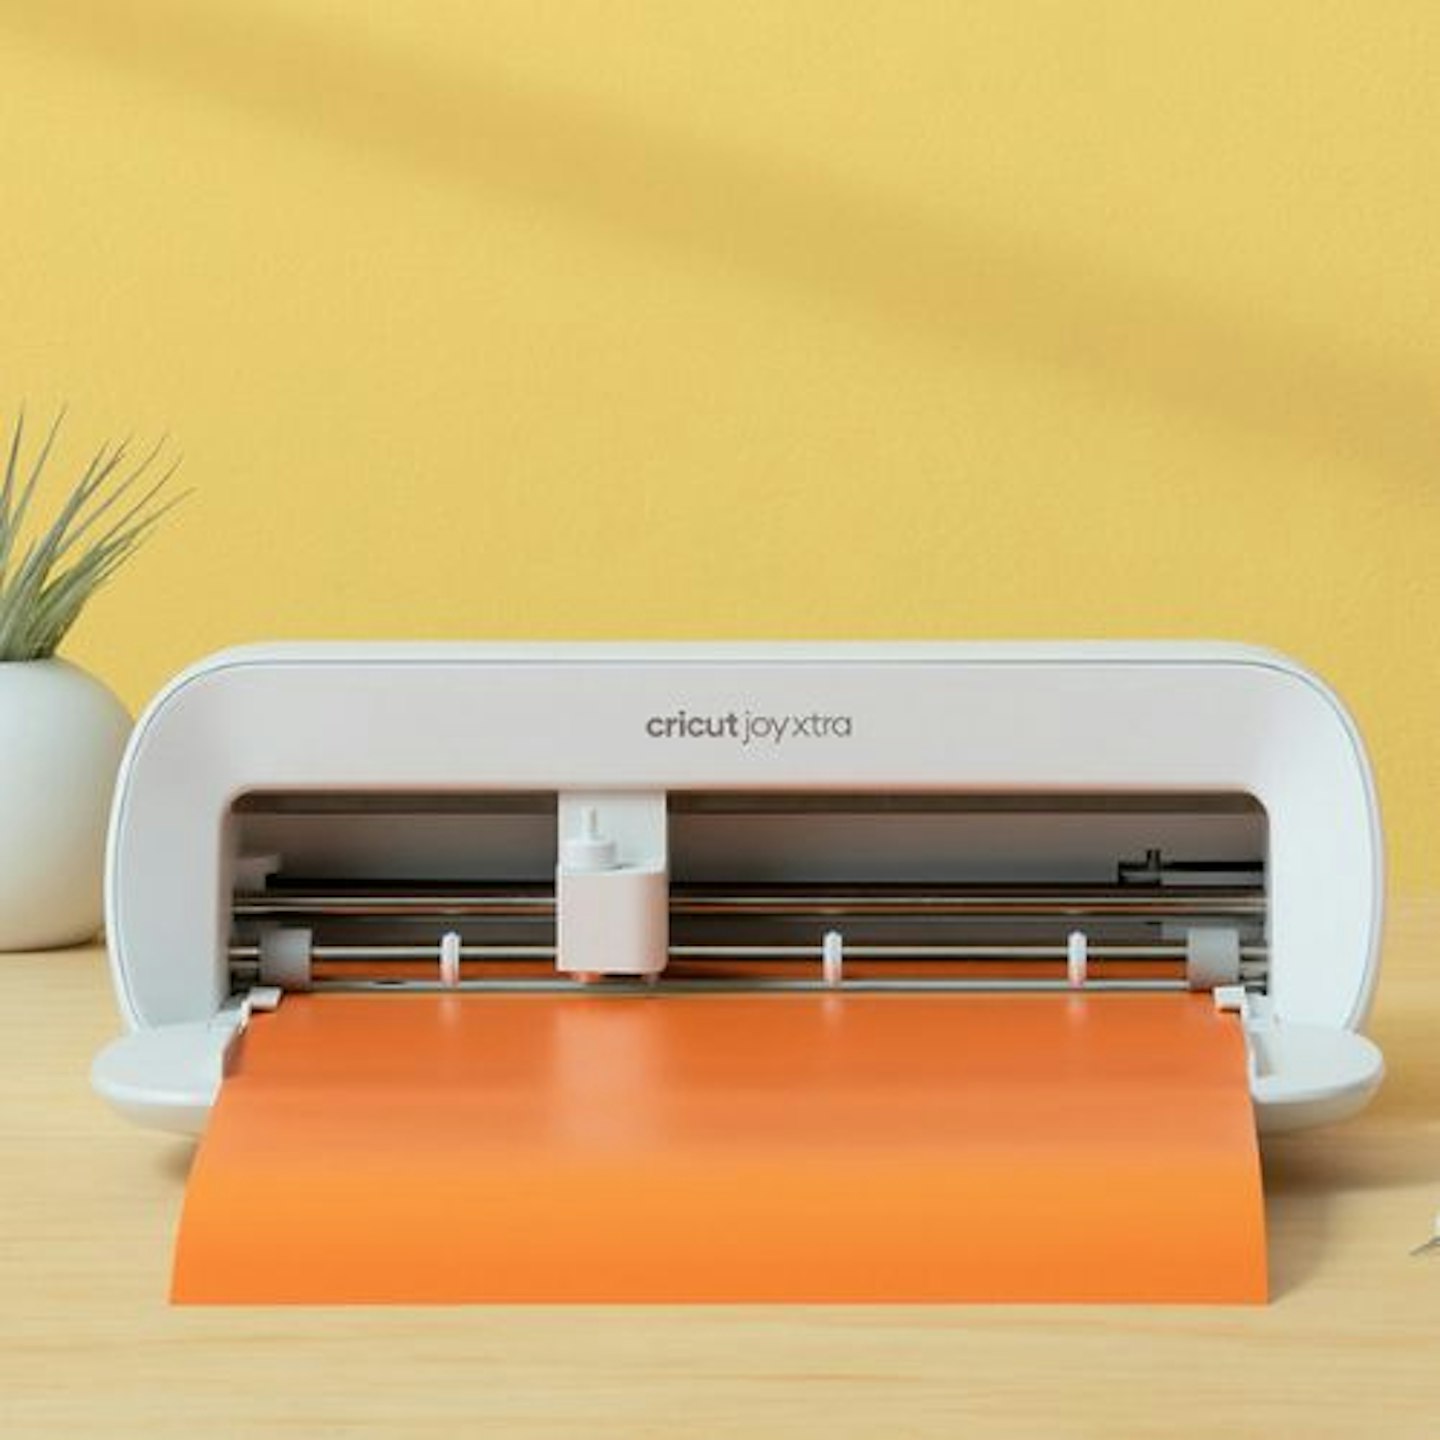
The Cricut Joy Xtra is currently £179.99 (it was £199.99) and is the best Cricut machine for beginners. It is smaller than the Explore and Maker with just one clamp. The Cricut Joy Xtra is perfect for beginners and hobbyists who want a compact, easy-to-use machine for simple, on-the-go crafting projects.
Key features of the Cricut Maker 4
• Twice as fast as the previous model for cutting Smart Materials
• Cuts more than 300 materials including paper, card, fabric, balsa wood, leather, chipboard and more
• Compatible with 13 tools for cutting thin fabrics, engraving, embossing, debossing, perforating and scoring (purchased separately)
• Cuts materials up to 2mm thick
• Backwards compatible with older Cricut tools

Shop this product
Patricia Hutny, UK & IE Marketing Manager, said: “The Cricut Maker™ 4 is the next generation of crafting machine. Cutting speeds of our smart materials are twice as fast, so it’s fantastic for regular crafters to create lots of projects in a short period of time. We find that customers who are experienced crafters are perhaps personalising items for their weddings or even have a small business side hustle, particularly love the Cricut Maker 4. This new machine allows for endless crafting possibilities as it can also cut tougher materials such as matboard, thin metal, leather and basswood. We’ve had a fantastic response from our crafting community and we can’t wait to see what they create with the new machine.“
Who tested it?
Natalie Knowles is a Commercial Content Writer who had a wonderful introduction to the world of Cricut when she reviewed the Cricut Explore 3, which coincided with her 40th birthday. Natalie was bitten by the Cricutting bug and has since reviewed the EasyPress 3 and Mug Press, plus a delightful range of the Cricut accessories which would be the envy of any creative type.
Natalie has a huge amount of experience and expertise when it comes to digital crafting. She started her graphic design career at a digital printing press in 2011, doing file preparation in a room full of large format cutting machines. When it comes to die cutting, sublimation printing and knowing her vector from her raster, Natalie knows.
How was the Cricut Maker 4 tested?
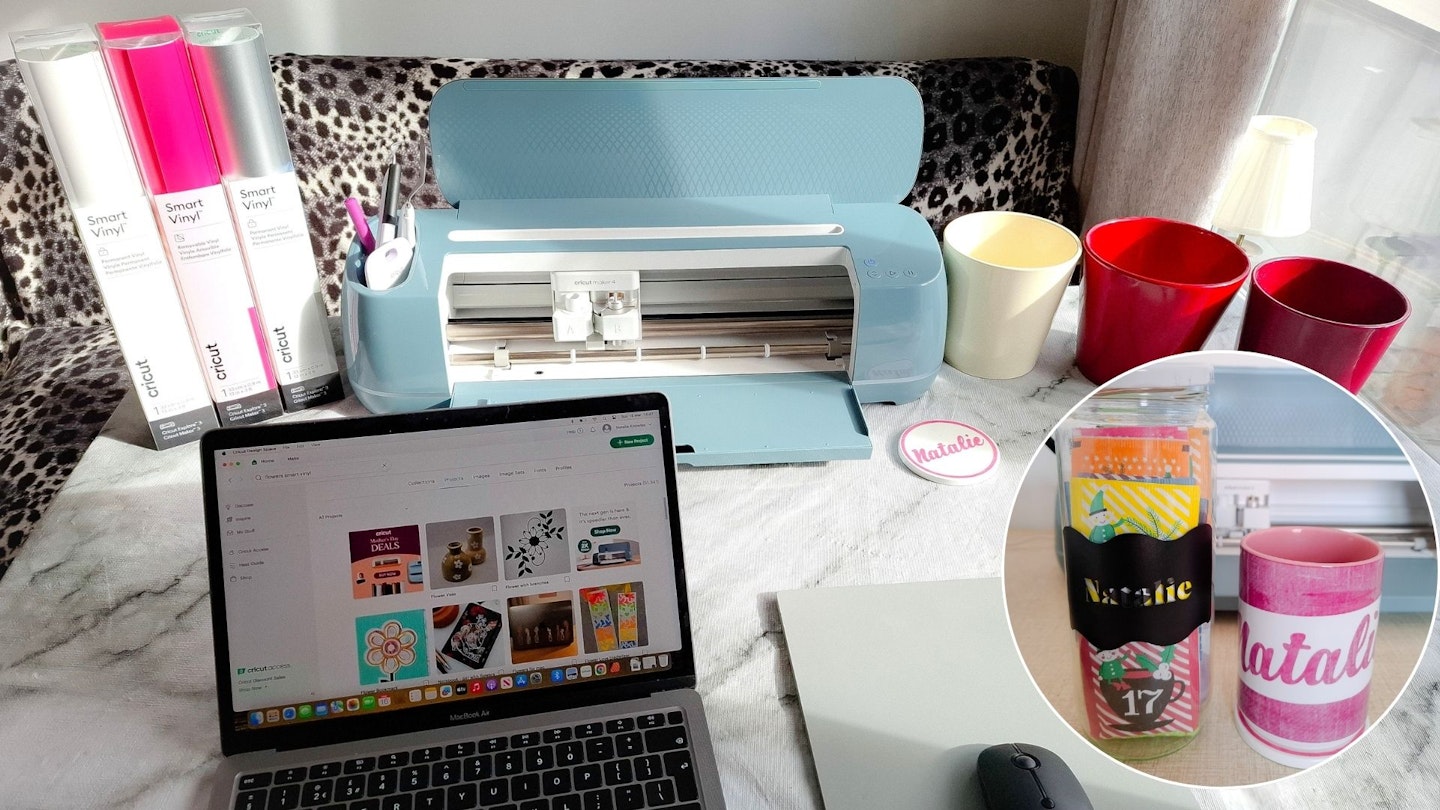
The Cricut Maker 4 was tested for a month, and Natalie made projects with the materials that came with the machine, as well as trying out some non-Cricut cardstock. Natalie evaluated the build quality, performance and usability of the Maker 4. She made greeting cards, decorative designs with Smart Vinyl, a design for fabric with Iron-On and personalised coasters using Infusible Ink. The aim was to evaluate if a newcomer to Cricut would be able to get to grips with the processes and whether it's enticing enough to want to invest in more tools.
What were the results?
The Cricut Maker 4 offers an incredible amount right out of the box. My dining table was almost too small to fit all the materials included. This was the machine-only option, but loads of materials were still supplied, enough for several projects. You really can be set up and happily crafting a Sunday afternoon away within thirty minutes.

Shop this product
Build quality
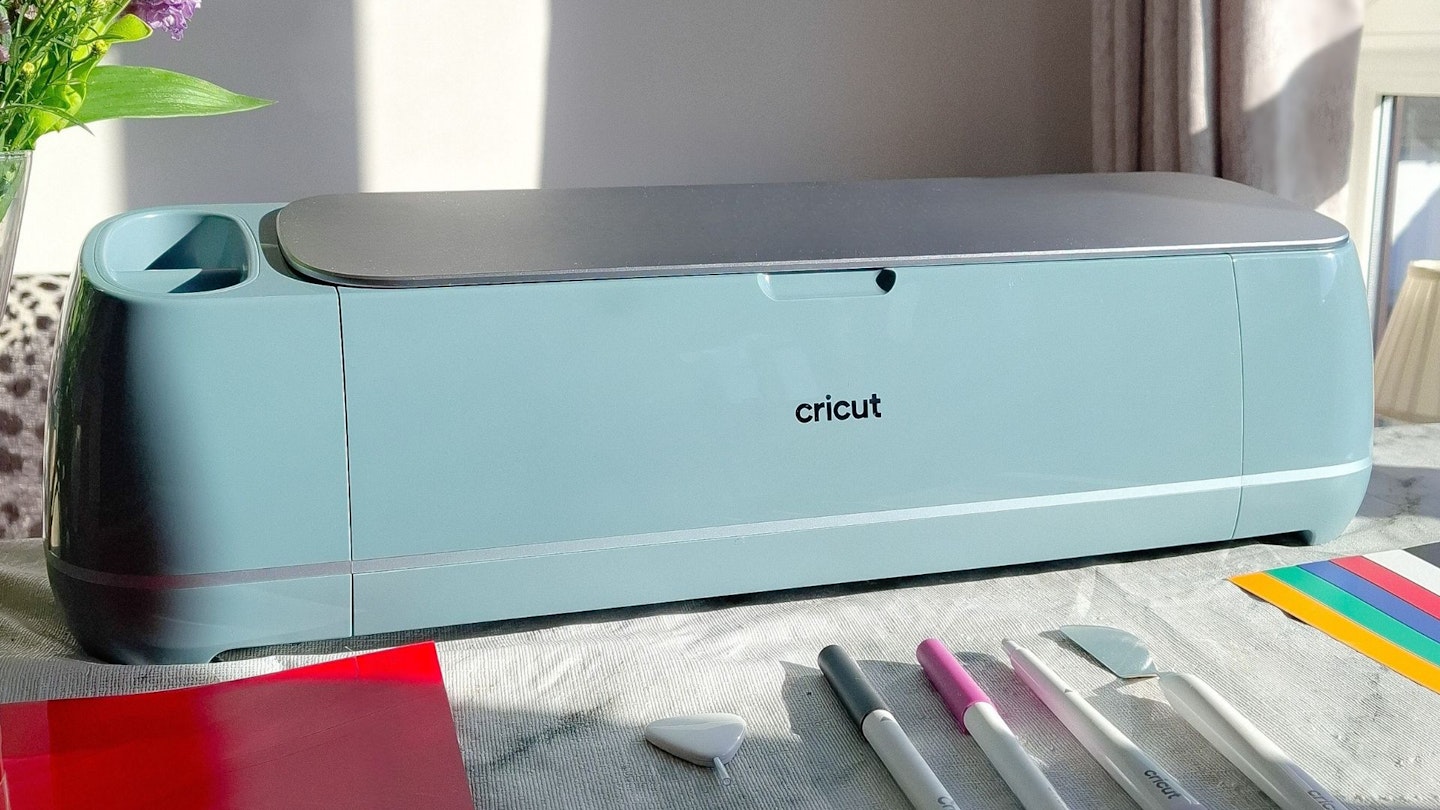
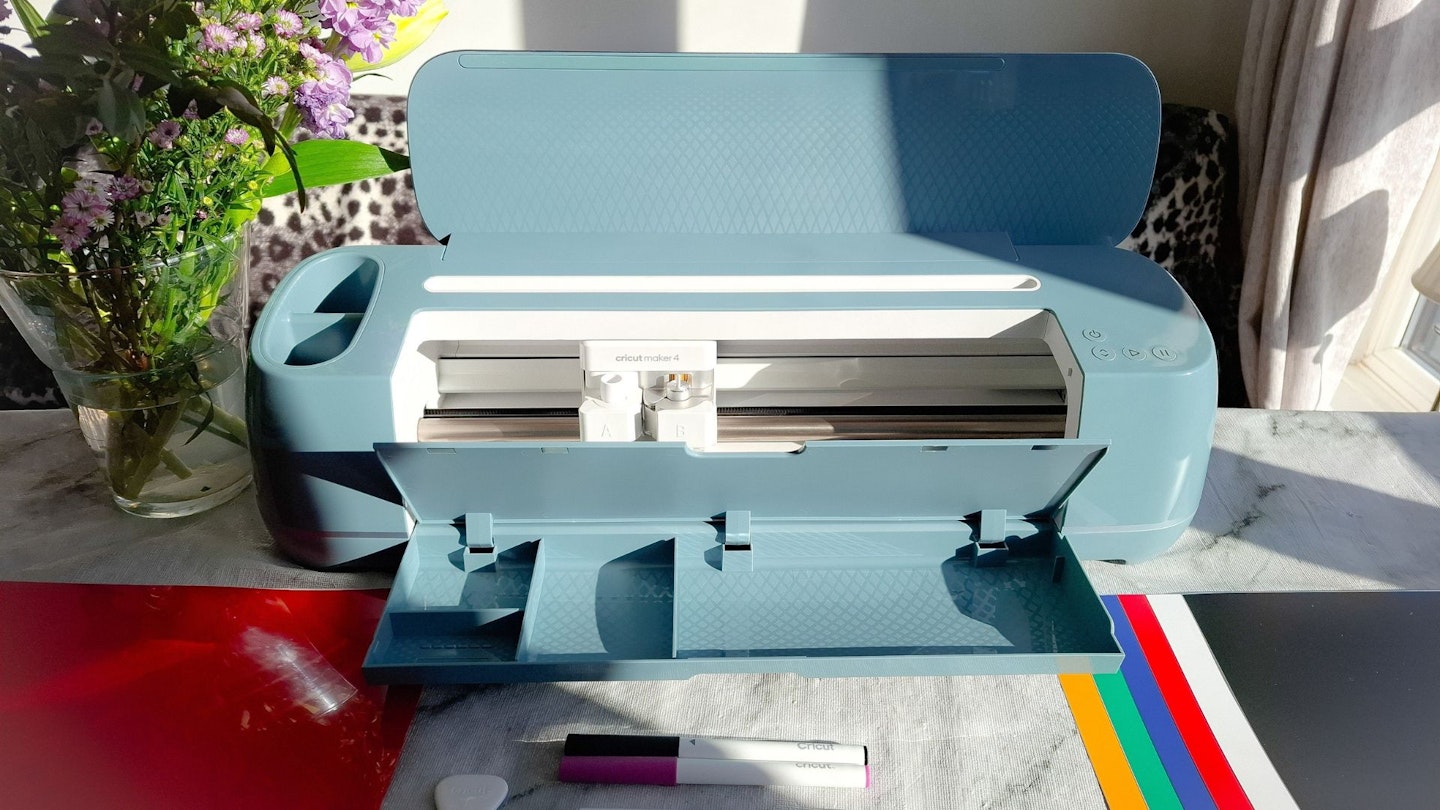
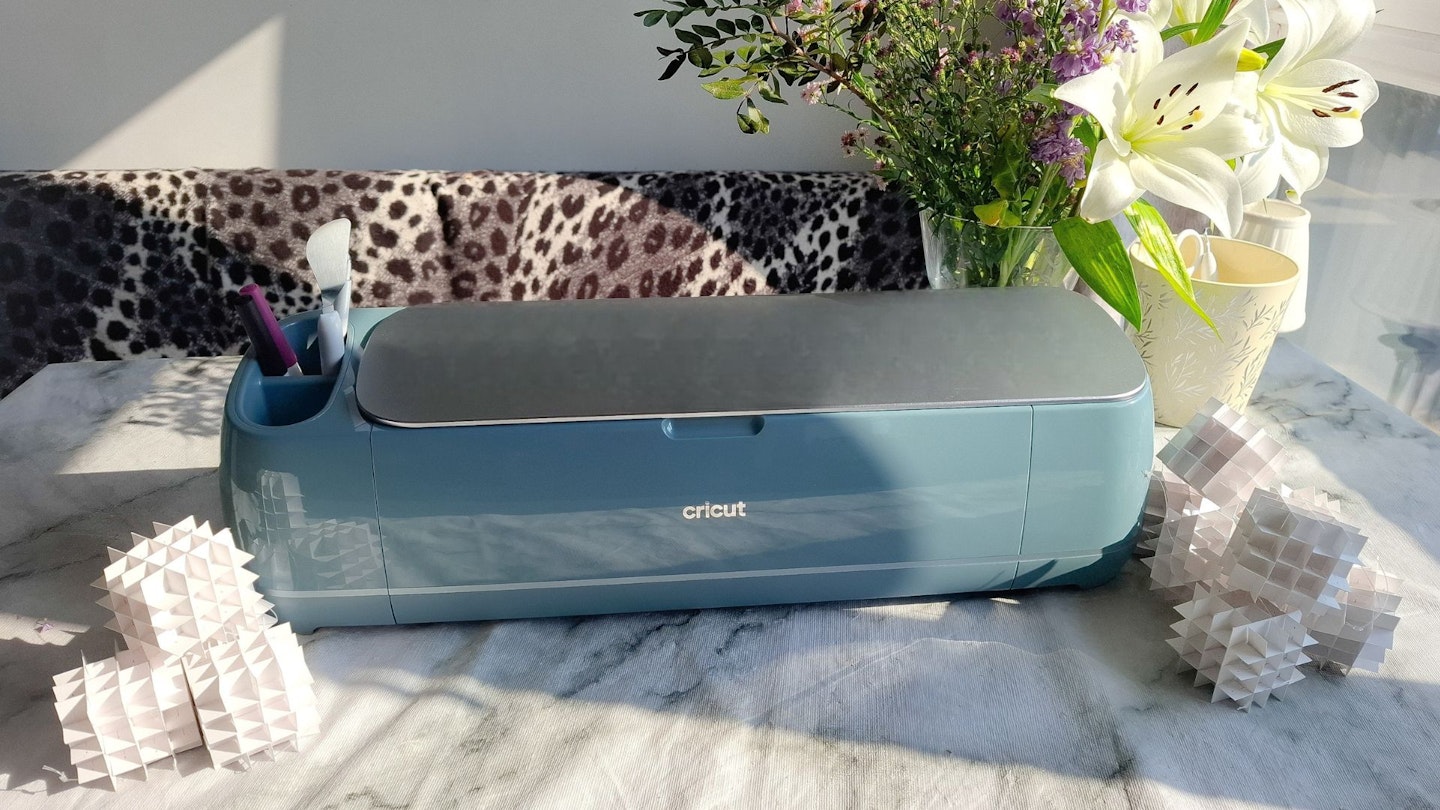
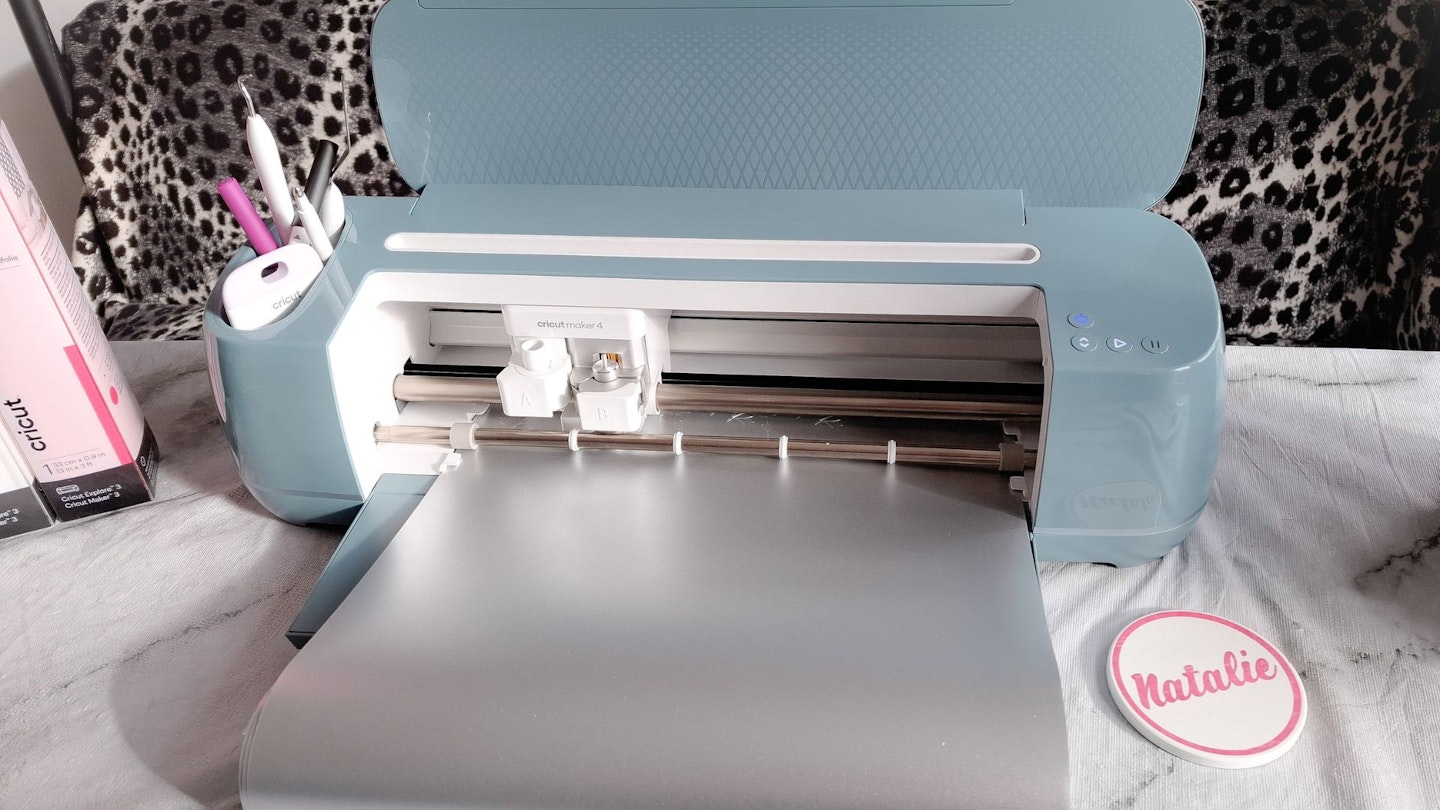
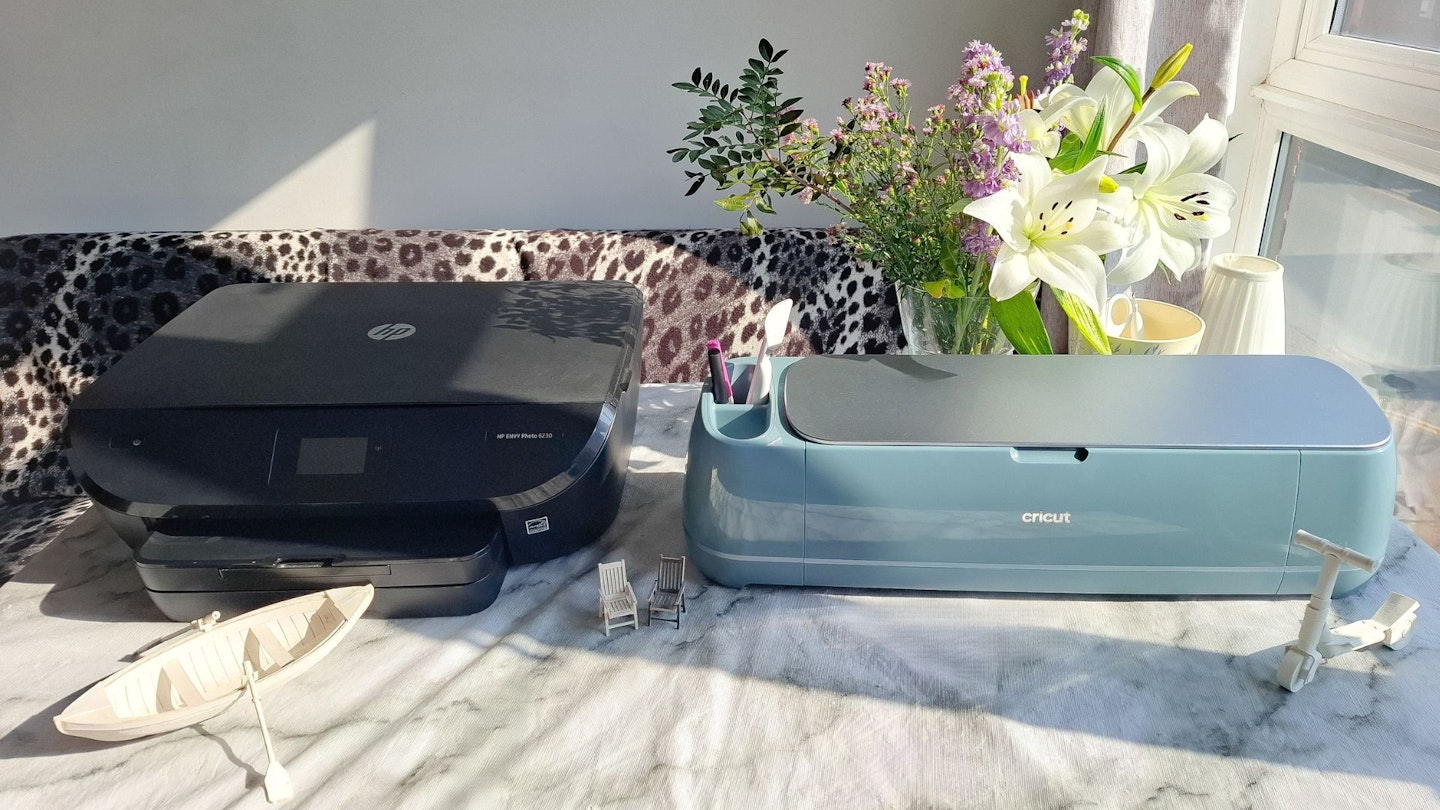
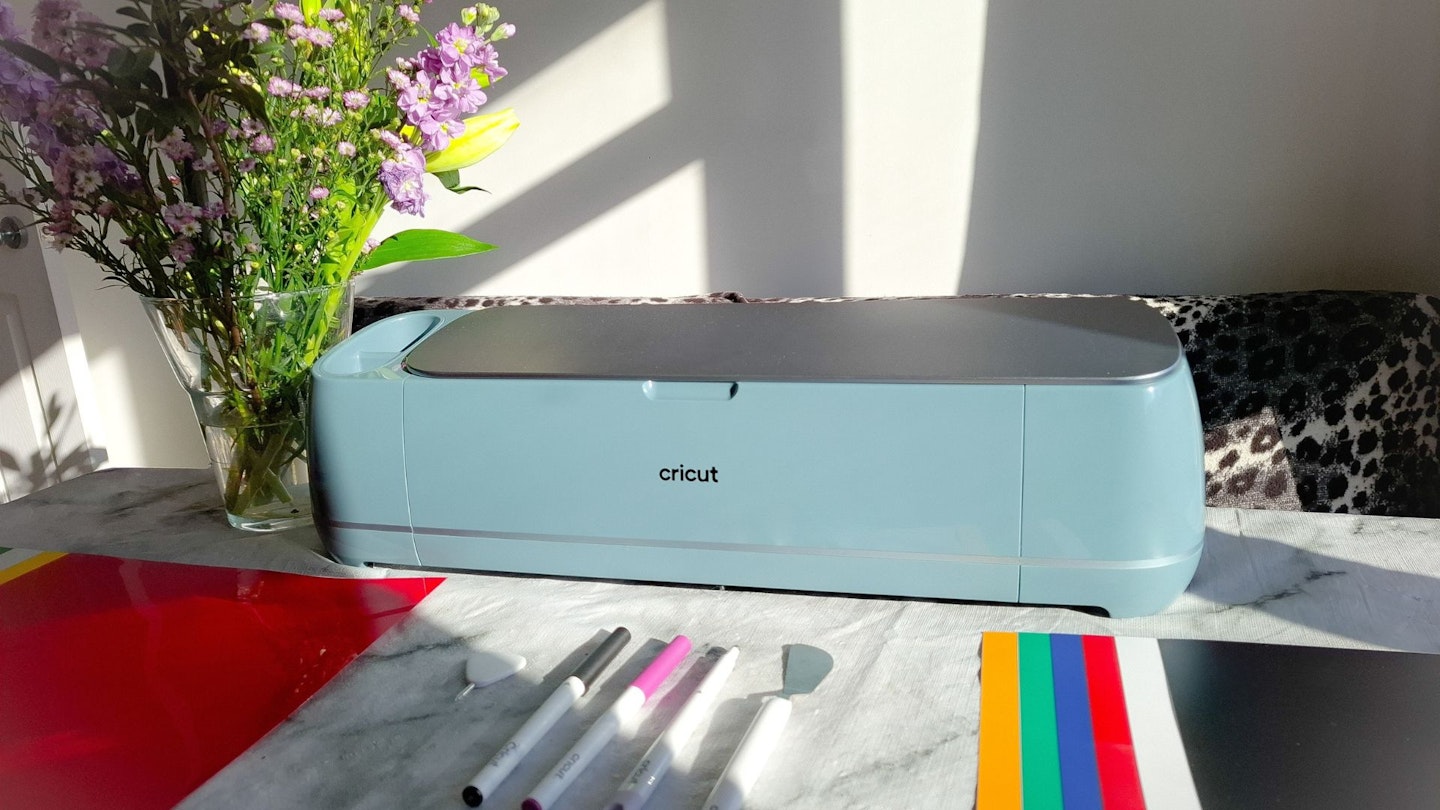
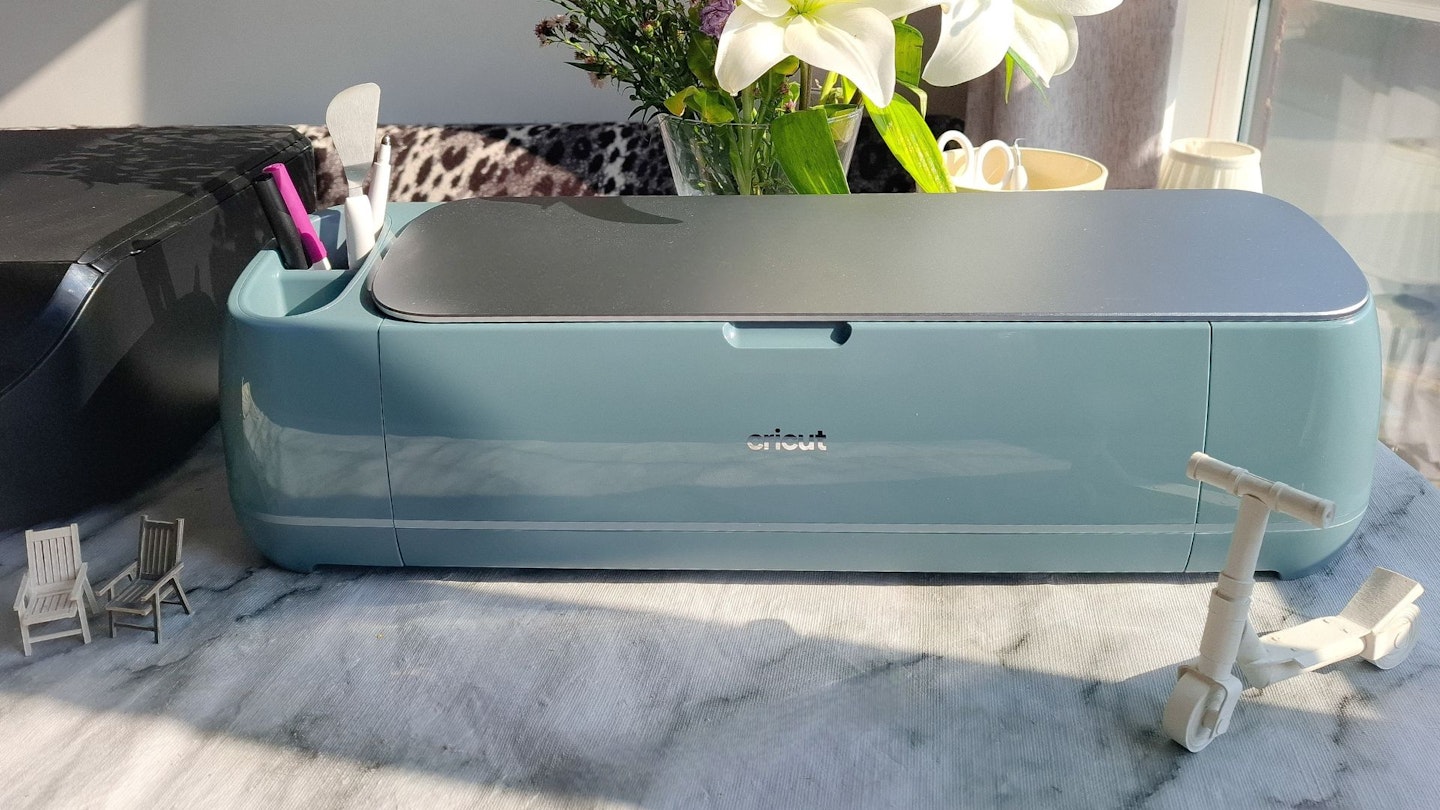
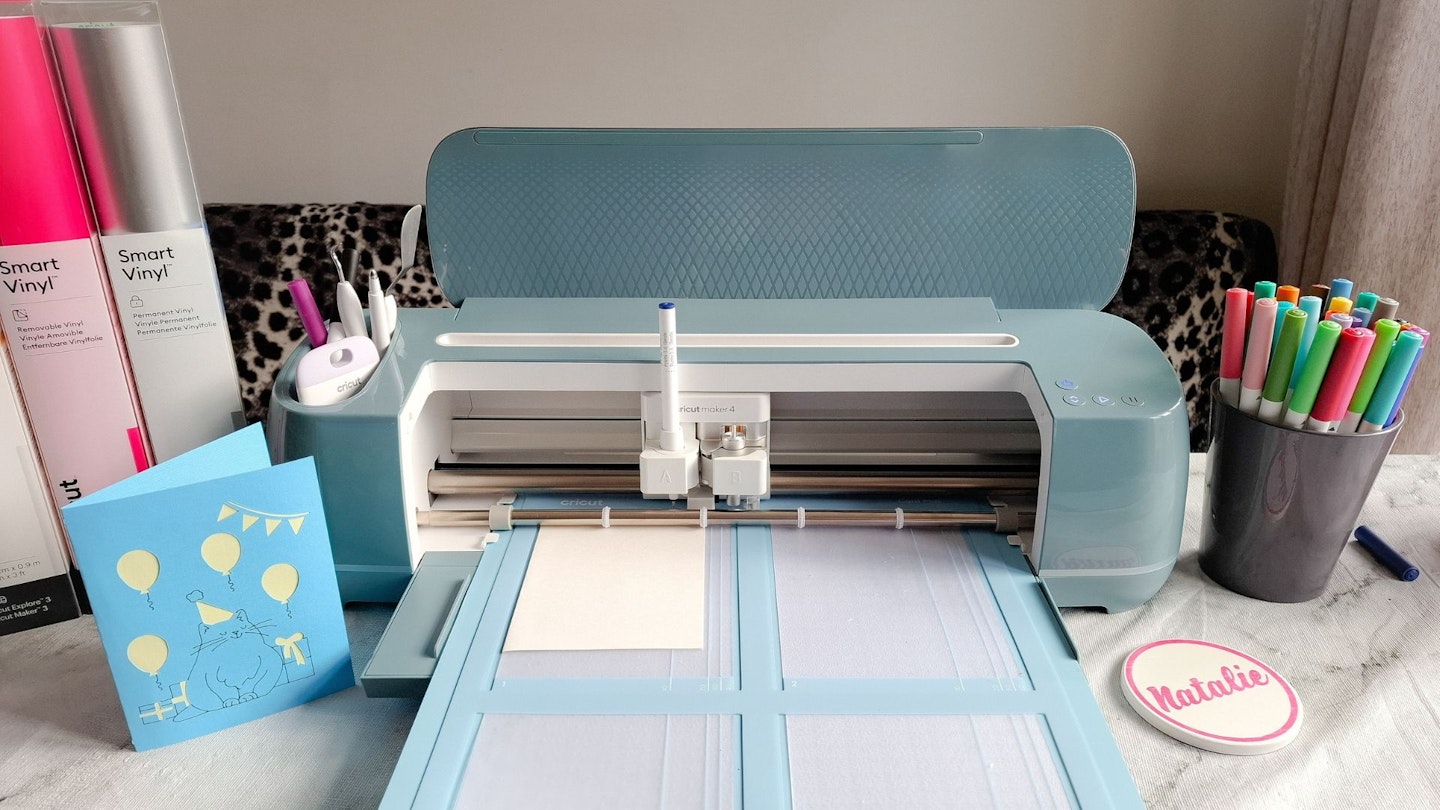
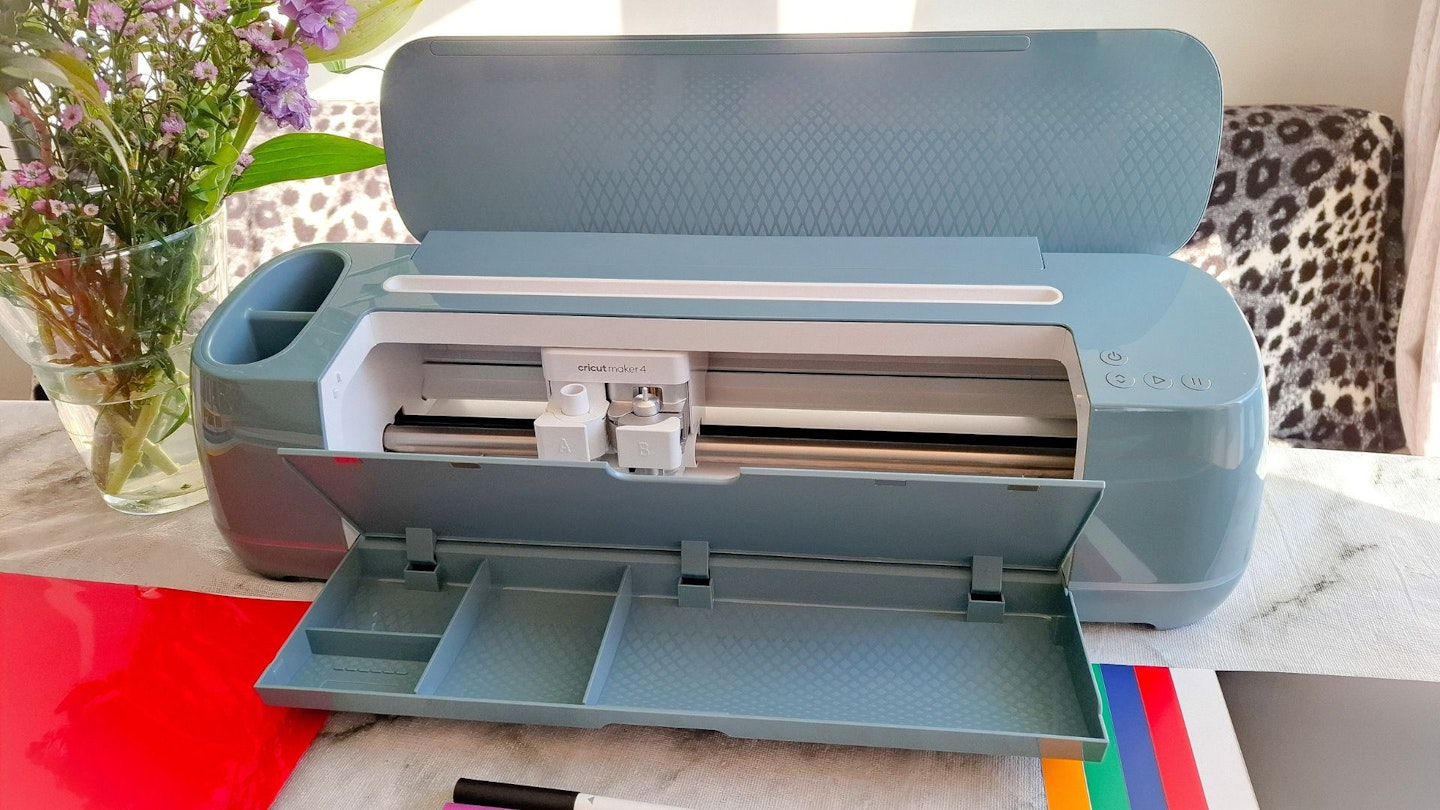
The Cricut Maker 4 in Sage has a sleek, stylish design that is in no way reminiscent of the old CNC machines from Design Technology classes at school or the vinyl cutting machines that I used to work with. This elegant cutting machine puts aesthetic front and centre with a glossy surface and diamond-lattice pattern on the inner lid. There is more metal present in its build compared to the Cricut Explore 3.
While it is a similar size to the Explore 3, I feel like the Maker 4 has had its protein shakes and is geared up to work with wood and other tough materials. It still has all the cute cubby holes and storage of the previous machines, which is ideal for keeping its array of tools close to hand when crafting.
Be aware that a Cricut machine has blades and should never be used unsupervised by under 16s.
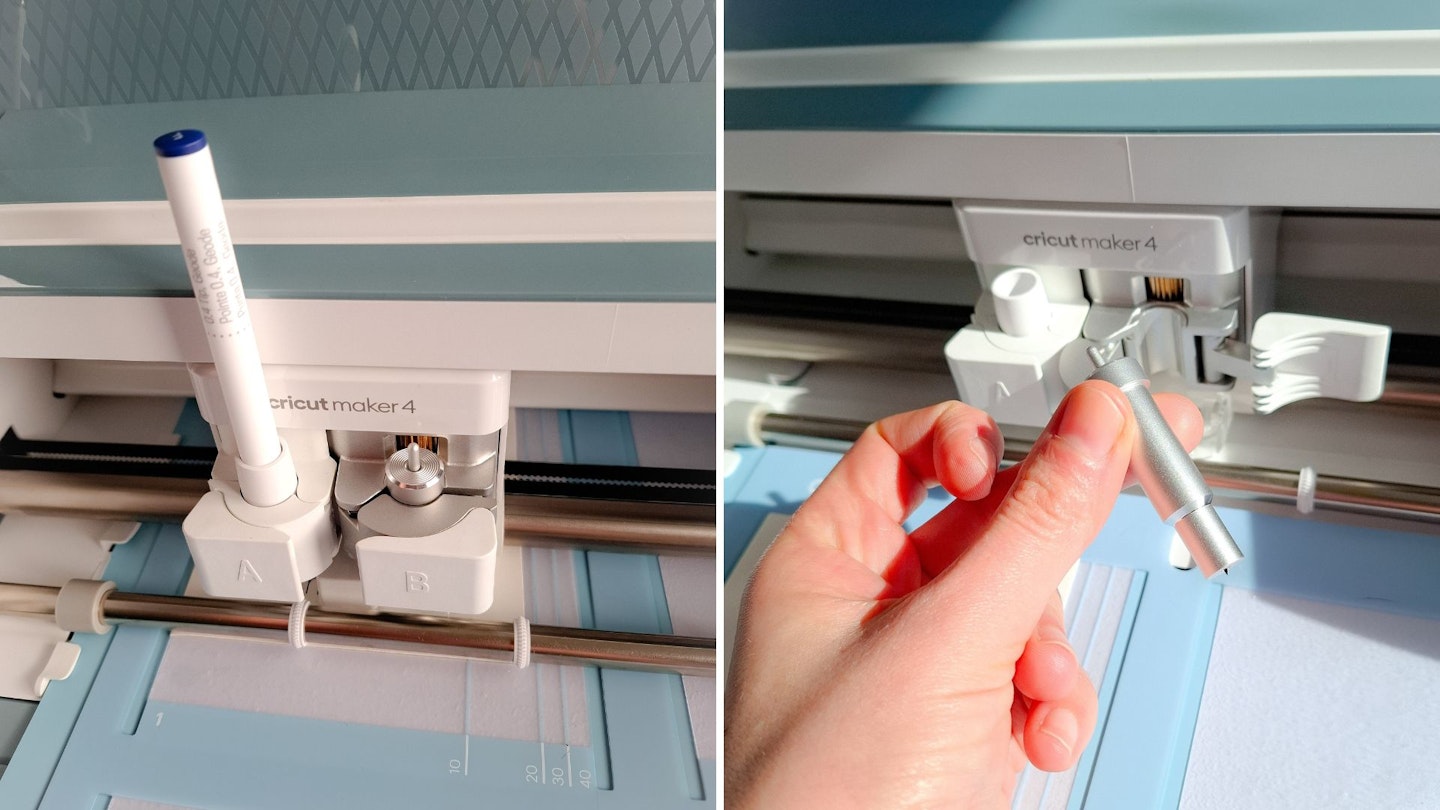
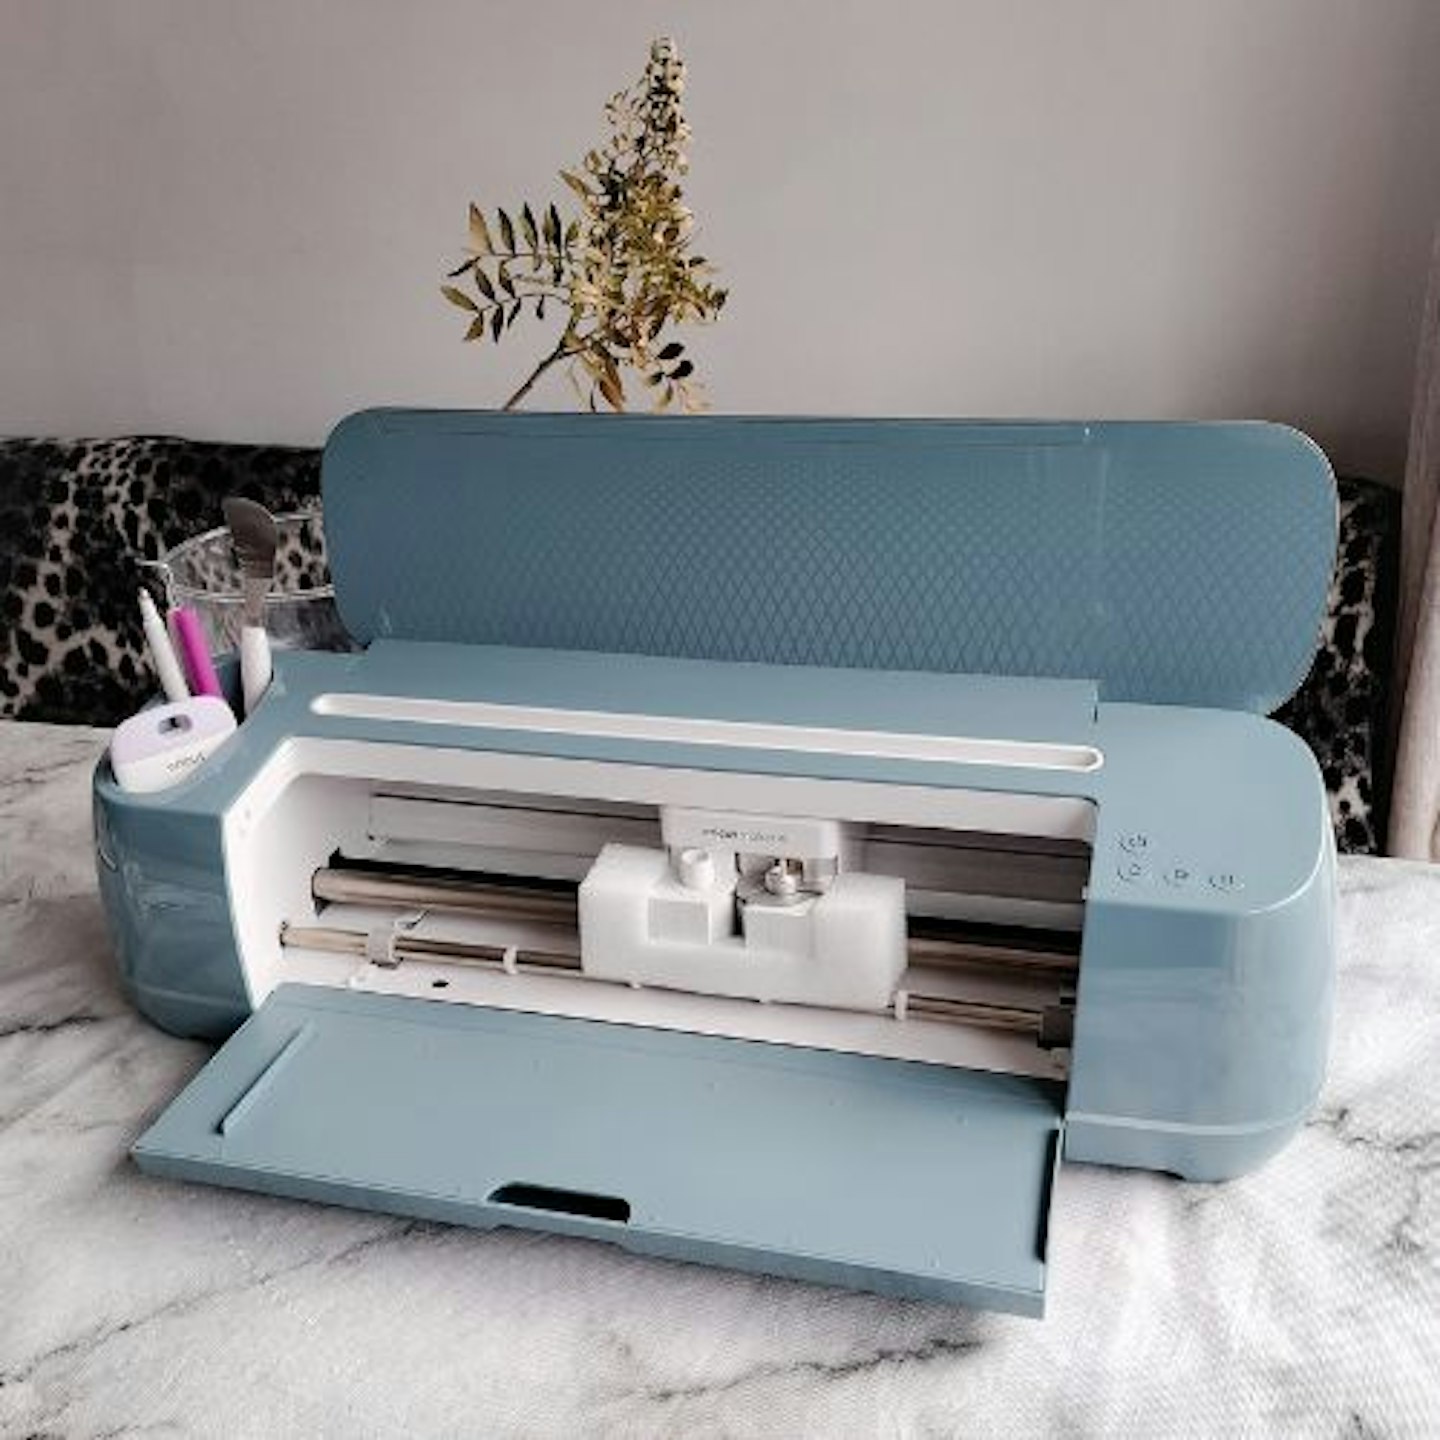
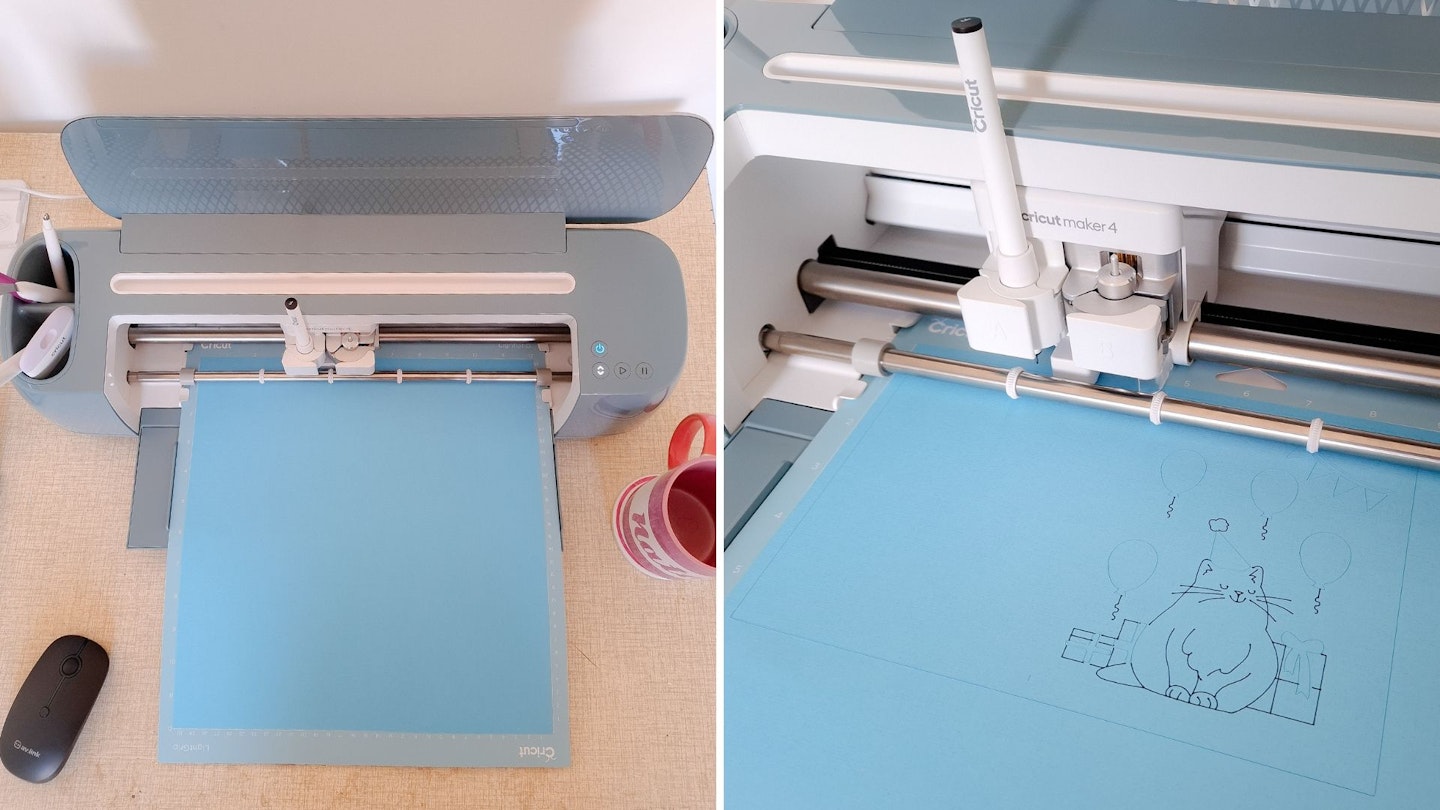
The Maker 4 has pride of place on the shelving in my craft room; I make no apologies for showing it off! It is a "wow" moment when it opens with a smooth, elegant reveal at the press of a button, showcasing the tool clamps. The A clamp is for the drawing and scoring tools, which click into place neatly. The B clamp is for cutting blades, of which there are several available, as part of the Adaptive Tool System exclusively for Maker machines. It feels tip-top for the robustness of the clamps that are reassuringly made up of metal and beautifully engineered plastic.
What's included?
I mentioned that I was really impressed with how much material was supplied with the machine-only option, so just imagine how much crafting stock you'd get with the Everything Bundle. Buying a bundle option with a Cricut Access subscription included is the best value option if you are certain you are going to be using your Cricut a lot.
It comes with a UK plug, so don’t worry if the instructions mention a European plug – that’s included too.
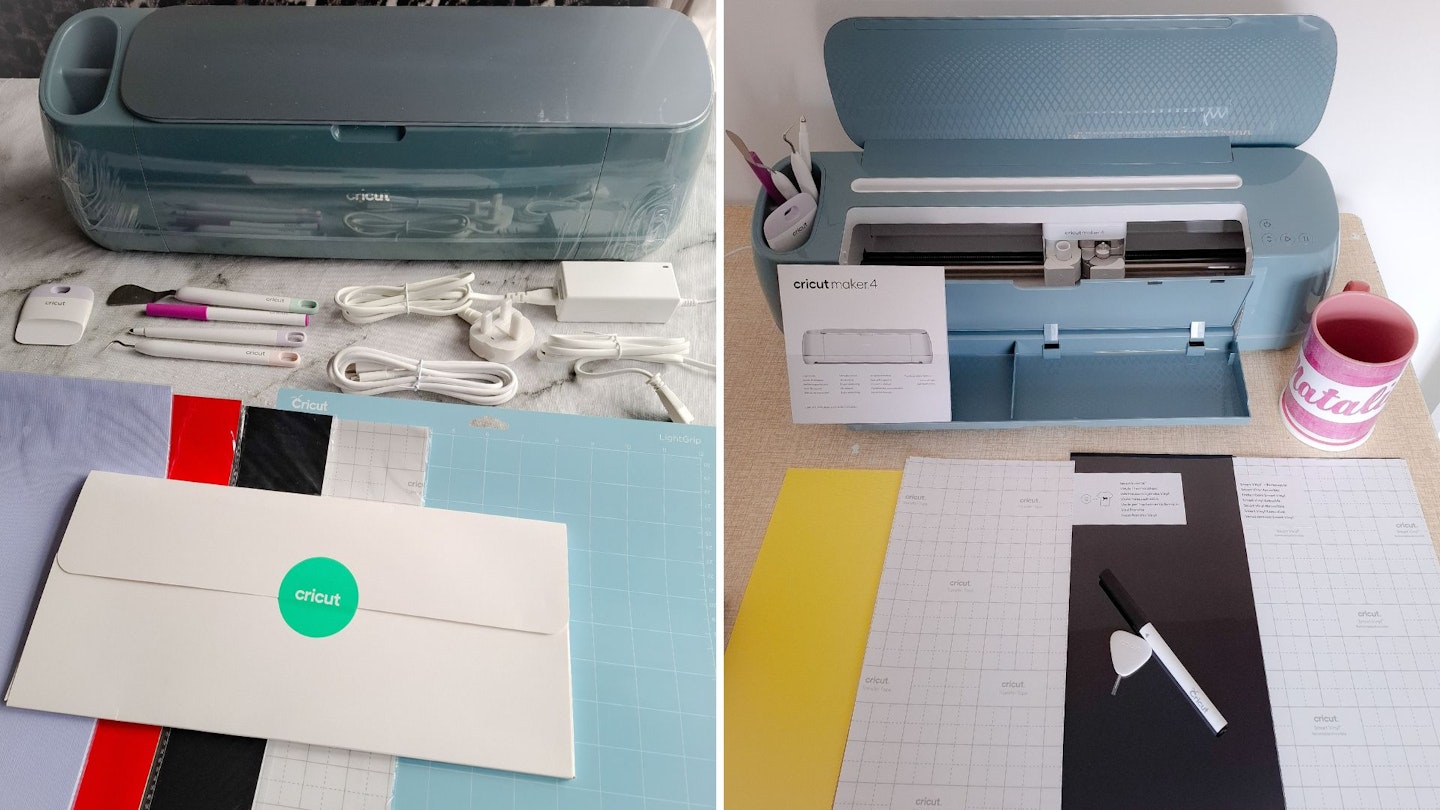
My Cricut Maker 4 came with a Light Grip cutting mat and some sample cardstock, so I was crafting within 10 minutes of setting it up. I always like to have multiple projects on the go!👩🎨 The great thing about Cricut materials is that they have been rigorously tested to ensure they work flawlessly with any Cricut cutting machine, so there's minimal trial and error.
Set-up
When using a Cricut machine, setting up your workspace properly is key. Start with a large table that has plenty of clearance around the machine, plus enough space for your laptop and materials. If you're short on space, consider using a tablet for Design Space and resting it on top of your Cricut machine. Alternatively, the Cricut Joy is a great option—small, portable and perfect for compact workspaces.
It's important to leave at least 25cm of clearance space behind the Cricut machine because the cutting mat will fly out of the back when it measures the mat before cutting. If it's too close to the wall, it will crinkle the mat and material.

In this instance, I was working in my craft room. I have a cupboard with a rack filled with Cricut materials, tools, and accessories and a desk beside it.
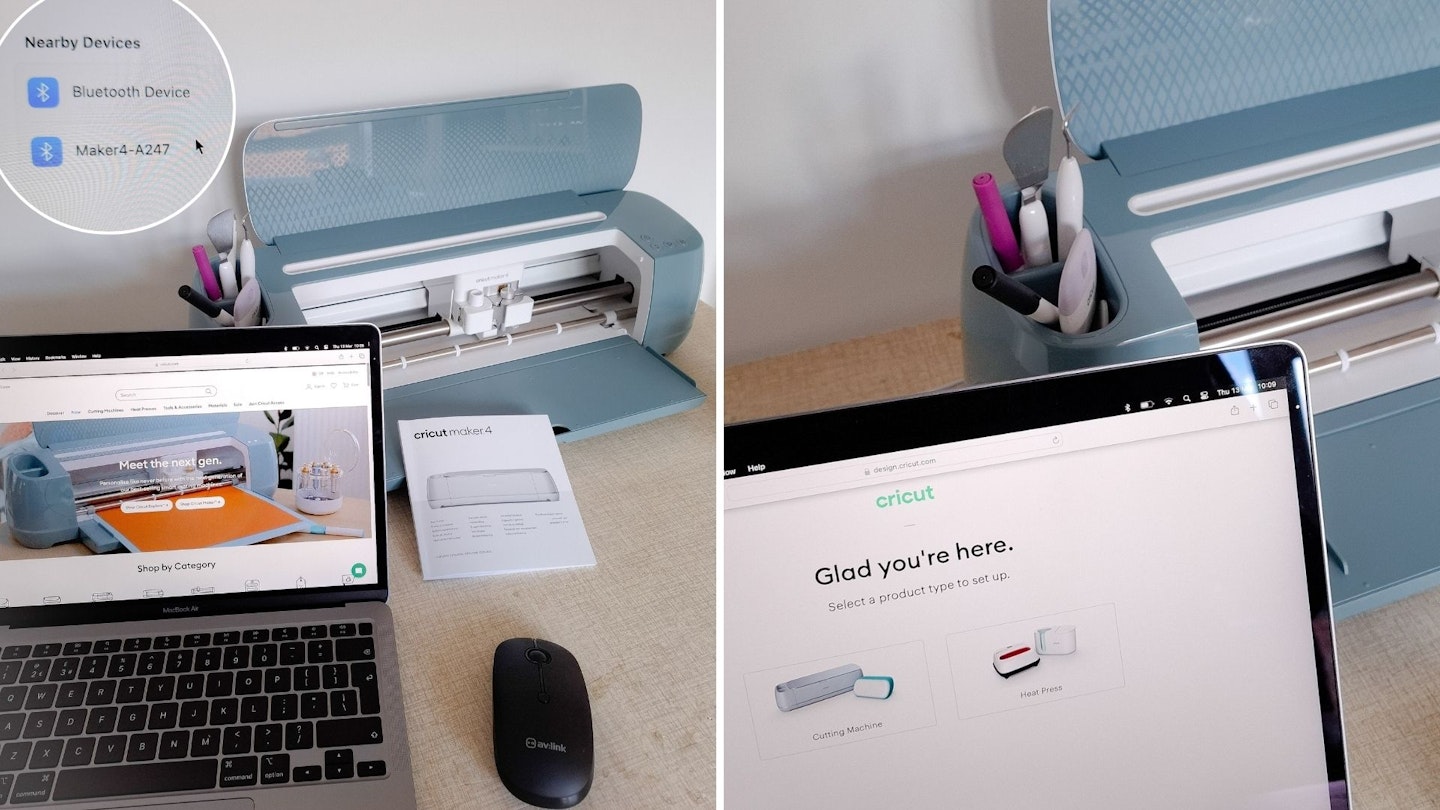
It is simple to set up a Cricut machine, and it follows the same process as previous models. Plug in the power cable, turn the power on and connect to a computer by Bluetooth. Alternatively, you can connect to using a USB cable. Then, go to cricut.com/setup to set up the machine.
You'll notice there are very few buttons on the machine itself, as most functions are controlled through the Design Space software.
Design Space and practice project
In a 1-2-1 session with Patricia Hutny, Cricut UK & IE Marketing Manager, I was told a lot of effort has gone into the set-up experience to make it as easy as possible for newcomers to Cricut. So, if you are hesitating because you are not sure you will be able to use a Cricut machine – emphatically, yes, you will. Cricut has made it dead easy to get started.
I downloaded the free Design Space app and installed it on my Mac. The app is also available for Windows. It can be used on a mobile device as well, with Android and Apple downloads available. I personally prefer it on a computer screen so I can see what I'm doing, but Design Space looks lovely on a tablet too. The tablet can be elegantly placed on the Cricut machine lid, acting as a stand, which is ideal if you are sharing a space with a cat that tends to sprawl across half of the table, clearly claiming it (and you) as their own!😂
The Maker 4 comes with a test project to get you up and running. The materials for this are supplied in a neat folder. Inside the folder is a cute mini weeder, which I know I'm going to use all the time for some of my more intricate designs.
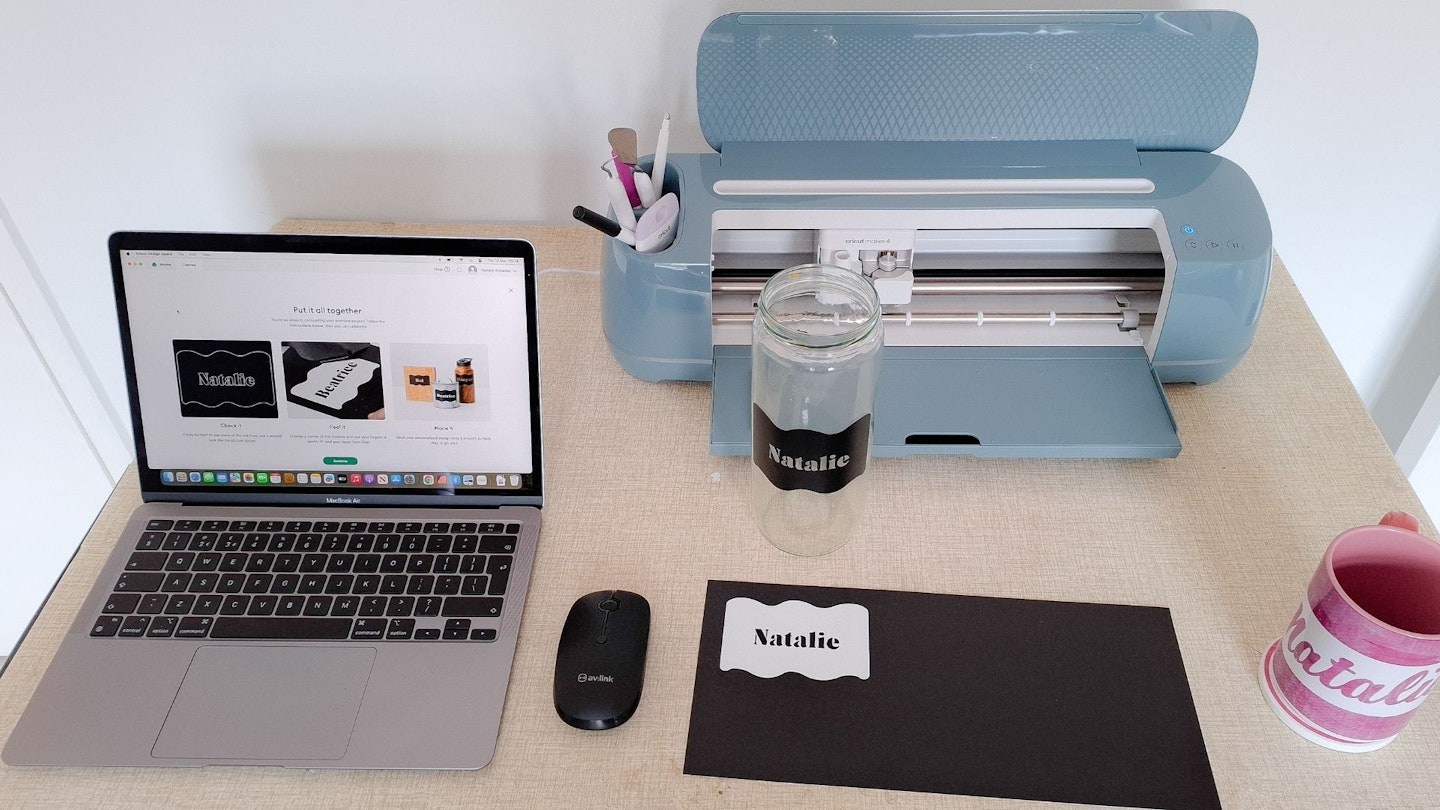
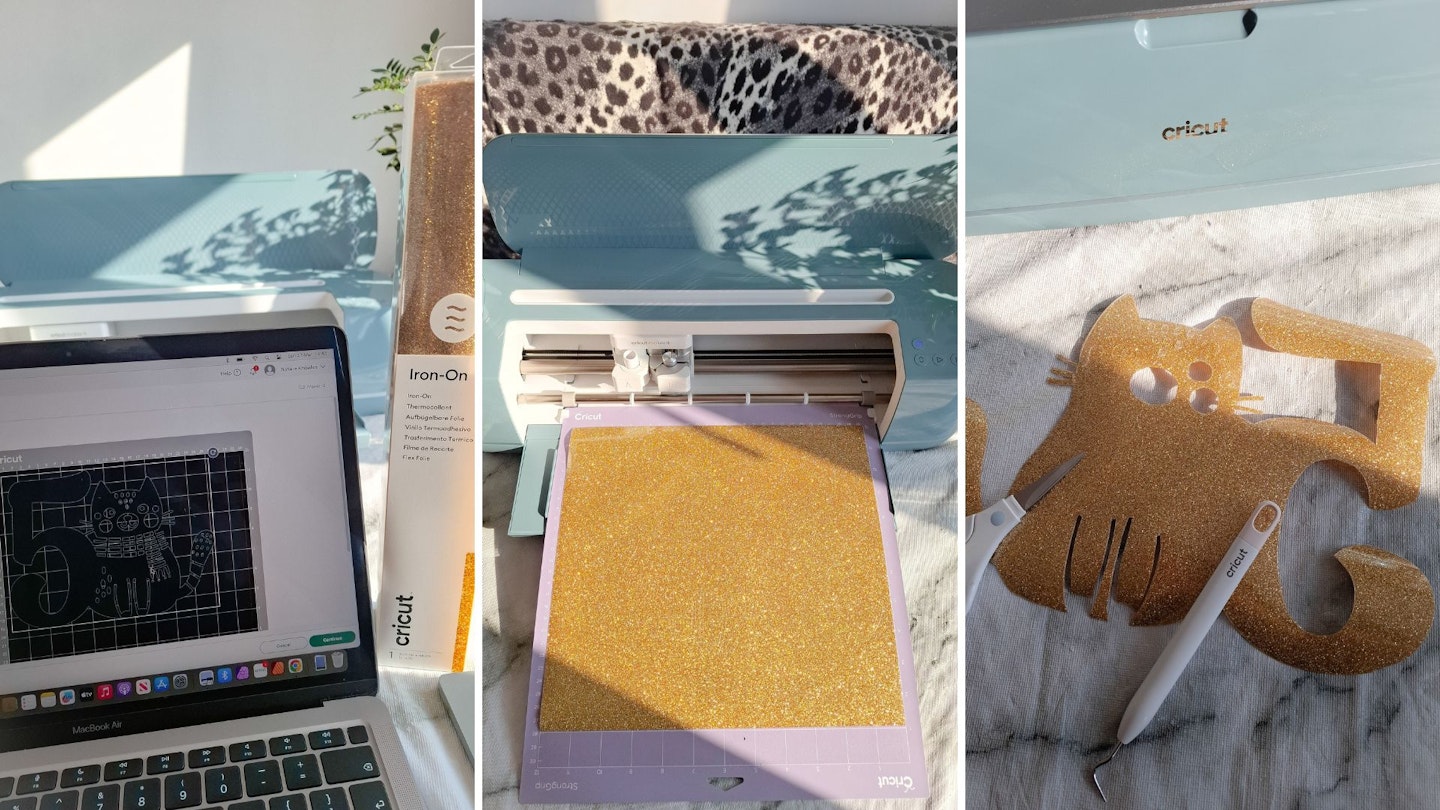
In Design Space, you are guided through a practice project: cutting a simple decal from black Smart Vinyl. A lovely touch is that you can personalise the decal with a word of your choosing. Once the decal is cut, you unload it from the rollers and peel your design. It's sticky on the back, so you can place it on whatever surface you like. I stuck mine on a glass jar which is my speciality tea bag stash. It looks really effective on my craft shelves.
Design Space is even more user-friendly than before, with a huge number of projects that you can make straight out of the box. Plus, there are more help resources for new crafters. Depending on your learning style, you can choose from step-by-step written guides, cheat sheets and loads of video tutorials.
If you are looking for readymade designs and projects, you should subscribe to Cricut Access, as it’s an easy way to create great designs with step-by-step instructions and reliable templates. You'll be prompted to set up a subscription in Design Space, or if you bought a bundle with Cricut Access included, you're all set! A subscription will save you a fortune, rather than individually purchasing elements.
Put in a search term, such as 'Birthday,' and Design Space will provide projects, images and image sets.
Just to say, if you are planning on using a Cricut with children, for example, in a school, Design Space has Content Filters to make it family-friendly.
Head to the How-Tos section, where you'll find simple 30-minute projects that are easy to follow. There are also how-to videos for inspiration.
Filter by Cricut Only designs, as these come with the clearest instructions, almost like a recipe card. They have been tested by Cricut to ensure the projects work. You can even print the instructions if you like.
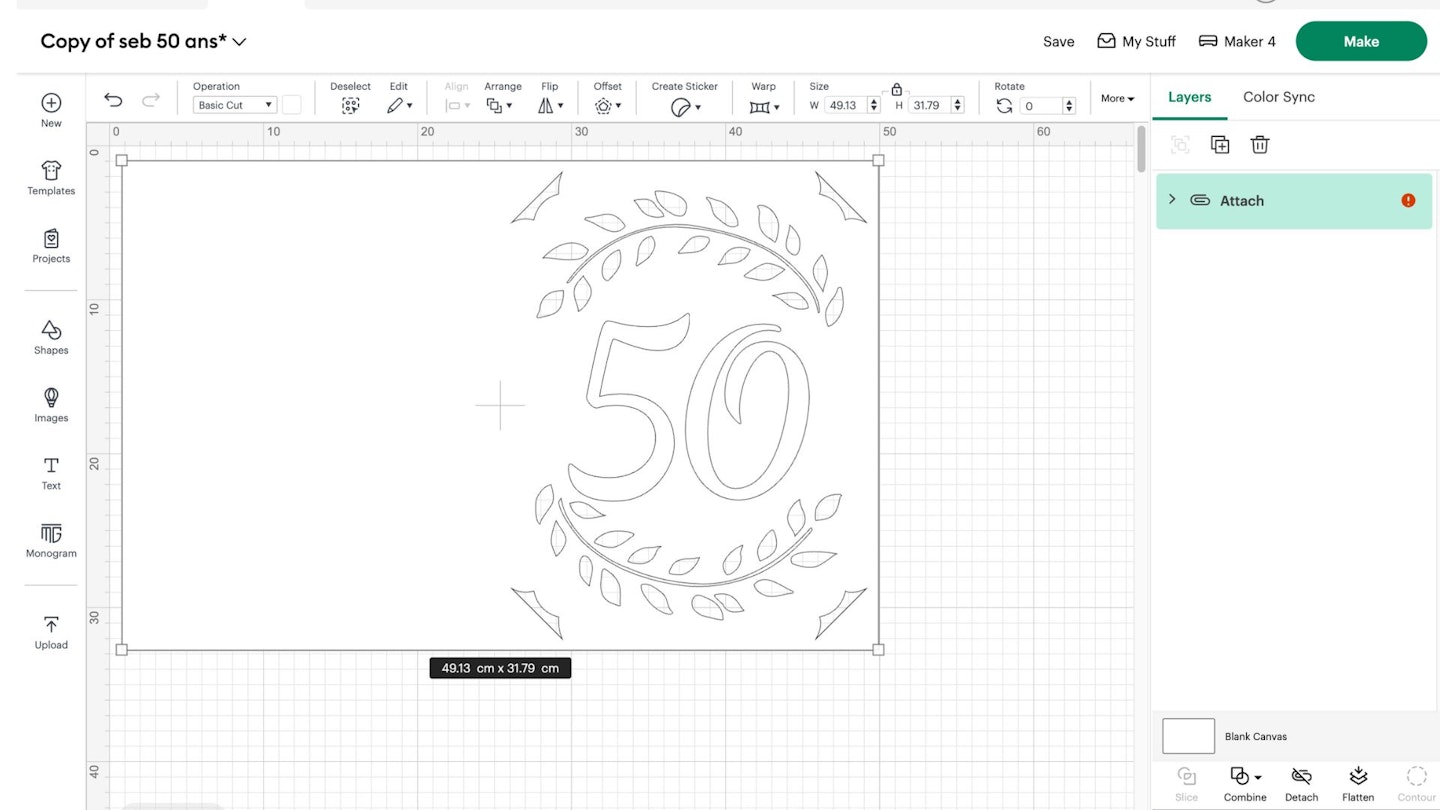
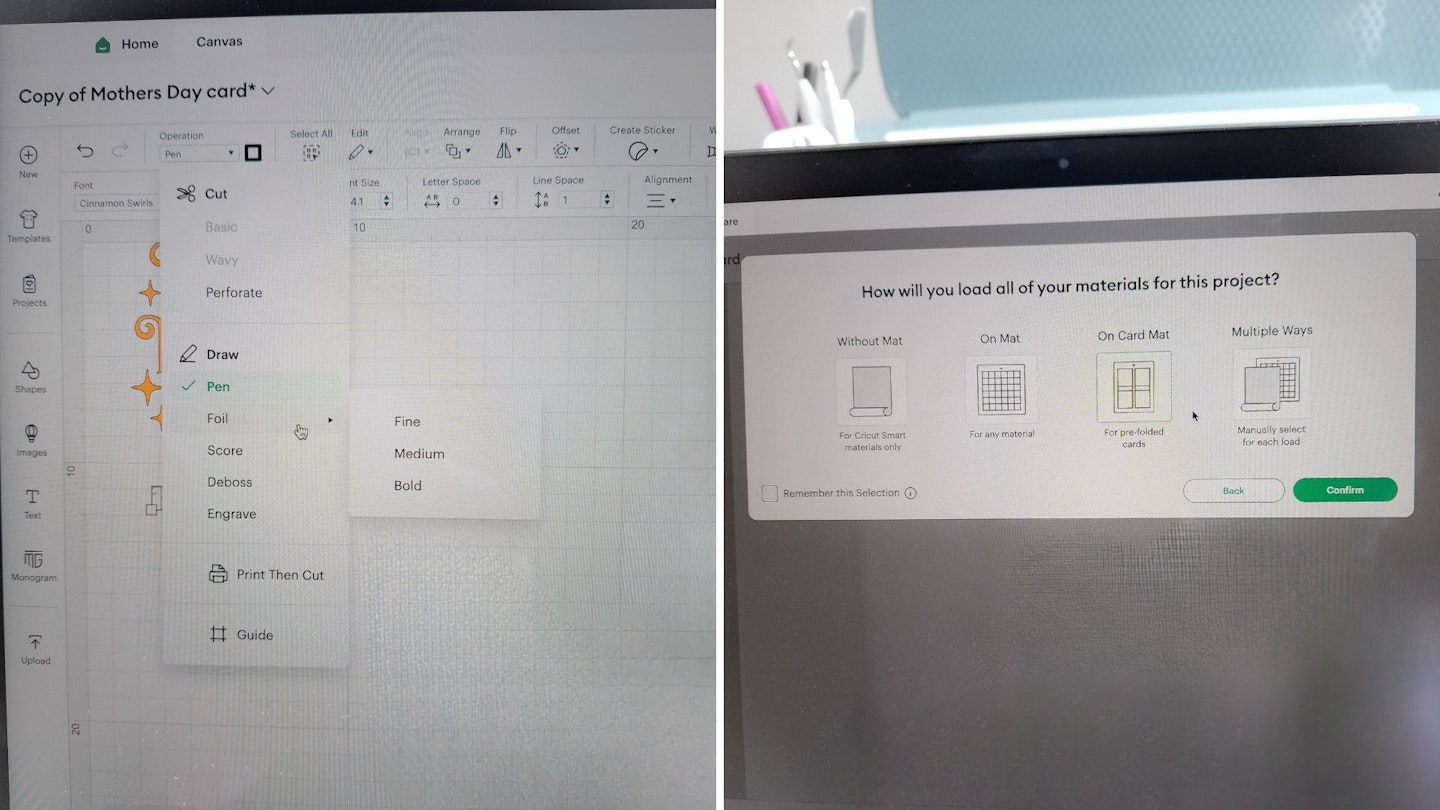
For those of you who want to create your own projects, you need to be aware of what types of graphics work best in Design Space. Users who are familiar with professional design software will understand the concept of working in layers. Design Space breaks down each element of a design into separate layers. While you can import jpegs and png files, I’ve found that Design Space can sometimes introduce errors when handling these formats—especially when removing backgrounds, which may cause parts of the image to be lost. Designs and images best suited for Cricut and Design Space are vector-based, as this file type scales more effectively for cutting. Importing an svg file allows Design Space to convert your design into clean, editable outlines. It’s also possible to import psd files and retain the layers, but remember to keep your design simple, focusing on line-based elements without shading.
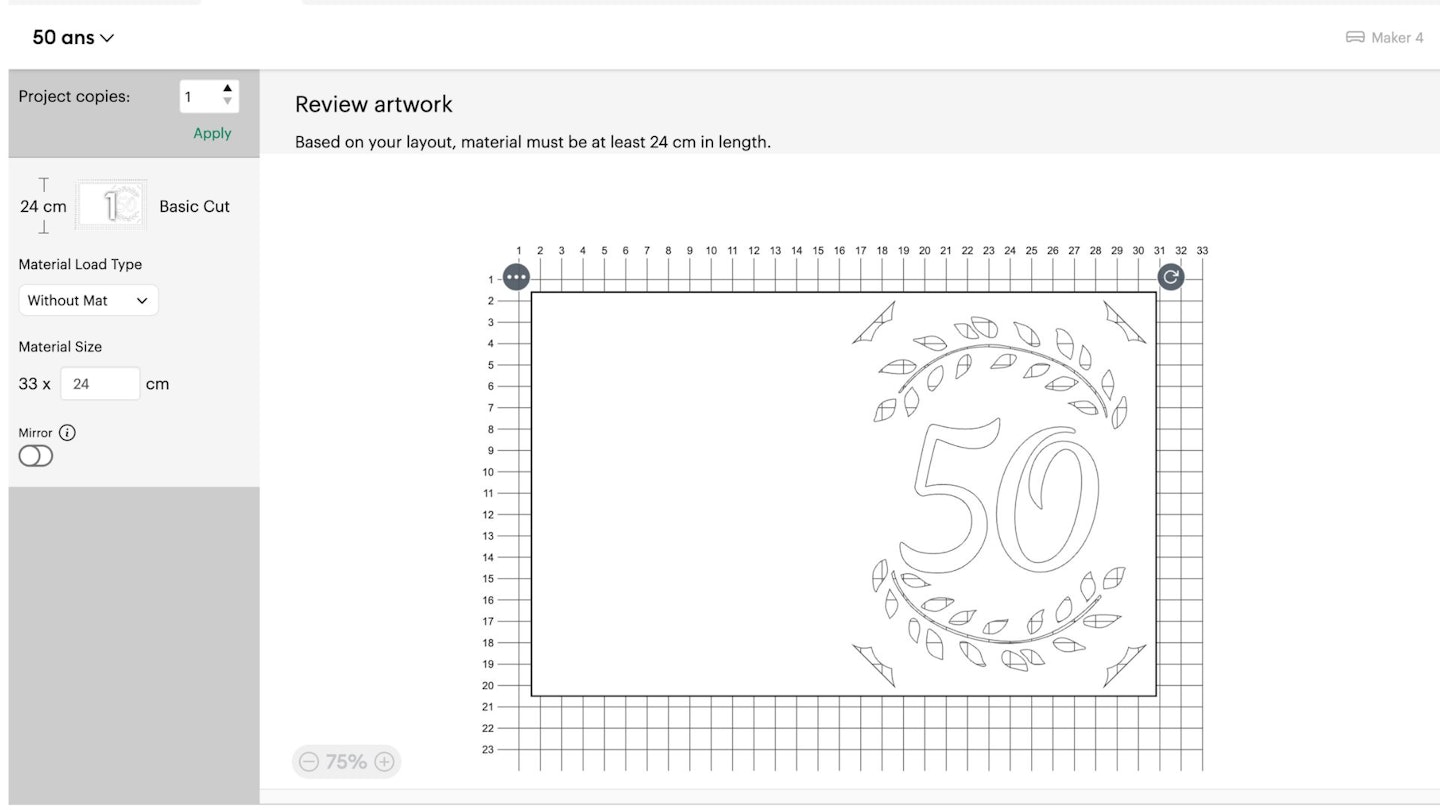
The next screen is called Prepare. This shows a preview of your design overlaid on a grid, which gives you the real dimensions and placement on a cutting mat if you are using one.
Think of the lines in your design like a path that the Cricut machine is going to cut in a sequence. It can do multiple passes. For example, one pass might involve using a pen in the A clamp for some drawing elements. The next pass might involve cutting out with the blade in the B clamp. Design Space is constantly improving to eliminate any error in the process; for example, in the latest update, it will now automatically turn the Mirror on for Iron-On and Infusible Ink materials, which are going to be transferred in reverse to a surface (more on that later⬇).
Shop this product
Performance
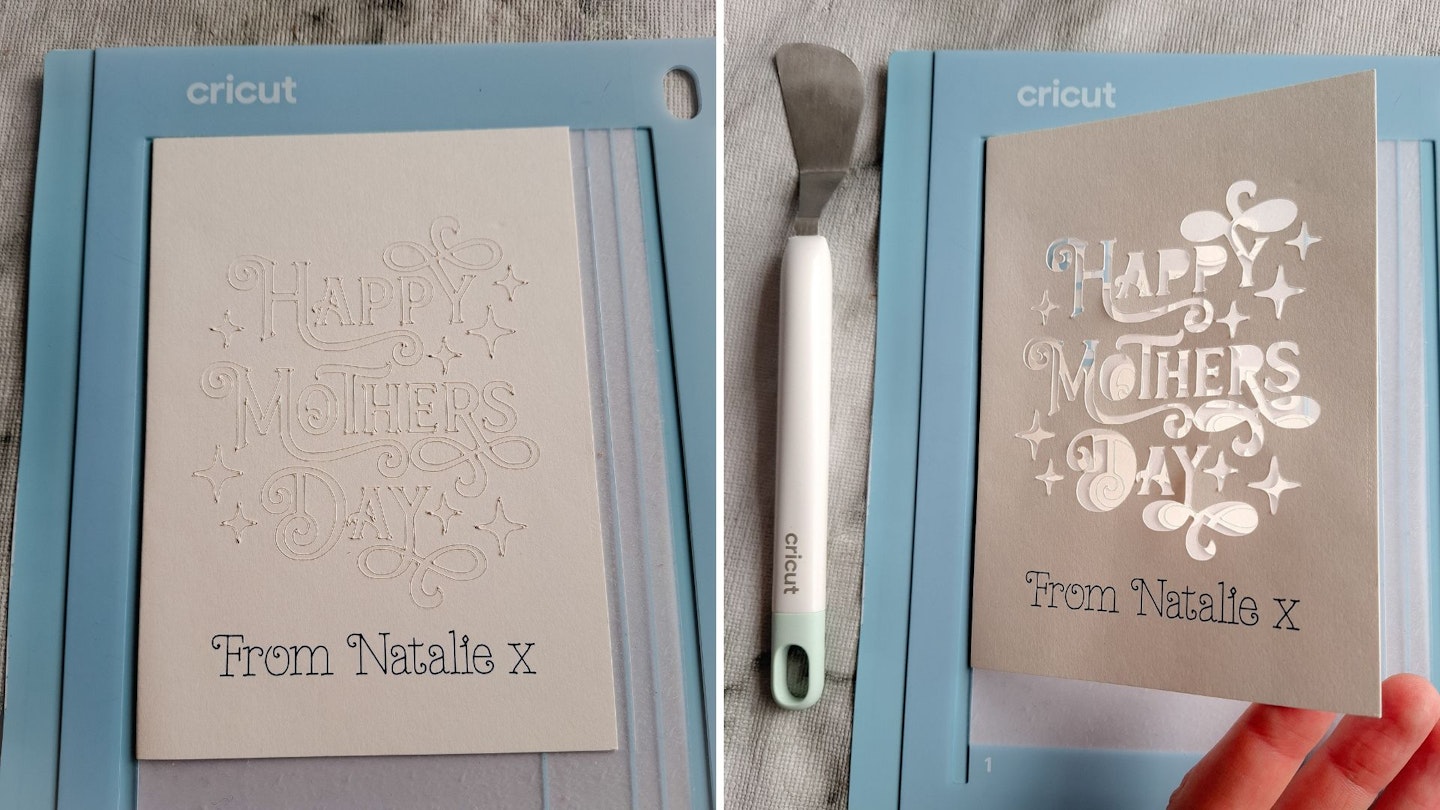
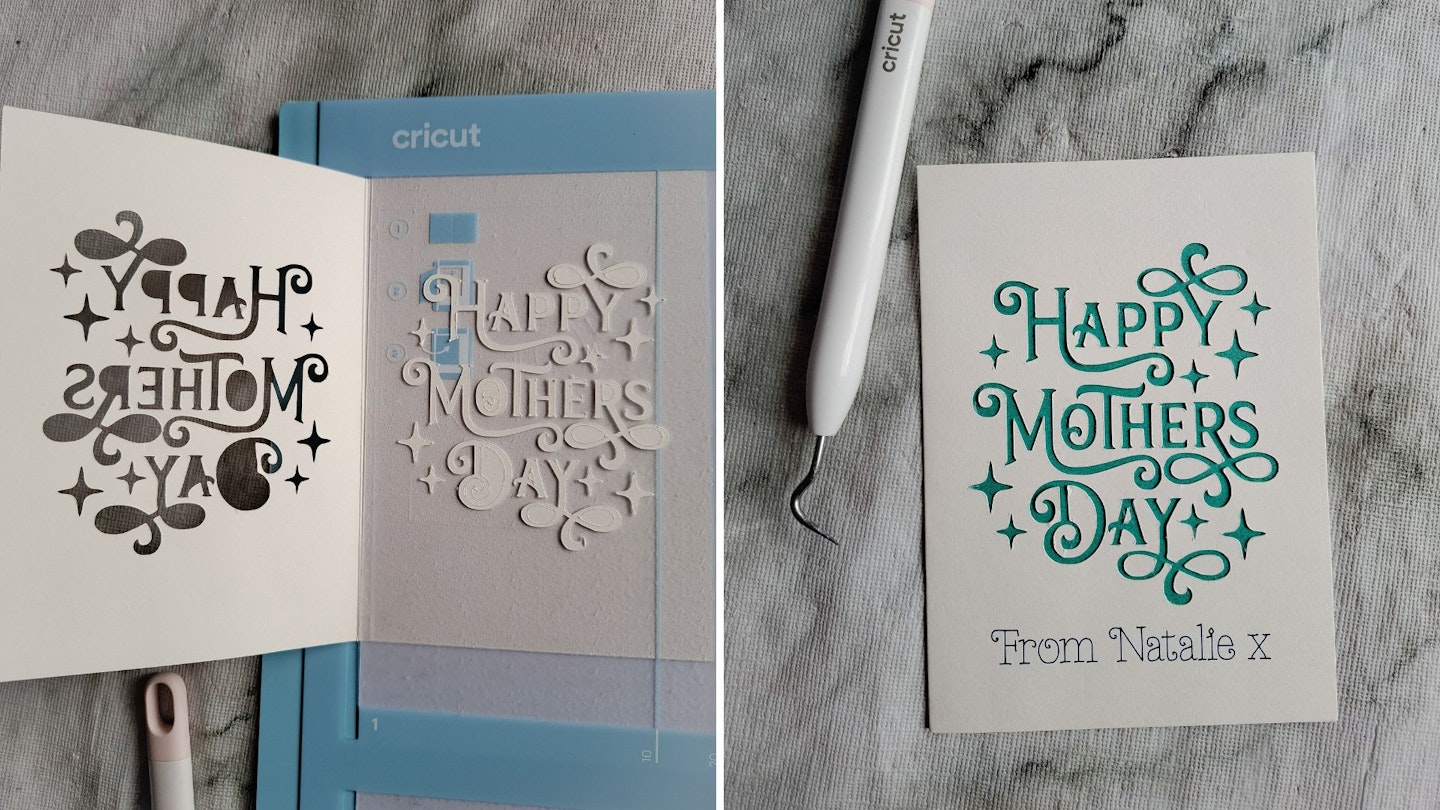
Making a card on a cutting mat
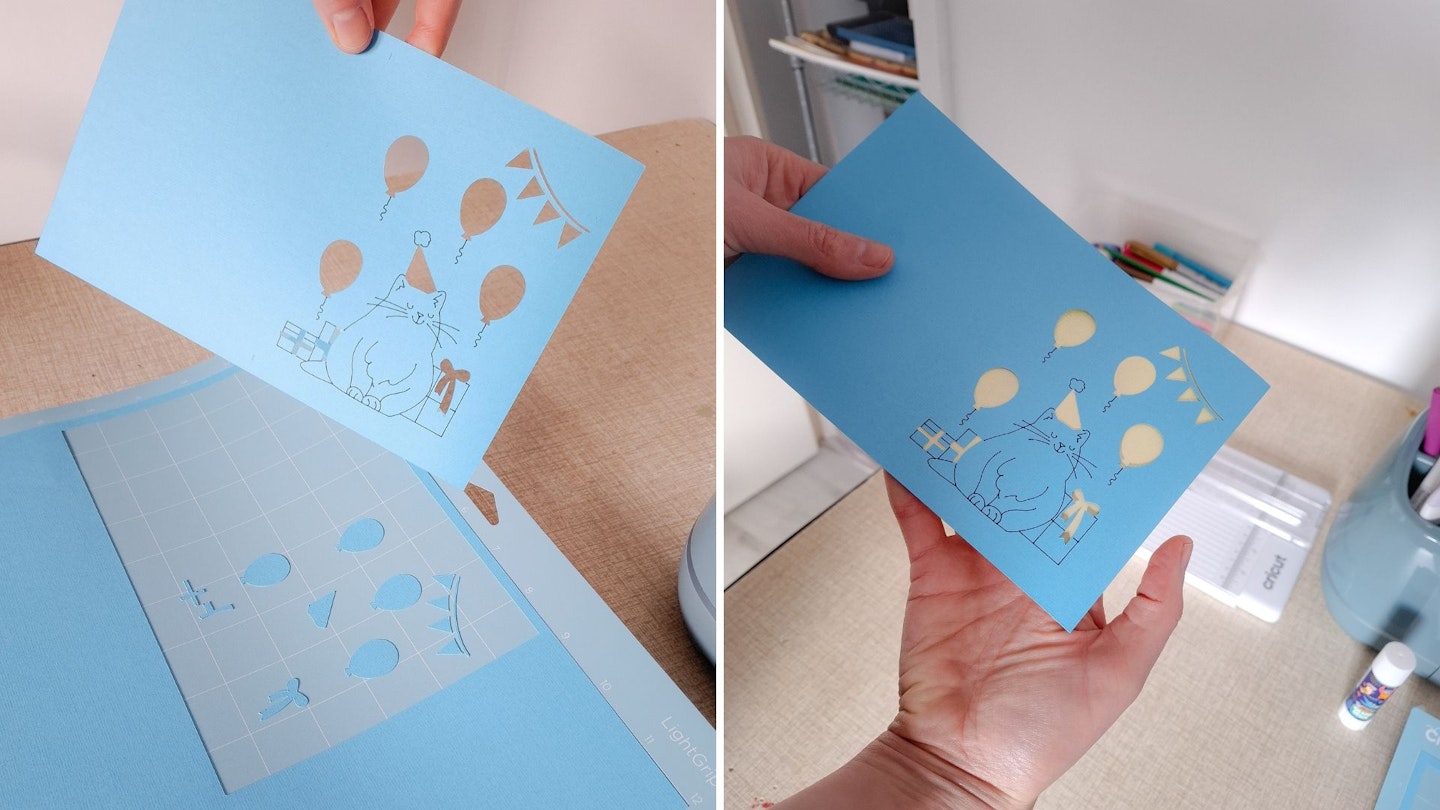
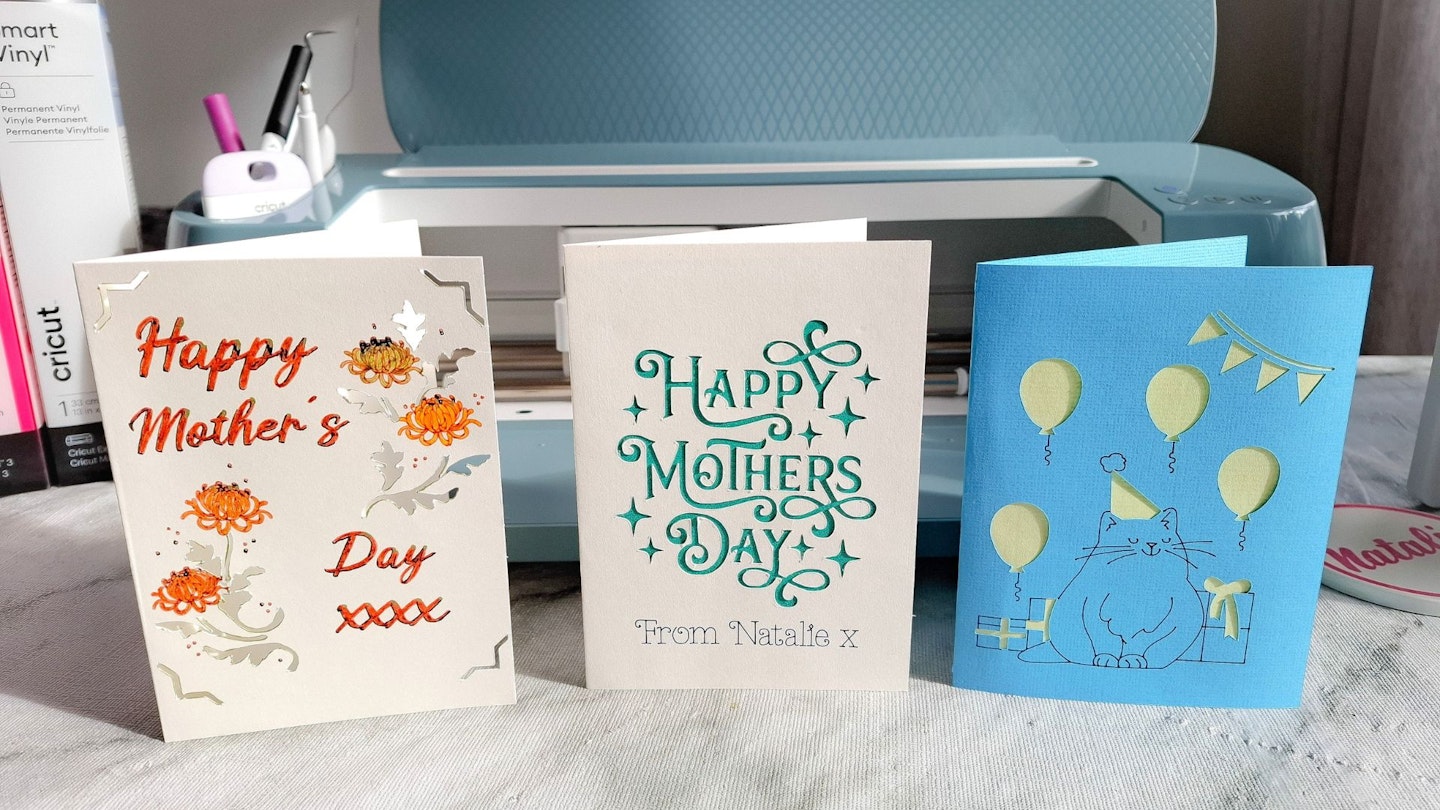
Amongst the materials that came with the Maker 4, there was some 216gsm textured cardstock in lots of lovely colours that I was keen to use to make a couple of DIY Mother's Day cards. The supplied cardstock is perfectly sized to fit a Cricut cutting mat. This is so handy if you are doing an intricate design or illustration as you can line up the cardstock precisely with the grid on the cutting mat, which also correlates with the Prepare screen in Design Space – super handy for lining things up!
I selected a template from Design Space. This project was designed and uploaded by a member of the Cricut community. That's the joy of Cricut; you can search over a million images and projects uploaded by Cricut users from all over the world. The cat design card has two processes: drawing with a pen and cutting with a blade. The Cricut Maker 4 has two clamps: the A clamp can hold a pen, and the B clamp houses the blade. This means less faff when changing tools and speeds up the process of creating the design.
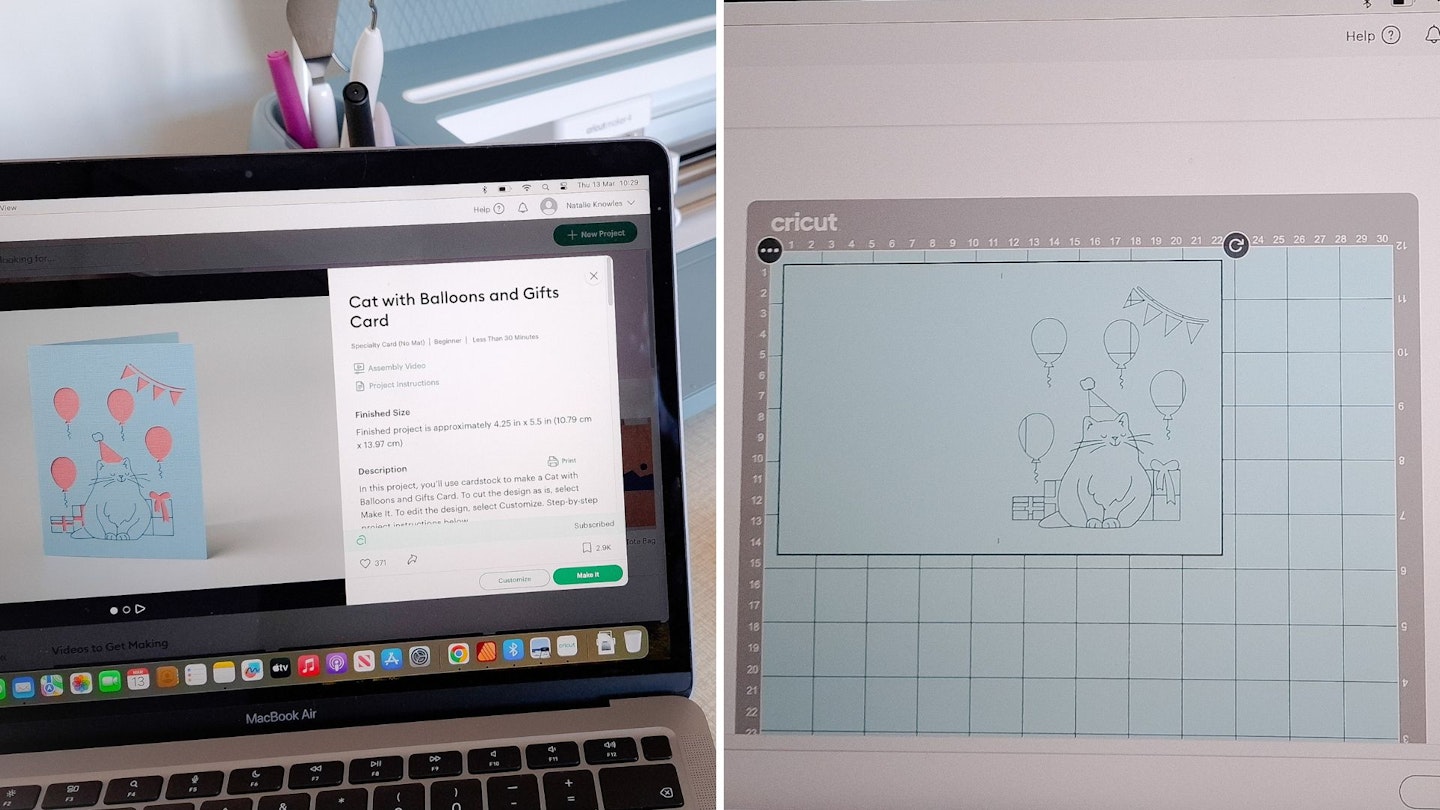
I loaded a fine black pen into clamp A and a sheet of blue Cricut 216gsm cardstock onto a Light Grip cutting mat. The Design Space software refers to this as Medium cardstock, and it was actually the first option that popped up on my screen.
If it is not a Smart Material, then it's essential to use a cutting mat with whatever material you are cutting, drawing or scoring. In my experience, I've found it best to use a Light Grip mat with card or paper so it doesn't stick too much and tear the surface.
Different types of material require specific cutting mats:
• LightGrip Mat: Best for paper or thin card—doesn’t stick too much, so the material won’t tear.
• StandardGrip Mat: For regular cardstock or vinyl.
• StrongGrip Mat: For thicker materials like chipboard or heavy cardstock.
• FabricGrip Mat: For fabrics, it holds them gently while cutting.
Each mat has a different level of stickiness, so it's important to choose the right one for your material to avoid damage.
Incidentally, I love that the overall card shape is automatically cut out from the card stock, so you get perfectly straight edges. It really is a game-changer when you realise you're going to save money in the long run because you'll never need to buy birthday cards, presents and decorations again, not when you can make your own with a Cricut machine.
The one thing to bear in mind when using the card and a cutting mat is to peel the mat away from the card, not the card from the mat, because this causes the card to curl. So, once the design is done, and you are ready to remove the card from the mat, turn the mat upside down on a table and gently peel the mat away from the card. In this instance, I manually folded and cut an insert card to size, rather than using pre-cut Insert Cards.
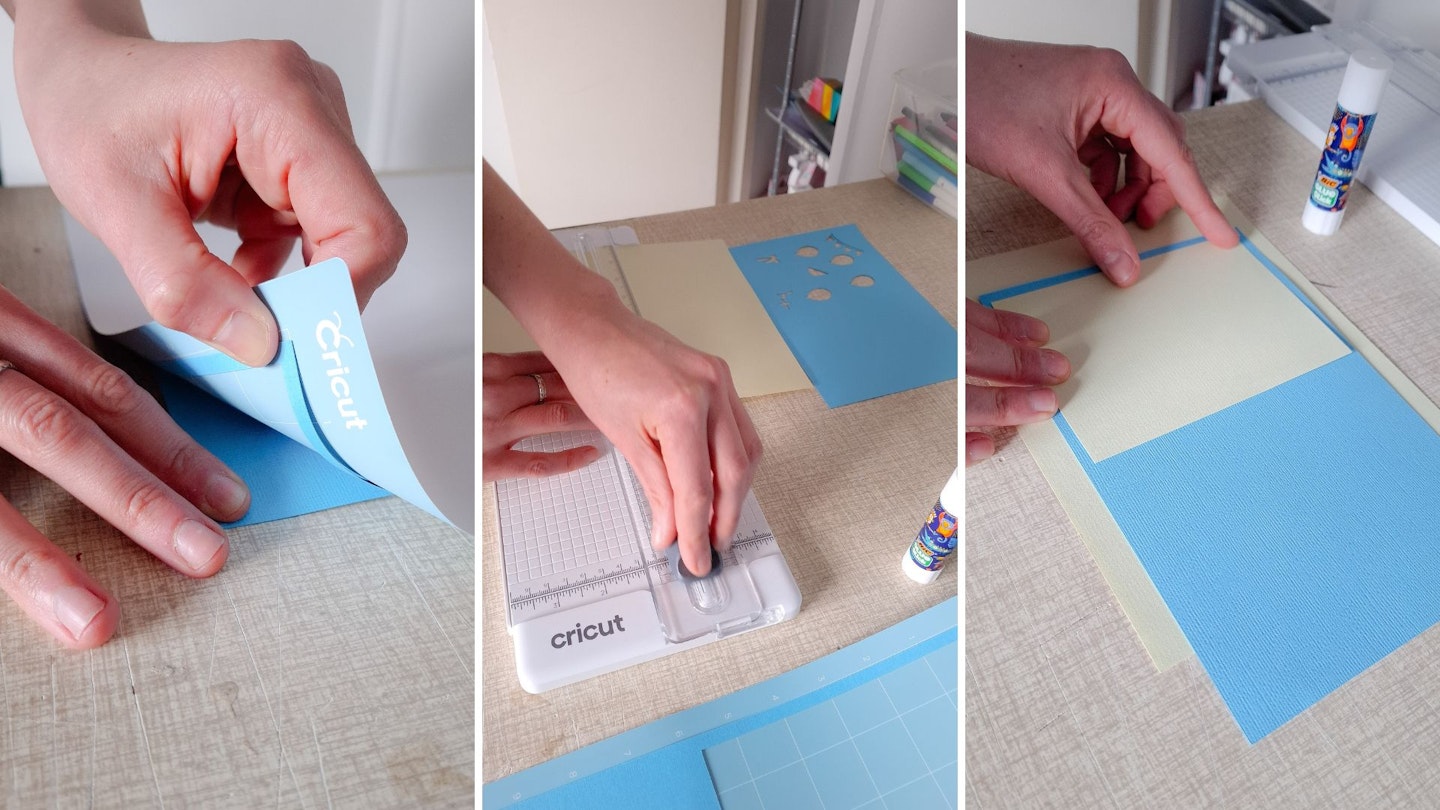
One of the great joys of Cricut is the range of 'analogue' tools and accessories. It is very therapeutic to cut, weed and apply designs by hand. BTW, weeding means removing excess bits from the design🤓. In addition, you'll find a scraper tool handy for removing stubborn bits from the cutting mat. Always clean a cutting mat after use and retain the plastic cover that comes with it, as this will help preserve its stickiness.
Cricut machines are compatible with over 300 materials, although it might take a bit of trial and error to get the pressure of the cutting blade right if the material is non-Cricut. I have a stash of colourful cards and paper stock that I wanted to use to make a couple of special cards and test if the Cricut Maker 4 could flawlessly cut non-Cricut materials.
It's a good idea to perform a test cut before using a new material; that way, you can adjust the blade pressure, which is an option before you start the cut. Also, test cuts help prevent material waste. Keep blades sharp and replace them as needed. If a cut doesn’t go through, try adjusting the pressure or using a different blade.
Making cards using a Cricut card mat
One of the simplest and most effective things to make with a Cricut machine is occasion cards. Even a basic one or two-stage design can look more complicated than it is. Once you've mastered the basics, cardmaking can get quite sophisticated with the Maker 4. The Perforation Blade and Scoring Wheel are just two of the QuickSwap blades that are compatible with Maker machines for advanced paper crafting.

But, we're getting ahead of ourselves! First off, if you think cardmaking might be one of your main uses for the Cricut, I recommend getting a Cricut Card Making Mat. Plus, with Cricut's pre-cut blank cards, there's no trial-and-error. It allows you to make four cards (of different designs, if you wish) in small batches.
This mat has a slightly sticky surface, just like the cutting mats, which keeps the cardstock in place while the Cricut machine draws, scores and cuts. Using pre-folded Cricut cards saves a lot of time and consistently gives a perfect result. Just remember to put the semi-transparent film back on the Card Making Mat when you're not using it to retain its grip.
You still get all the fun of weeding material, but the Cricut machine and accessories help to streamline the production process. This time-saving really makes a difference if, like me, you're limited to crafting for a couple of hours on a Sunday afternoon. Alternatively, if you are taking your projects to the next level as a creative side hustle or small business, you are going to benefit from the Cricut Maker 4's fast-cutting speed and tools to enable batch production.
Shop this product
Usability
The outstanding aspect of Maker 4 is that it caters to varying levels of complexity, from beginner to professional. The range of uses Cricut machines have is staggering. Design and fashion students use the Maker to cut their models for building miniatures of set designs and more. All those super cool car and computer decals you see everywhere now are cut on a Cricut (the fonts are a giveaway).
Think of it like a sewing machine and a pattern—the design can be as simple or as intricate as you imagine—the machine does the repetitive and laborious bit so you can enjoy spending time being creative.
If you choose to purchase the Maker, it’s likely because you take your crafting seriously—whether you're a seasoned crafter, a small business owner or someone who loves to create professional-quality projects. Investing in the additional tools will really expand the machine's capabilities, and it's the only table-top Cricut machine that has the extra tools. For the serious small business, go for the Cricut Venture, which is twice as wide as the Maker. It can be used to make large-scale displays for fairs, exhibitions and weddings.
Who will use the Cricut Maker 4?
• Crafters and DIY enthusiasts who love creating custom projects like greeting cards, decals and personalised gifts. Hobbyists who enjoy working with materials like paper, vinyl and fabric.
• Small creative business owners and Etsy sellers who make handmade items such as stickers, custom T-shirts, home décor or wedding decorations. These may be individuals who are looking to streamline production and add a professional touch to their products. We have a guide on how to sell on Etsy if you're interested on finding out more.
• Sewists and quilters who work with fabric and need precise cuts for patterns, appliqués and quilting projects. Also, textile designers who want to save time by letting the machine handle intricate pattern-making and fabric cutting.
• Teachers and educators who create classroom decorations, bulletin boards and personalised learning materials. A Cricut machine can be transformational to home-schooling parents who want to make fun and interactive educational tools.
• Wedding and event planners designing decorations, invitations and themed party accessories. The Cricut Maker 4 allows you to craft bespoke signage, centrepieces and favours.
• Woodworkers and DIY home decorators interested in cutting thin wood, leather or chipboard for personalised home décor, signs and 3D projects.
• Creators and graphic designers who enjoy digital design and want to turn their custom graphics into physical products. Those who have a bit of know-how to work with software like Adobe Illustrator can create unique designs.
The Cricut Maker 4 is perfect for anyone who wants to take their crafting, business or projects to the next level with precision and ease.
Using Smart Vinyl
It's birthday season chez Natalie, and what with one festivity after another, I am so glad I can use my Cricut machine to create cards and pressies.
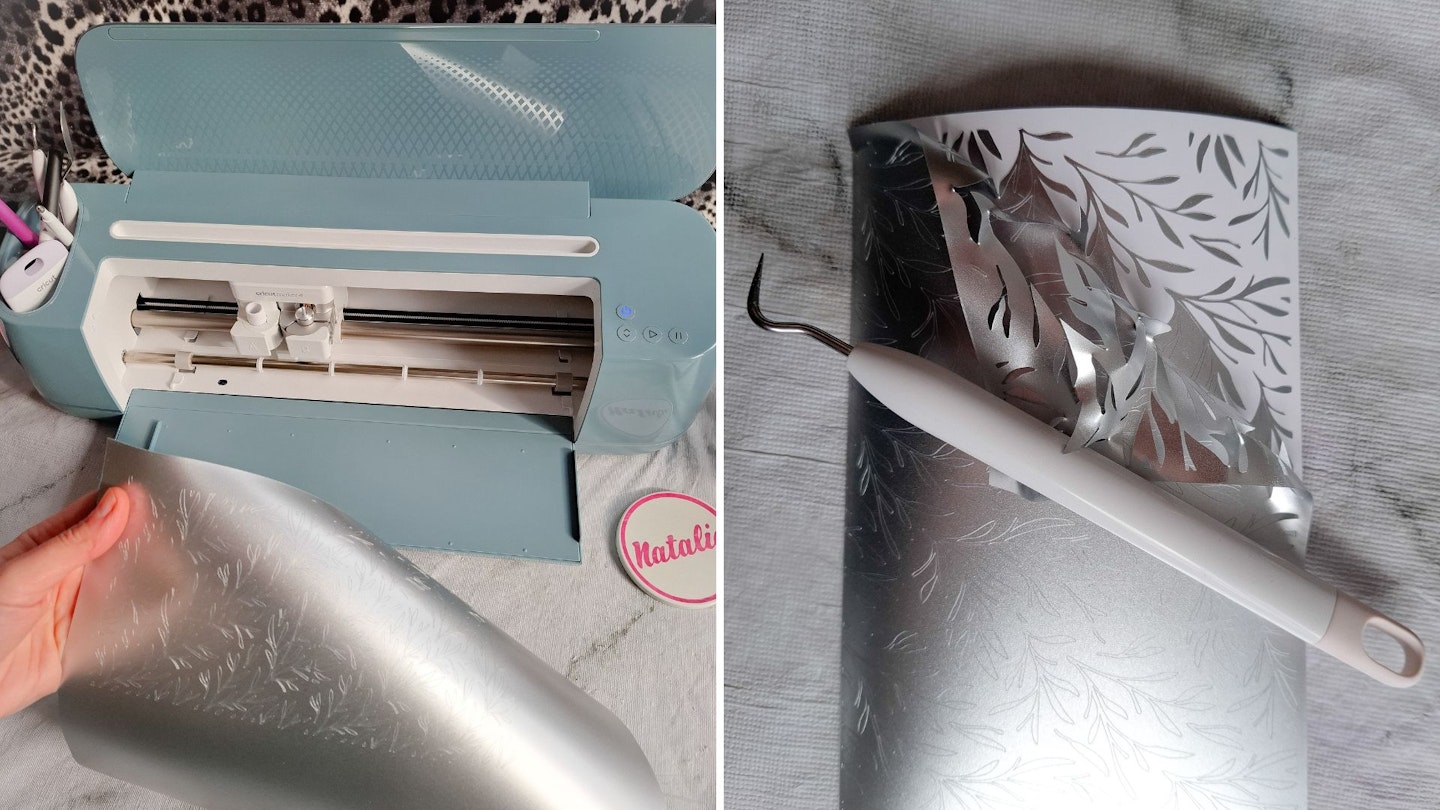
By far, the easiest material to work with is Cricut's Smart Vinyl. It comes in colourful rolls with a sticky backing and is perfect for decorating windows and jars and making signs. This Smart Material has been carefully tested to work perfectly with Cricut machines.
Smart Vinyl doesn’t need a cutting mat and comes in long rolls, making it a cost-effective choice for crafting. I love how quickly you can create simple and intricate designs. The best part? Weeding the design with the pick tool from the Essential Tool Set—it’s surprisingly relaxing!

I wanted to decorate some colourful flower pots with patterns to give to the mum(s) in my life as Mother's Day presents and prepare gifts for all birthdays that come one-after-the-another at this time of year.
If you think using a Cricut takes away the hands-on part of crafting, think again! The Essential Tool Set is your perfect companion once your design is drawn or cut by the machine. It lets you enjoy the process of crafting your project with handy and stylish tools.
My favourite tool in the set is the pick, which I use to weed my designs. I also use most of the other tools, especially the mini cutter, scissors and scraper (which helps me smooth designs onto surfaces). These tools are high-quality and carefully designed by experts who know just what’s needed when you're transferring a design.
When transferring vinyl to another surface, you can keep the layout of your design in place with transfer tape. This is helpful for things like putting letters on a window or moving detailed decals, especially if you're working with a curved surface. Transfer tape is a clear film with a grid that helps you line up your design. Cut a piece the same size as your design, peel off the backing and apply it to your vinyl. For larger designs, go slow and be patient, as the tape might curl up, but it’s generally easy to manage. In the end, you'll have the transfer tape perfectly placed over your design.
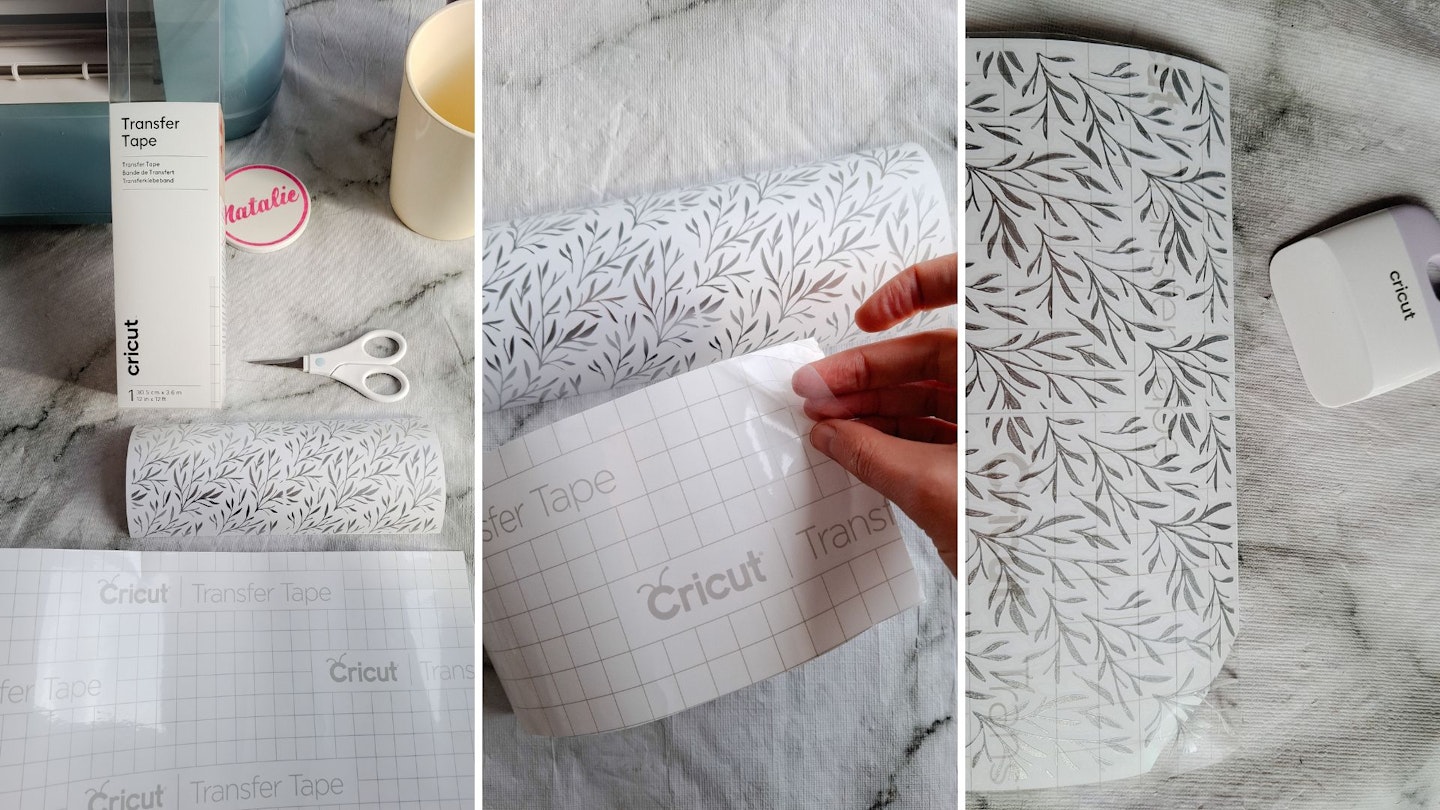
A helpful tip is to use the scraper tool to press the transfer tape onto the Smart Vinyl, making sure all the details stick. Then, carefully peel off the vinyl backing. Take your time, using the scraper and weeder tools to assist. Once the design is stuck to the transfer tape, flip it over and apply it to your surface.
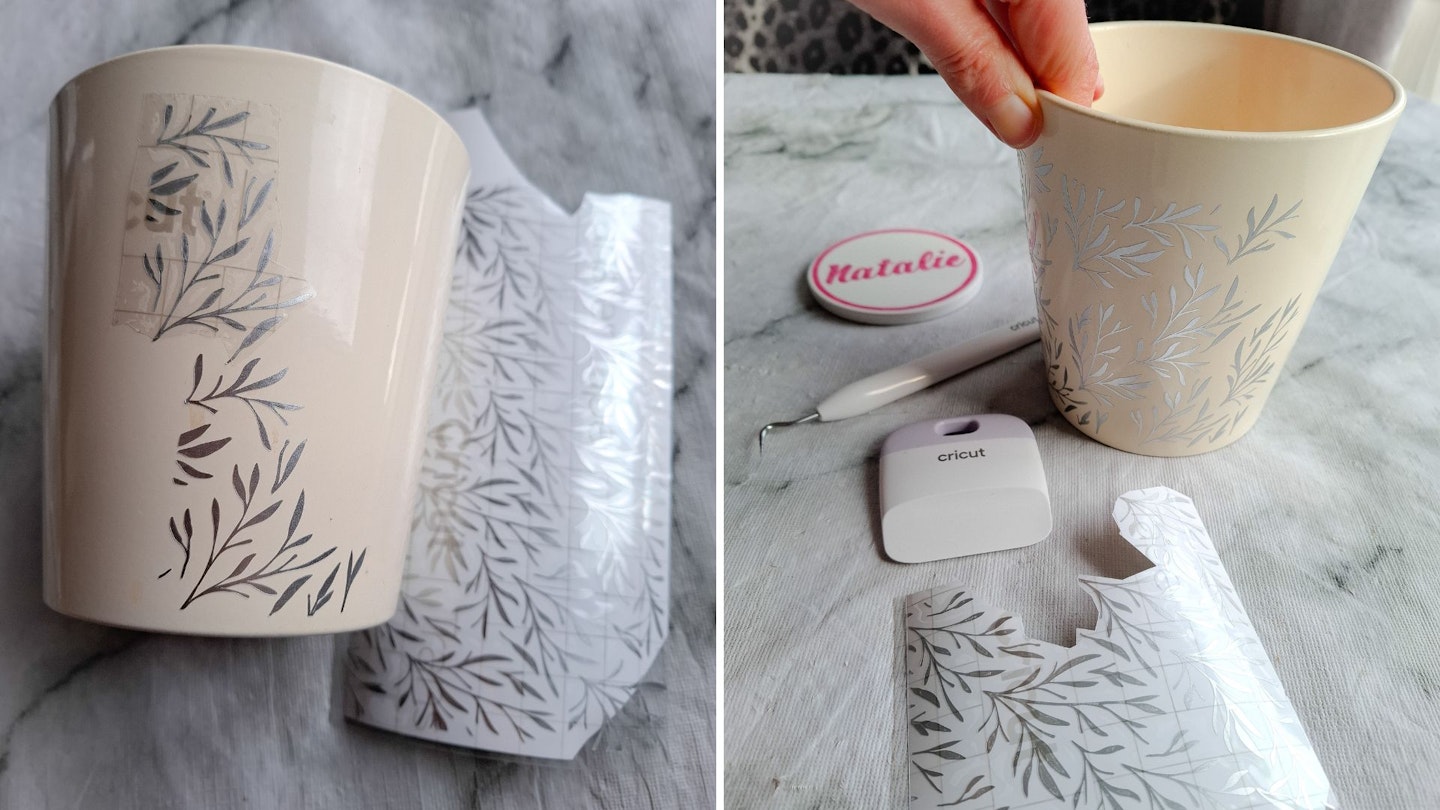
When transferring to a curved surface, I found it best to do it in sections. Cut the design into manageable parts and affix them to the surface. It's not for the impatient, but I found the process entirely mindful while listening to the radio.
Print and cut
A Cricut expert recommended Print and Cut to me in a 1-2-1 session. Since my own illustrations and artwork are very detailed, it's best to print them as a flat image and then cut around them. This lets me easily make stickers and transfers of my artwork. Also, my partner is a very talented model maker, and he is keen to use the Cricut Maker to cut his flat-pack kit for his miniatures which involves cutting around print-outs of the component parts. I think we should design a range of book nooks together!
The Print and Cut feature in Cricut Design Space is perfect for detailed, multicoloured or shaded designs. Instead of cutting out complex shapes from different materials, you can print your design on a home inkjet printer and then have your Cricut cut it out perfectly.
Everything happens in one place—Design Space sends the design to your printer via Bluetooth, and once printed, your Cricut cuts around it precisely. You could even print on to Printable Iron-On which lets you customise T-shirts, tote bags, and more with your intricate designs. Design Space has a mirror function to flip designs for iron-on transfers.
Iron-On
Iron-On is a form of heat transfer vinyl (HTV) that requires heat (using an iron or a Cricut EasyPress) to adhere to fabrics. Cricut also produces Infusible Ink which fuses with a material. In simple terms, Iron-On vinyl sticks to fabric, while Infusible Ink sinks in like sublimation printing.
Iron-On is designed for fabric and works well on cotton, polyester and blends, as well as canvas and denim. It doesn’t work on synthetic materials like acrylic or fabrics that can’t be ironed. Besides fabric, it can also be applied to wood, corkboard and cardstock, but the process differs.
Personalising items with Iron-on is a fantastic way to create thoughtful gifts, like custom cushions or fabric napkins. You can easily update your front room for just £50 with a few simple touches. It’s also perfect for a Spring refresh, giving new life to old materials. Iron-on is great for adding personal flair to costumes for events like Red Nose Day or World Book Day. It’s an affordable and creative way to make anything feel special!
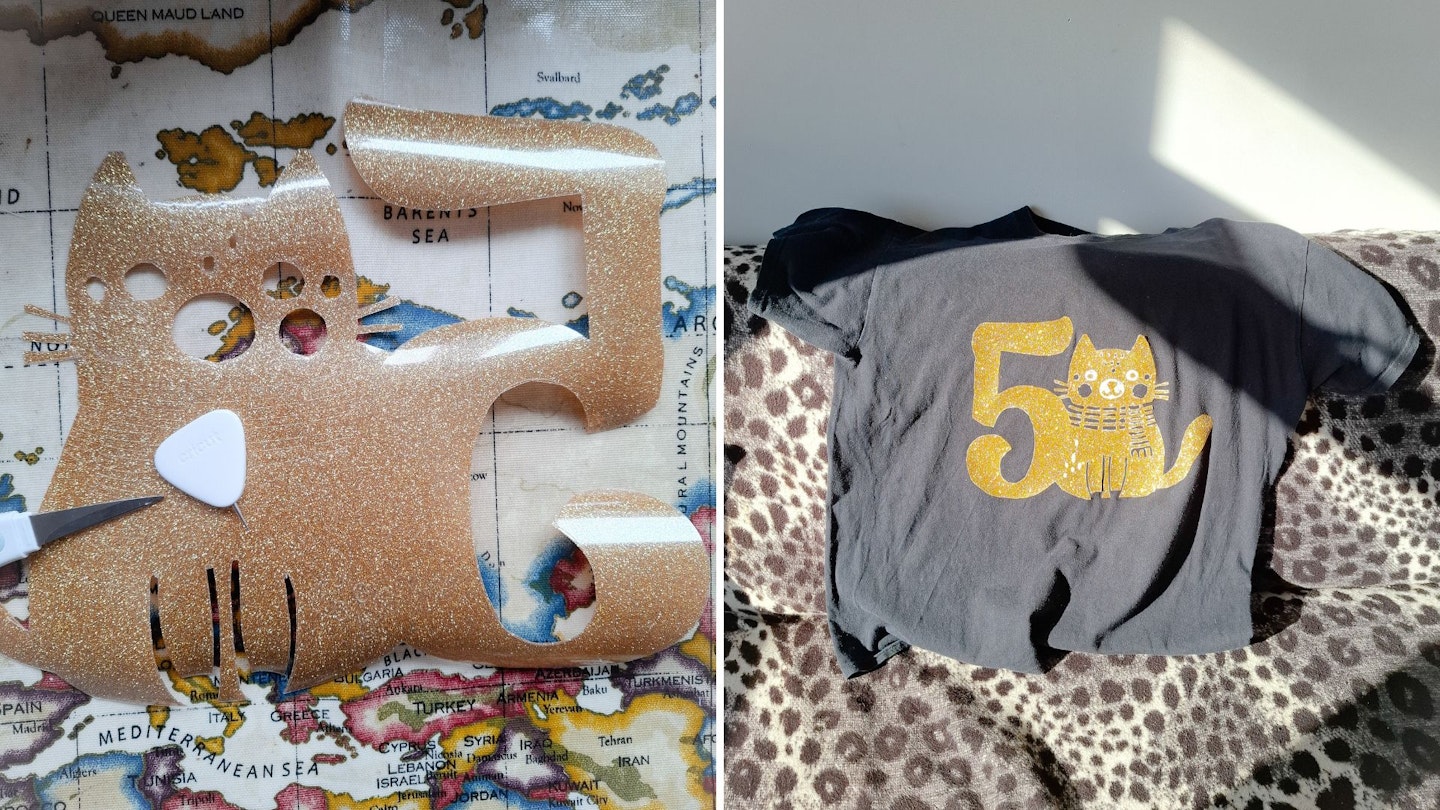
First of all, I recommend Smart Iron-On because it doesn’t need a cutting mat, making cutting faster and allowing for longer designs. Just lay it onto clothing, apply a heat press and you have a custom outfit in minutes! It can even cover stains, giving new life to your favourite jeans or concert T-shirt. Before applying, use a lint roller to remove dust and threads. Customised clothes with Smart Iron-On can be machine-washed up to 50 times. Smart Iron-On has a thick, clear backing, similar to acetate and the vinyl peels off smoothly. This means your design stays in one piece, so you don’t need Transfer Tape.
Your design will begin in Design Space and be cut with a Cricut machine, but using a Cricut heat press is a separate step. I recommend finishing your design and weeding first, then taking a coffee break before setting up for the heat press or household iron. Trying to manage a laptop, Cricut machine, app, heat press and all your tools (and a needy cat😺) at once can be a bit overwhelming!
I customised my partner's old T-shirt with a design. Standard iron-on requires a cutting mat, but I was still able to make a design up to 30cm wide and tall. I still recommend Cricut's Smart Materials, though. They are much simpler to use than regular iron-on and let you create longer designs—up to three meters with an Explore or Maker machine.
Iron-On is usually easy to weed, but I did find Glitter Iron-On a challenge because it was difficult to see where the cutting lines were due to the texture of glitter. For detailed or fiddly designs, I suggest cutting away the excess vinyl in sections. Also, the mini weeder that comes with the Maker 4 is brilliant for picking out really fine details.
Next, I used a Cricut EasyPress 3 to transfer the design to the T-shirt. The vinyl is a thin layer that bonds quickly, so the fabric stays flexible and feels smooth.
Use Iron-On on soft or hard surfaces. You can also try Iron-On on heat-resistant materials like smooth wood, faux leather, and thick cardstock—these are great for customising!
Infusible Ink
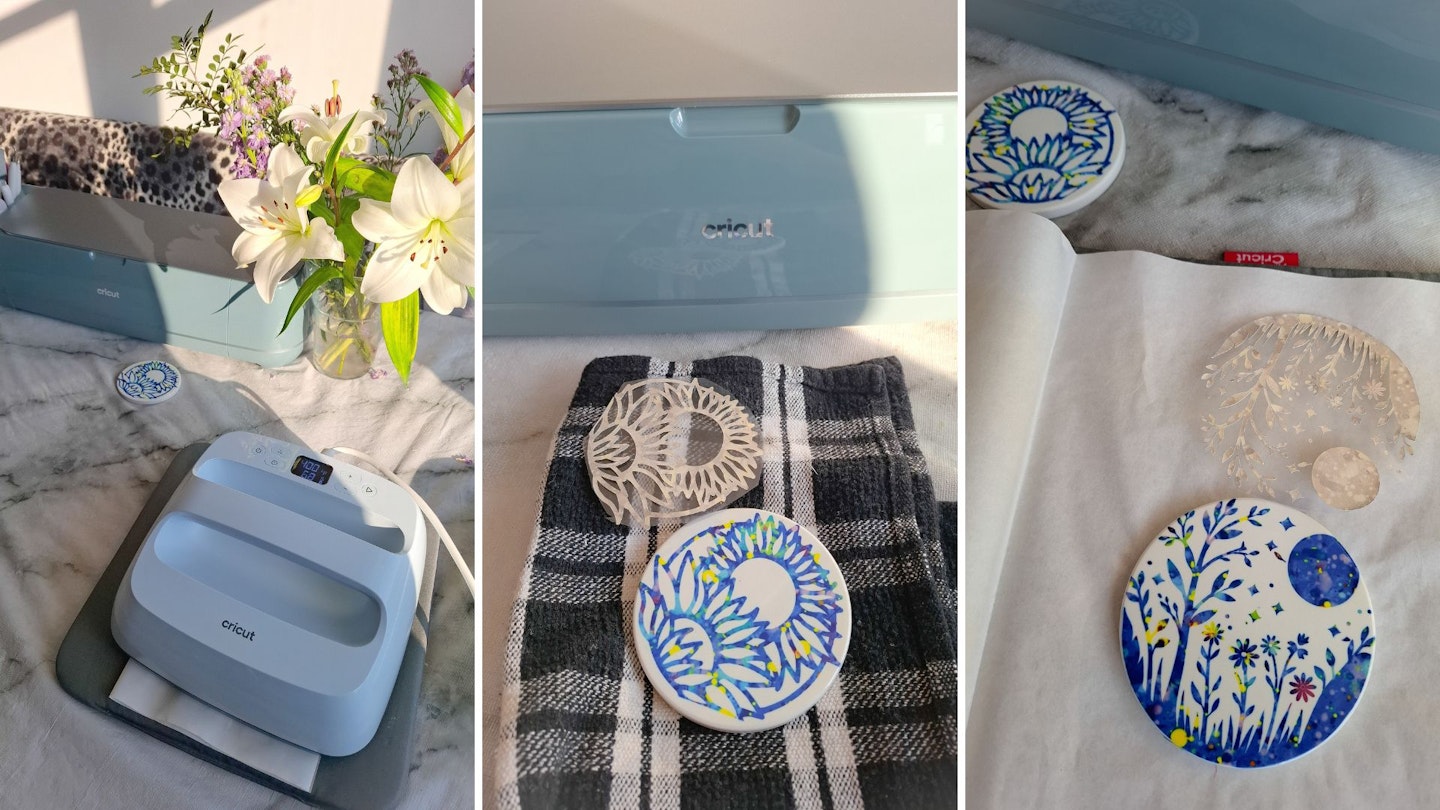
Infusible Ink is a type of sublimation printing where the ink bonds with the material when heated. It needs a high temperature, so a regular household iron won’t work, and it only works on certain surfaces. For best results, use Cricut blanks that are compatible with Infusible Ink and bond with a Cricut heat press. There are tote bags, coasters, mugs and more that you can customise with the mesmerising colours and patterns that are only possible with Infusible Ink. In addition, Infusible Ink Transfer Sheets and Pens can be used on 100% polyester clothing. The quality of the polyester matters, as Infusible Ink works best on materials with a high polyester content.
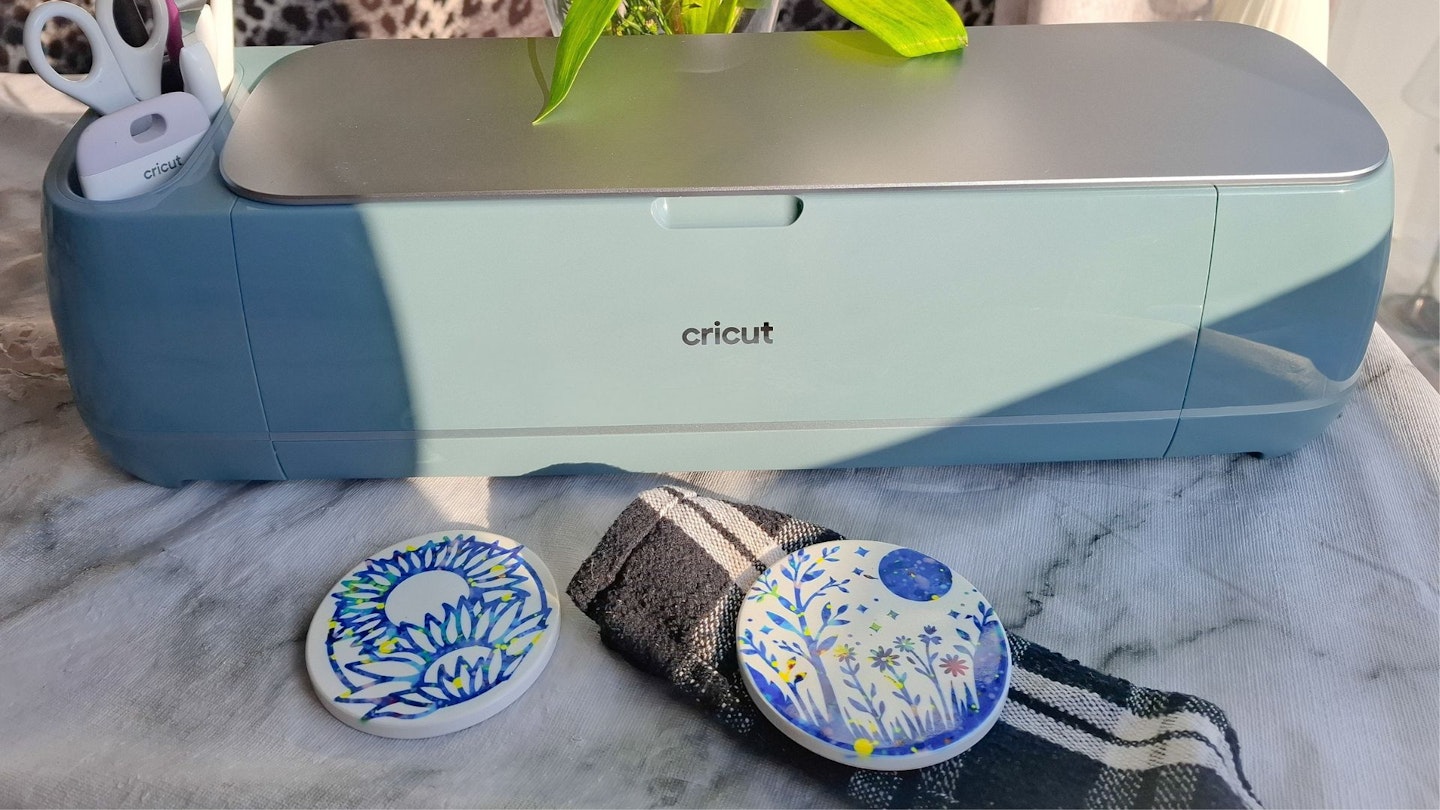
The Infusible Ink Transfer Sheets come rolled up and look like stiff paper with a plastic backing. Don’t worry if they look lighter in colour, like watercolour—it gets brighter once heated. First, make a design using the Cricut machine and Design Space. Then, put a sheet of Infusible Ink on a Strong Grip cutting mat. It helps to smooth out the sheet a bit before using it, as it can be hard to line it up if it’s still curled from the roll.
Make sure the 'Mirror' option is on in Design Space and that the ink side of the material is facing up. Remember, especially with text, your design will be backwards, so it will show the right way when applied. The latest version of Design Space should now automatically turn on 'Mirror' for Iron-On and Infusible Ink.
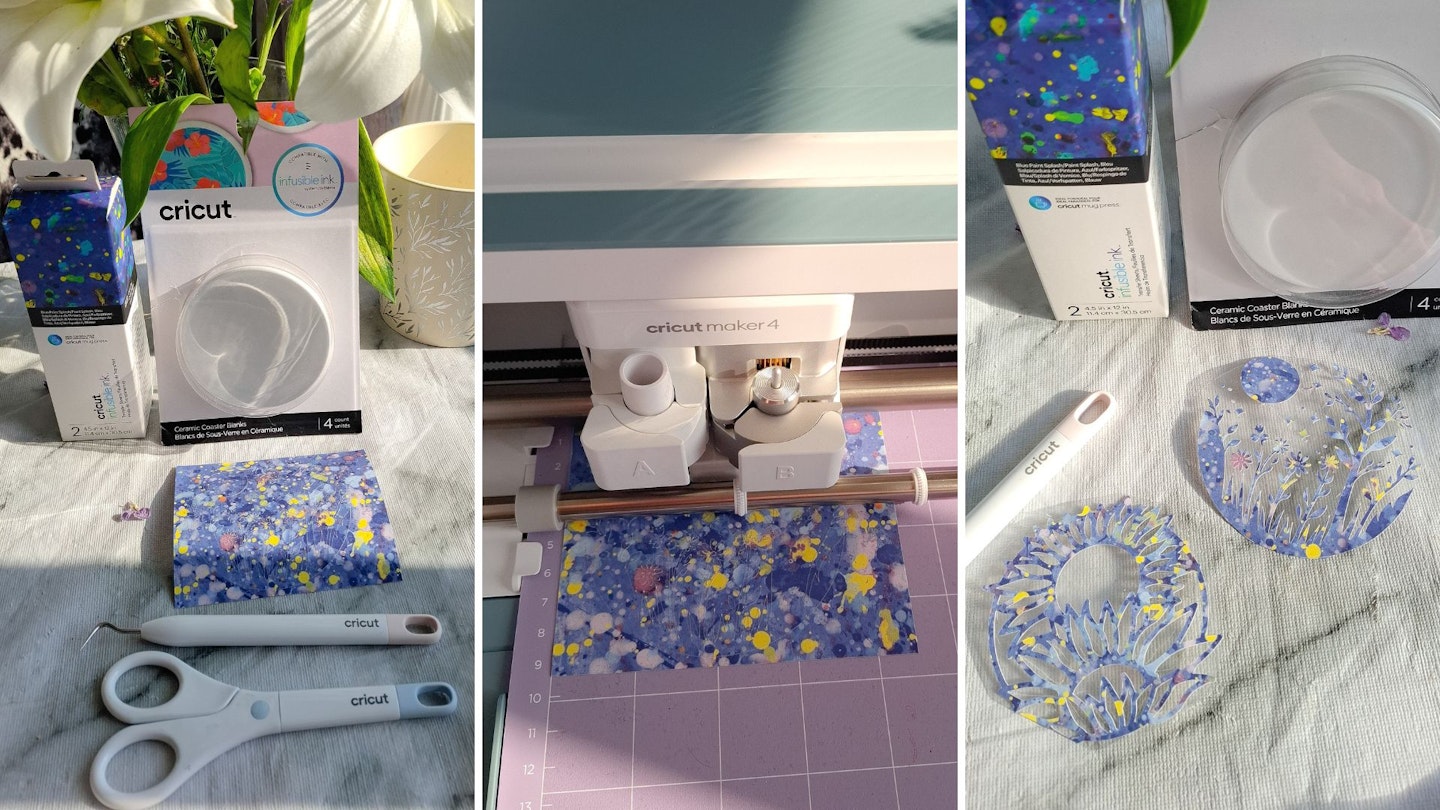
I could see the difference in cutting speed when the Cricut machine cut two coaster designs out of Infusible Ink. The Maker 4 really did breeze through those cuts a lot faster than my previous machine. If you intend to buy the Maker for a business, there is definitely a benefit to getting the Maker 4, as it greatly speeds up the cutting process. When running a small business, it's important to be efficient. With the Cricut Maker 4, you'll be cutting corners, not quality…
The future...
With Cricut, it is important to take baby steps and focus on mastering a process with one material. Start with simple projects (like vinyl decals or paper crafts) before moving on to more complex ones.
After a month with Maker 4, I feel confident with crafting using the cards, Smart Vinyl, Iron-On and Infusible Ink. I absolutely want to try out the different blades and tools (Fine-Point Blade, Deep-Point Blade, Rotary Blade, etc.), and I have several projects in mind...🎨 Which, I guess, leads to the big caveat about the Cricut, the cost of all the materials and tools quickly adds up.
But actually, it’s actually a great investment for a business. If you are serious about making crafts to sell, these expenses can be treated as business costs, helping to expand your creative offerings and improve your products, all while potentially increasing your revenue. And if you're a hobbyist, a Cricut is no more costly than buying the latest games console and games (nudge, nudge to my boyfriend!).
With a Maker 4, serious crafters can create detailed small models, such as architectural designs, at speed. Print and cut vector-based designs, adding scoring lines for precise folds. The Maker 4 improved cutting speed makes it perfect for efficient batch production. It helps to streamline the production process, which is ideal for small businesses or anyone working on multiple projects at once.
Shop this product
Adaptive Tool System
The Cricut Maker's Adaptive Tool System enables the Maker 4 move the blade intelligently. It lifts and rotates the blade to the best position for each cut. This makes cuts more accurate, especially for detailed designs or cutting through thicker materials.
It is possible to create leather jewellery, wood décor, engraved metal with tools that are sold separately. With 13 compatible tools, Cricut Maker 4 cuts 300+ materials, writes, scores, foils, engraves, embosses and more. The Premium Fine-Point Blade (included with the machine) is best for cutting lightweight to medium-weight materials, like cardstock and vinyl. It’s perfect for detailed, precise cuts on these materials.
As an example, with the QuickSwap Tools from Cricut's Adaptive Tool System, you could design flat pack models, jigsaw puzzles and miniature stage sets. QuickSwap tools have a single handle where you can easily change the tips for different tasks, like scoring or engraving. There are also standard tools (like the scoring wheel, knife blade, or engraving tool) which has its own dedicated housing, so you need to replace the entire tool when switching tasks. QuickSwap is faster because you only swap the tip, not the entire tool.
These are the current Cricut QuickSwap Tools and standard tools which work with the Cricut Maker machine:
• Single Scoring Wheel: This tool creates a single-fold line, perfect for light materials like paper.
• Double Scoring Wheel: It makes two-fold lines, which is great for thicker materials like cardboard.
• Debossing Tip: This tool makes a soft, indented design on materials, adding texture to your projects.
• Engraving Tip: It allows you to carve text or designs into materials. Create personalised text and monograms or inscribe a keepsake. The Engraving Tip can be used on Cricut blank Aluminium Sheets.
• Perforation Blade: This creates tiny perforated lines, making it easy to tear paper or cardstock, such as tear-off tickets.
• Wavy Blade: Adds a wavy edge to your designs for beautiful effects, perfect for romantic designs.
• Deep-Point Blade: Cuts thicker materials up to 1.5mm, like poster board and craft foam.
• Bonded Fabric Blade: Easily cuts through bonded fabric (i.e. material that is made by combining two or more fabrics).
QuickSwap Tips are a great choice for creative hobbyists or small business owners because they’re easy to store and can be bought in pieces—just buy the housing once and then swap out the tips as needed. The tips work fast and efficiently, making them ideal for business projects. There are Cricut blank Maker-only materials, including aluminium sheets and basswood, designed to work flawlessly with the tools.
It is inevitable that cutting blades will wear over time, especially if you are regularly cutting thick materials. QuickSwap tips are ideal because you only need to replace the blade tip, not the entire tool, making them more cost-effective and convenient. Plus, they’re small enough to make great stocking fillers for the Cricut completist!
Shop this product
Final verdict
If you love hands-on creativity and are new to Cricut machines, now is the perfect time to join the Cricut family. The Cricut Maker 4 inspires learning and experimentation, making it an outstanding addition to schools, local clubs and universities. It's ideal for people who are serious about crafting and want to try new things. Perfect for those who enjoy personalising items – by adding names or designs – and want to keep improving their crafting skills. Whether you’re making gifts, decorations or custom projects, the Maker 4 gives you the tools and flexibility to do more with your crafting.
A Maker 4 would benefit a business where one person does the making—it's up to the job 8-12 hours a day. For example, an Etsy seller creating professional cake toppers would speed up production with a Maker 4 and its tools. It can cut intricate designs, add details like wavy edges, and create custom, eye-catching showstoppers. With the Maker 4, you can produce high-quality, personalised decorations for weddings, birthdays and other special events.
If you've been considering a Cricut, now is the perfect time to take the plunge, stock up on materials with a bundle deal, and unlock endless creative possibilities!
It's one of the best Cricut deals on a brand new Cricut machine, thanks to the bumper amount of materials included in the box. Why I haven't awarded it top marks is because I really need to see more about what the Adaptive Tool System can do, plus take time to learn and grow with the machine. I also stress that if you've already got a Cricut Explore or Maker, there is nothing radically different about it to warrant rushing out to buy the Maker 4. However, if you don't have a Cricut machine and you LOVE crafting, the Maker 4 is the machine to go for😍.
If you are still on the fence about getting a Cricut machine, I recommend a trip to Hobbycraft to get a look and feel of the Cricut range. In addition, you can book a demonstration, in-store or online, via Hobbycraft's Classbento.
Rating: 4/5
Shop this product
Similar products to consider
TESTED
Best Cricut machine for intermediate crafters
 Cricut
cricut.com
The Cricut Explore 4 is great for making with paper, vinyl and light materials. It's a great intermediate option—twice as fast as its predecessor, available in a new "seashell" colour, and compatible with 100+ materials for projects like stickers, cards, and T-shirts. The updated Cricut app also makes finding projects easier.
The new machine offers faster performance while maintaining the same functionality. If you're upgrading, your existing tools and materials remain compatible, ensuring a seamless transition. However, if you're looking to work with more advanced materials, engraving, and a wider range of tools, the Cricut Maker 4 may be a better fit.
Read our full review of the Cricut Explore 4.
Pros
- Twice as fast as the previous model for cutting Smart Materials
- Cuts 100+ materials, ideal for paper, vinyl and light materials
- Compatible with existing tools and materials
- New "seashell" colour
- Improved Cricut Design Space app for easier project browsing
Cons
- No major upgrades beyond speed and colour
- Lacks the adaptive tool system of the Maker 4
| Size: | 56.4 x 17.8 x 15cm |
| Maximum cutting size for Smart Materials: | 29.7cm x 3.6m |
| Maximum cutting size with a mat: | 29.2 x 59.6cm |
| Design Space software: | iOS, Android, Windows and Mac |
- Cricut Explore 4 smart cutting machine
- Premium Fine-Point Blade + Housing
- Light Grip Machine Mat, 12in x 12in (30.4cm x 30.4cm)
- Fine Point Pen (0.4mm)
- Mini Weeder
- Materials for practice cuts
TESTED
 Cricut
With the launch of the Cricut Maker 4, expect to see its predecessor on offer at a lower price. Choose the Maker 3 if you're a serious crafter looking for the ultimate all-in-one digital crafting machine. While it’s the same size as the Explore 3, it offers advanced features ideal for small business crafters, artists and students. If you're planning to sell your creations, this machine is a great choice—it supports a wide range of tools and allows for large-scale projects, including banners up to 3.65 metres long.
The Maker 3 works with Smart Materials, which don’t require a cutting mat, but it’s also compatible with traditional materials using a mat. Its Adaptive Tool System supports various blades that can cut wood, aluminium and heavier fabrics like leather up to 2mm thick.
For those who love personalising and decorating objects—perhaps for an Etsy shop or craft fairs—this machine is a top pick. In addition to cutting, engraving and debossing, it can accommodate a scoring wheel for effortless folding of thick cardstock in 3D paper crafts. The Cricut Perforation Blade also makes it easy to create tearable edges in various materials.
Please note: These tools are sold separately from the machine.
Read our full review of the Cricut Maker 3.
Pros
- Works with Smart Materials (no mat needed)
- Adaptive Tool System supports various blades for diverse materials
- Cuts wood, aluminium, and heavy fabrics up to 2mm thick
- Ideal for small business crafters and artists
- Supports large-scale projects (banners up to 3.65m long)
- Engraving, debossing, scoring, and perforation capabilities
Cons
- Requires additional tools/blades for certain functions
| Dimensions: | 56 x 18 x 15.7cm |
| Maximum cutting size for Smart Materials: | 29.7cm x 3.6m |
| Maximum cutting size with a mat: | 29.2 cm x 59.6cm |
| Design Space software: | iOS, Android, Windows and Mac |
- Machine only, with free images in Design Space (bundle option is available)
TESTING
 Cricut
cricut.com
The Cricut Joy Xtra is compact and ideal for small, quick projects. It's the best Cricut machine for beginners. It’s small, portable and easy to take anywhere – some people even craft on the train! The main difference between the Cricut Joy and the Joy Xtra is that the Xtra works with Smart Materials, which don’t need a cutting mat. Just feed the material into the machine, and it automatically detects it. It can also cut over 50 types of materials up to 30.48cm with a cutting mat.
The benefit of the Cricut Joy Xtra is its convenience and versatility. It saves you time by eliminating the need for a cutting mat, making your projects quicker and easier, while giving you more options for your crafts.
Unlike the Explore and Maker, it only has one clamp, so it's best for simpler craft projects, such as cardmaking.
Pros
- Small, portable and easy to take anywhere
- Works with Smart Materials (no cutting mat needed)
- Can cut over 50 materials up to 30.48cm with a cutting mat
- Convenient and time-saving for quick projects
- Ideal for beginners and simple craft projects (like cardmaking)
Cons
- Less versatile than the Explore and Maker machines
| Size: | 31.7 x 15.2 x 13.9cm |
| Maximum cutting size for Smart Materials: | 21.6cm x 1.2m |
| Maximum cutting size with a mat: | 20.8 x 29.7cm |
| Design Space software: | iOS, Android, Windows and Mac |
- Cricut Joy Xtra machine
- Premium Fine-Point Blade + Housing
- Cricut Joy™ Fine Point Pen
- Cricut Mini Weeder
- Welcome card
- Power cable
- Free trial subscription to Cricut Access™ (for new subscribers)
- 100 free, pre-designed projects in the companion app
- Materials for a practice cut
Cricut Maker 4 FAQs
Does the Cricut Maker 4 come with everything I need to get started?
Yes, as well as the smart cutting machine, you'll receive enough materials and accessories for up to 10 projects.
What tools/blades are compatible with the Cricut Maker 4?
The tools that work with the Cricut Maker 4 are the Premium Fine-Point Blade, Deep-Point Blade, Bonded-Fabric Blade, Knife Blade, Foil Transfer Tool, Pens and Markers, Scoring Stylus, Scoring Wheels (Single and Double), Rotary Blade, Wavy Blade, Engraving Tip, Debossing Tip, and Perforation Blade.
What is the weight and the dimensions of the Cricut Maker 4?
The Cricut Maker 4 weighs 6.98kg and measures 56.1 x 18 x 15.7cm.
How is the Maker's Adaptive Tool System different from the other Cricut machines?
Smart cutting machines, such as the Cricut Explore, use Cut Smart Technology that drags the blade across a material. The angles and curves of a design change the blade's direction. Conversely, the Maker's Adaptive Tool System intelligently lifts and rotates the blade for the perfect position to make the next cut. This gives greater precisions for more intricate cuts or thicker material.
Where can I find resources to help me with my Cricut machine?
Cricut Help is a comprehensive resource on Cricut machines, Design Space, Cricut Access, materials and accessories. Also, Cricut's Youtube channel has lots of video tutorials and how-to projects for beginners. Plus, there's loads of guidance in the Design Space app too.
This article contains expert commentary from Patricia Hutny, Cricut UK & IE Marketing Manager.
Natalie Knowles is a Commercial Content Writer for Yours.co.uk, specialising in home appliances. When she's not testing sparkling water makers, she flexes her creative flair as an artist. Find out more about Natalie's art work. Follow @natalieknowlesart on Instagram for new designs and exhibitions.