
With the Cricut EasyPress 3, customise T-shirts, tote bags, coasters, and more. It's a Bluetooth, hand-held heat press that can be used on many materials. Along with a Cricut cutting machine, you can create customised baby clothes for a little one's first Christmas photos. Personalise objects to sell in your Etsy store. Accessorise blankets, bags and banners for special occasions, such as DIY Halloween costumes.
If you regularly host special events, designing your own decorations is more affordable and an economic way to reuse preloved materials. This heat press is one of the best Cricut accessories for upcycling clothes, for example, by covering stains with Iron-On heat transfer vinyl (HTV) in bright designs.
What makes the Cricut EasyPress 3 stand out from previous heat presses is the new app support and Bluetooth connectively... plus, it's also a lovely pastel blue hue that makes a stylish companion for the Cricut Explore 3.
If Infusible Ink sounds like it belongs in Harry Potter to you, this review will be a helpful guide to Cricut's heat press materials and accessories.
Tested
Best Cricut heat press
 Natalie Knowles/Cricut
cricut.com
Pros
- Create consistent, professional-quality custom designs on fabric
- Clear step-by-step instructions make it easy to learn, even if it seems a bit intimidating at first
- Discover a gorgeous selection of Iron-On and Infusible Ink materials for creative projects
- Delivers consistent, edge-to-edge heat
Cons
- This machine heats up to very high temperatures
| Size: | 30 cm x 25cm |
| Temperature range: | 99°C (210℉) to 205°C (400℉) |
| Connectivity: | Bluetooth connects to Cricut Heat app |
| Dimensions: | H39.29 x W42.09 x D19.38cm |
- Compatible with major brands of iron-on (HTV), Infusible Ink™ and sublimation products
- Advanced heat plate design with ceramic-coated surface
- Compatible with the Cricut Heat app
What is the Cricut EasyPress 3?
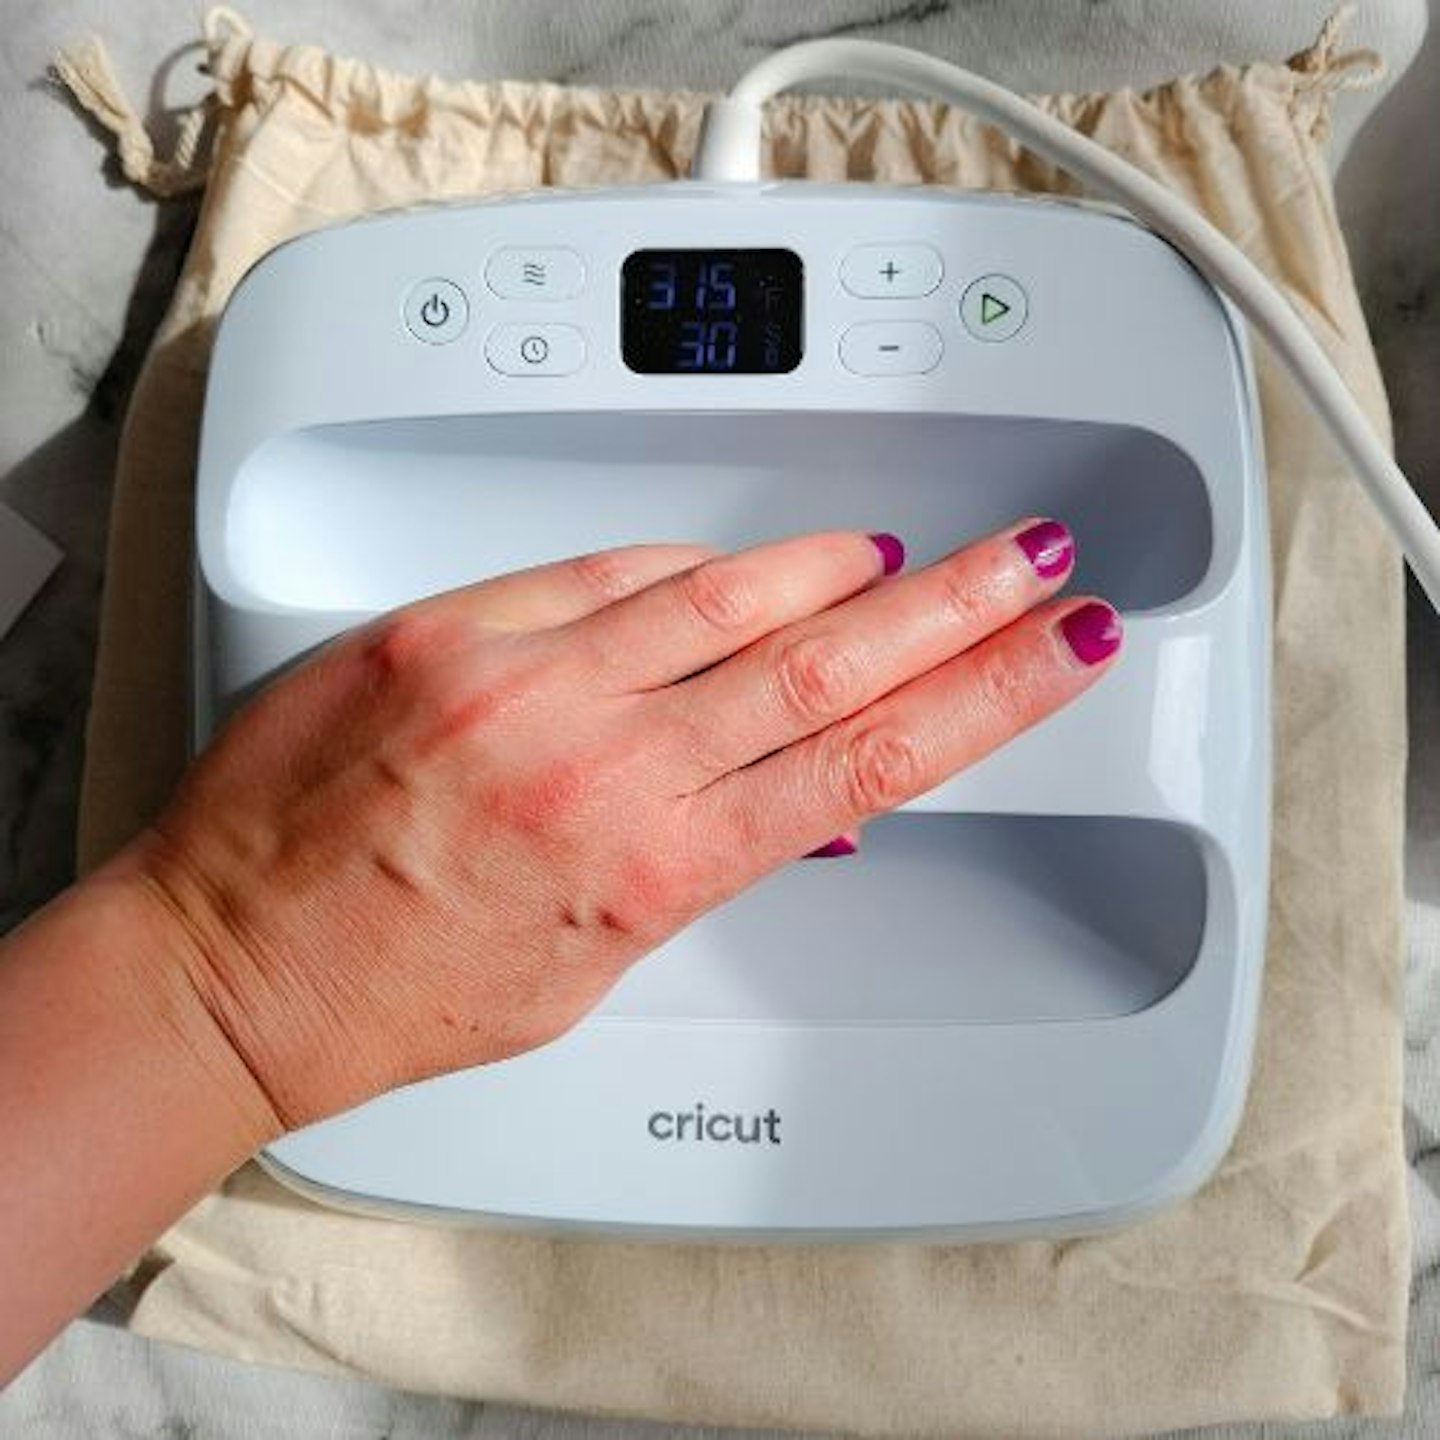
The Cricut EasyPress 3 is a portable, table-top, ceramic-coated heat plate that rests on a safety base. It connects via Bluetooth to the Cricut Heat app on a phone or tablet. The EasyPress has precision temperature and timings, plus it can reach high temperatures up to 205°C. It delivers more consistent results than a conventional household iron because it can apply a wider edge-to-edge and even heat. It works with two types of Cricut material: Iron-On and Infusible Ink which delivers different results.
Broadly speaking, Iron-On is a form of vinyl that adheres to the surface of a fabric. Infusible Ink bonds with a material like a form of sublimation printing.
Who tested it?
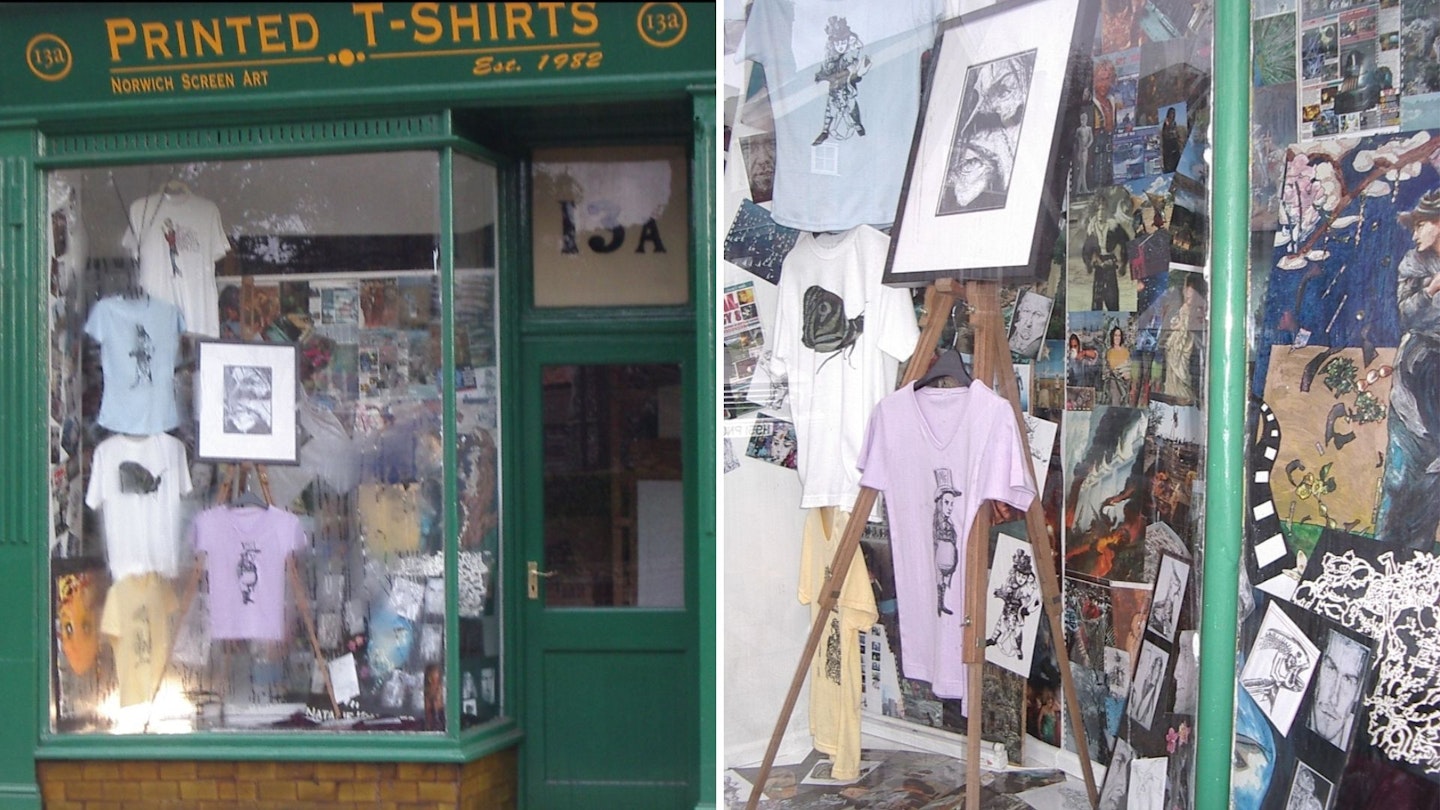
Homes & Garden writer Natalie Knowles has been trying out Cricut tools, materials and accessories. Natalie was a professional graphic designer and illustrator in London. She has since returned to her home county of Norfolk, where she regularly exhibits her art. You can see how she's produced designs with her Cricut machine and accessories by following Natalie Knowles Art on Instagram.
Natalie says: "Circa 2006 and fresh out of uni, I took over a shop window with my art work. I had my illustrations screen-printed onto T-shirts by the business next door and got an education in sublimation printing. It's astonishing to see this technology is now available for the home and delivers professional results."
How was the Cricut EasyPress 3 tested?
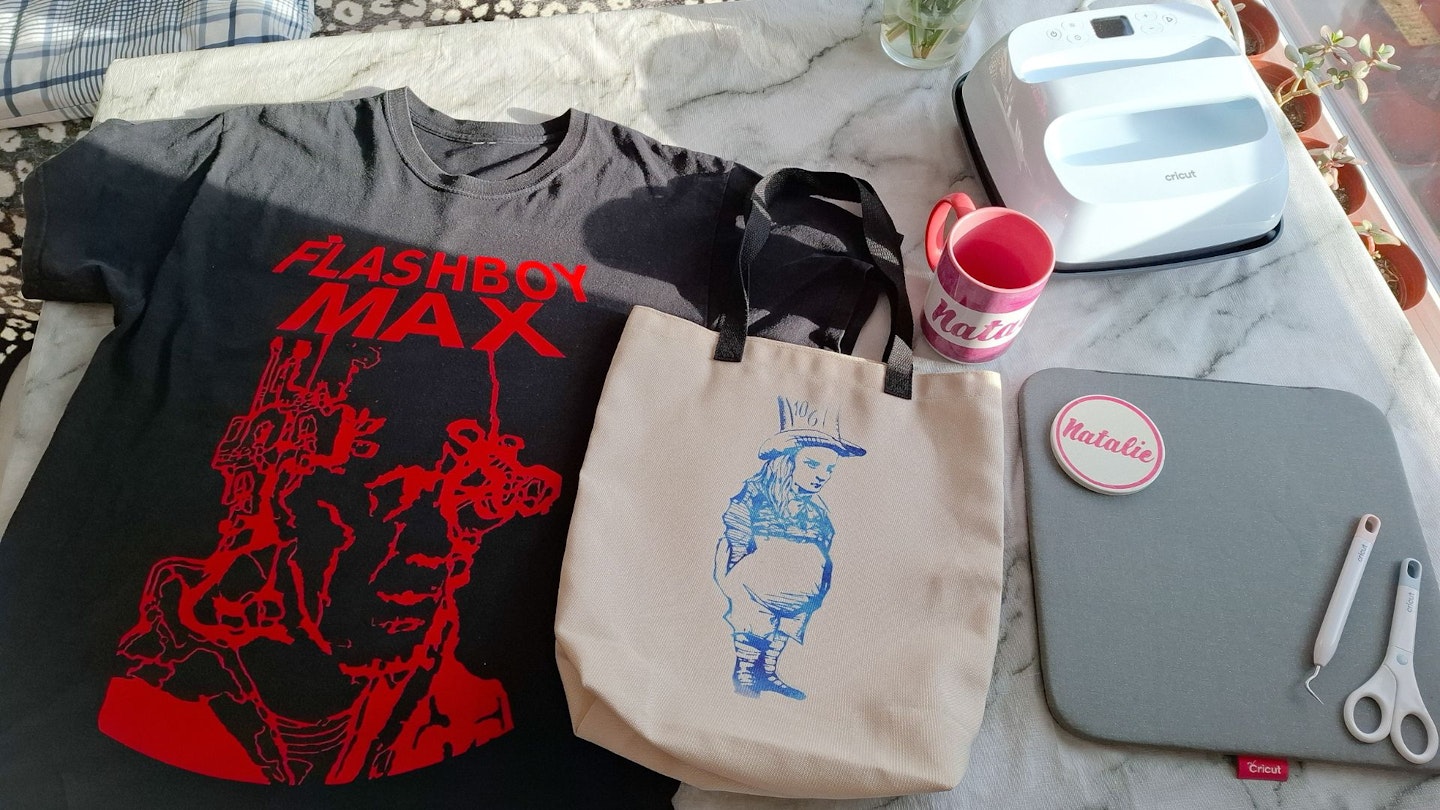
The Cricut EasyPress 3 was tested over a month at home and continues to be a part of Natalie's Cricut arsenal for transferring her designs onto fabric. In this review she uses Smart Iron-On to create a custom T-shirt with her Flashboy Max illustration. Next, she tries out transferring her art logo to a tote bag using an Infusible Ink transfer sheet. Finally, she makes a personalised coaster. Natalie evaluates how easy it is to use the heat press, app and materials. The Cricut EasyPress 3 is rated for its build quality, performance and usability.
As a bonus, keep scrolling for a review of the Cricut Mug Press, in which Natalie creates a personalised mug.
What were the results?
Build quality
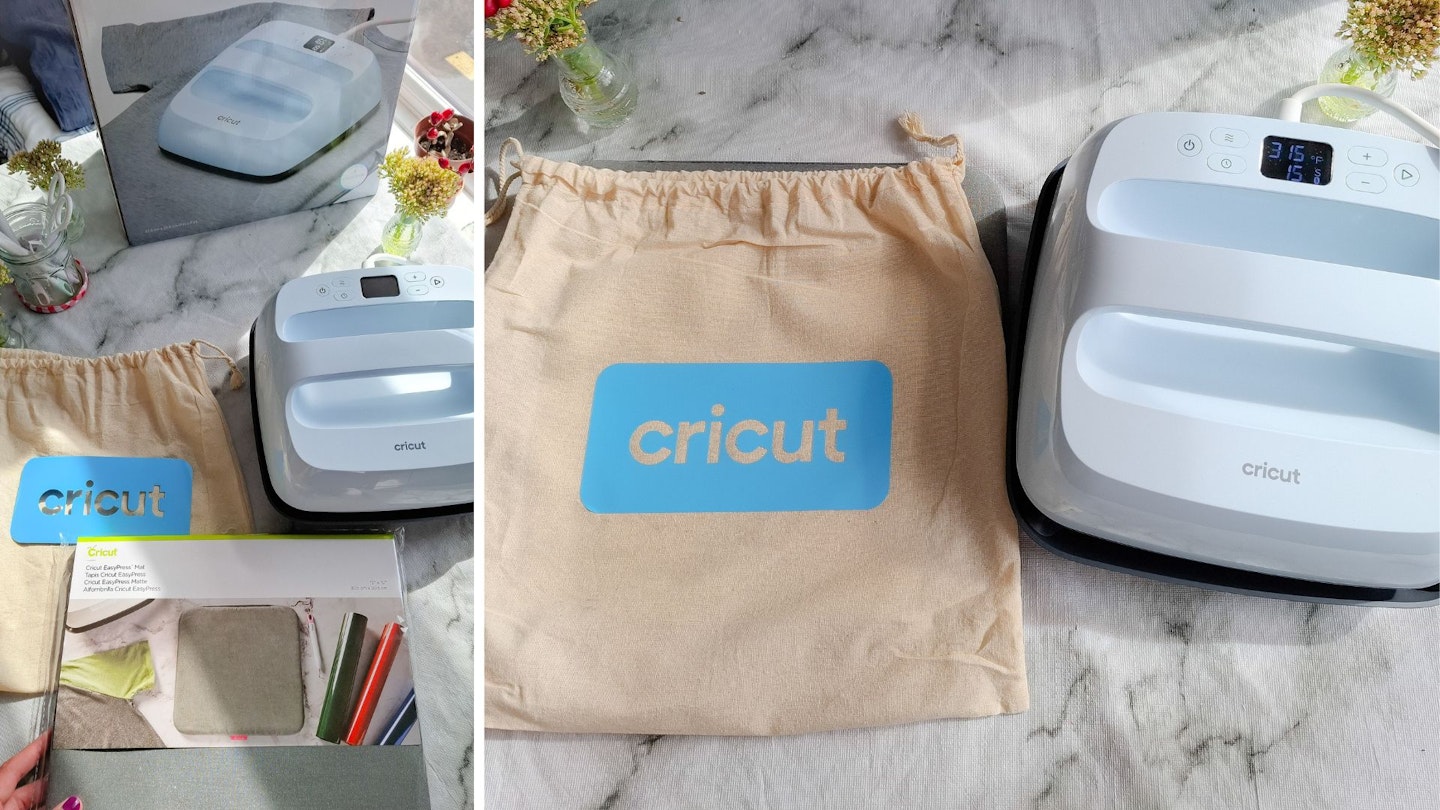
As with all Cricut products the build quality is exemplary. The heat press looks and feels well made and has safety features to ensure it won't overheat. Also, it sits on a robust safety base. I advise buying a Cricut EasyPress Mat so that you have a heat-proof surface to put your creations on.
The EasyPress 3 is avaiable in two sizes and I tested the 30cm x 25cm press. It's pretty comfortable for me to hold with one hand. However, I recommend a trip to Hobbycraft and have a feel of the weight because it might be too heavy and cumbersome for individuals with mobility issues.
There is a smaller version available: Cricut EasyPress 3 - 22.5cm x 22.5cm which is the perfect size for customising children's clothes. Also, there is the Cricut EasyPress Mini, which is a computer mouse-sized heat press that's ideal for adding custom decoration to toys and fabric shoes.

Cricut Heat App
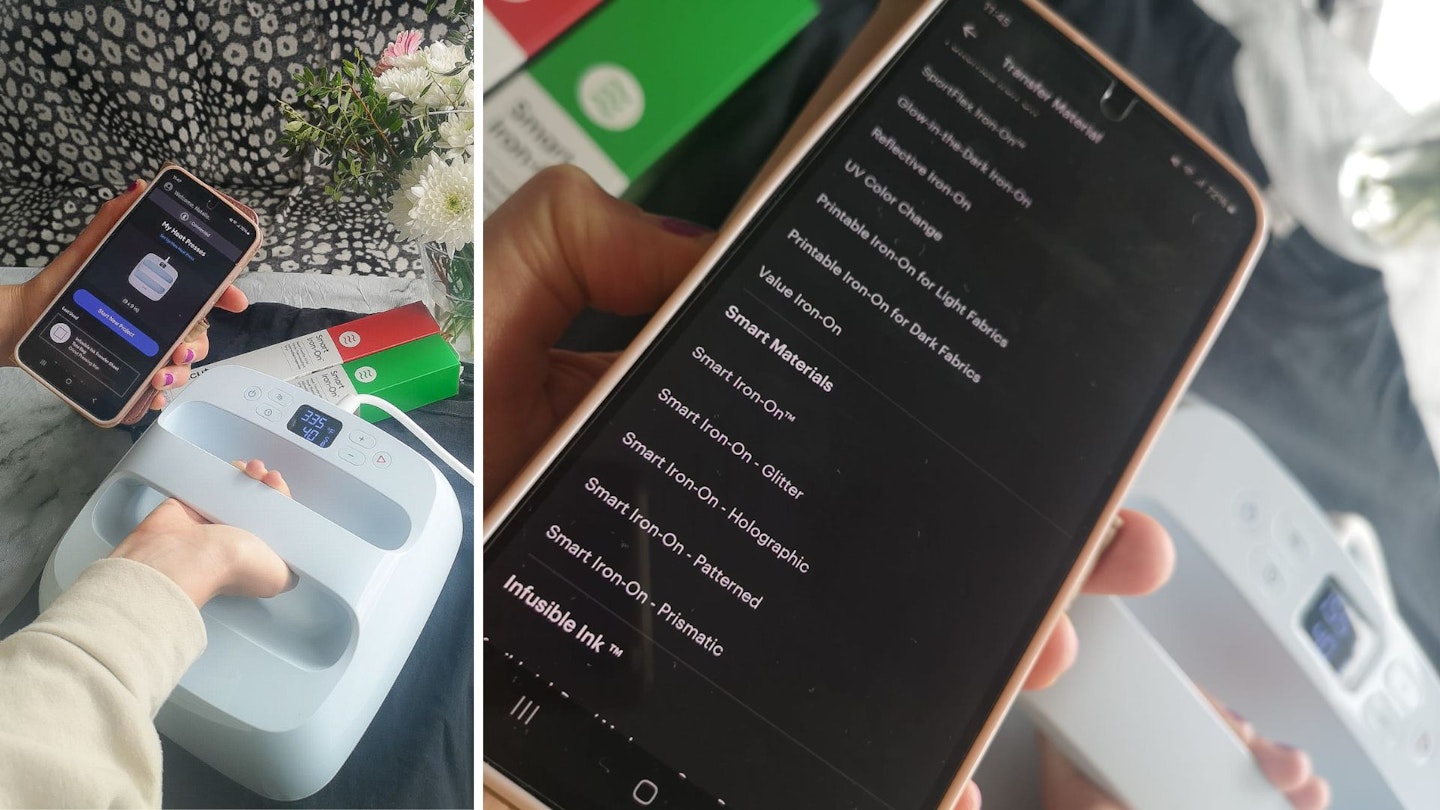
The Cricut Heat app has a huge list of materials to select from and then it sends the temperature and time readings to the heat press so you get perfect results. It tells you how much pressure to apply and for how long. Just follow the on-screen prompts – or when you feel confident – set the temperature and pressing time manually. But I do recommend having a thorough persuse of the app as it contains detailed step-by-step guidance and video tutorials.
Set up and practice project
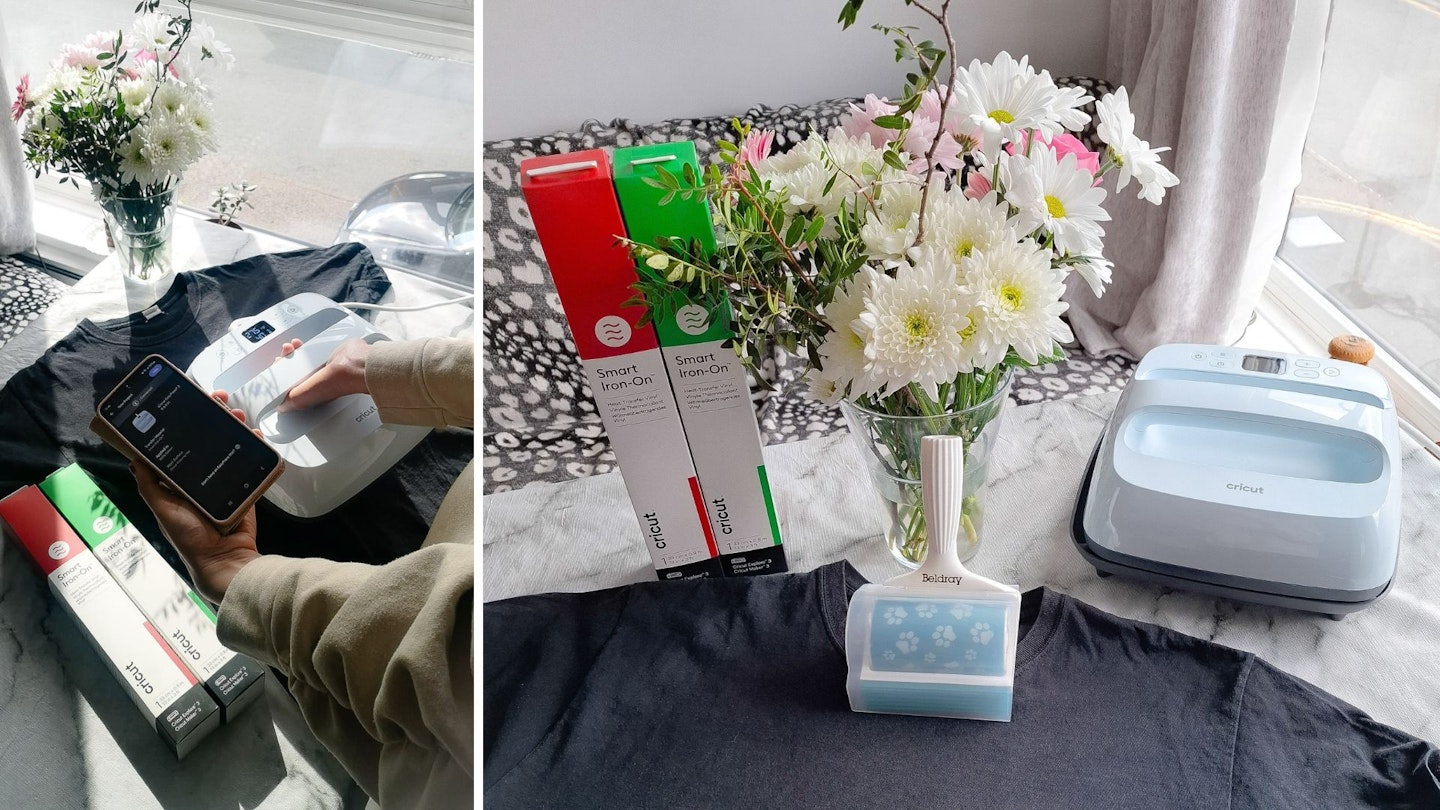
Setting up the Cricut EasyPress 3 is a step-by-step process. No computer required, set-up is done with a mobile device. A QR code takes you to a download of the Cricut Heat app. Sign into the app with your Cricut ID. Connect to the Cricut EasyPres 3 via Bluetooth. It beeps when it is connected.
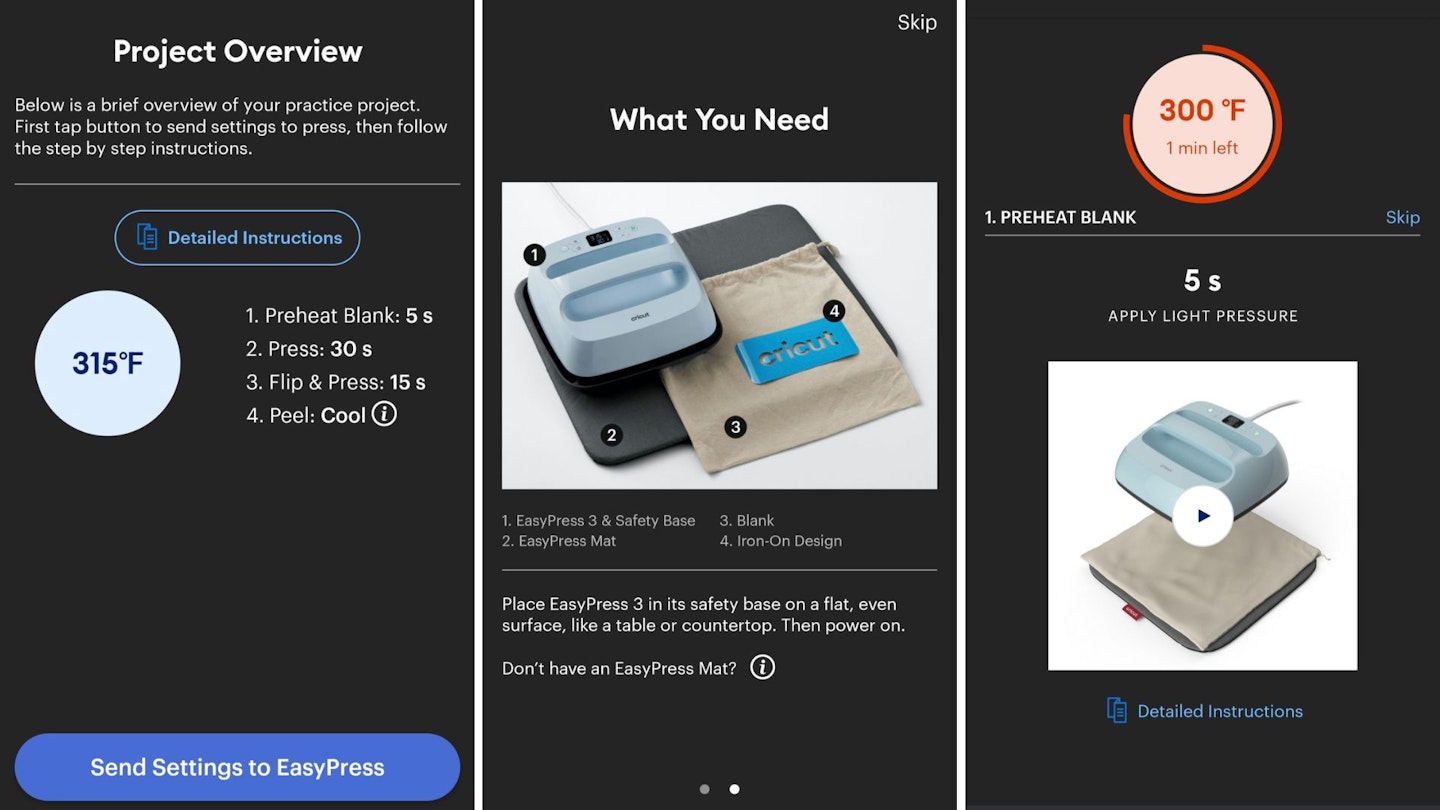
Make the Practice Project, which involves transferring a sample of Iron-On to a drawstring bag supplied in the box. It would be best if you had an EasyPress Mat, otherwise, use a towel. This is a simple 10-minute project that will get you used to transferring an Iron-On design to a material. There are tutorials at every stage of the process in the Cricut Heat app, as the screenshots show.
Wait until the material has cooled. Then, you'll be able to peel off a layer of film. Now, you can see how the Iron-On has fused with the material.
Performance
Making a T-shirt using Smart Iron-On
Primarily, Iron-On is intended to be used on fabric. It works well with cotton, polyester and a blend of both. It can also be used with canvas and on denim. It will not work on synthetic materials, such as acrylic. If a fabric can't be ironed, then it won't work with a heat press. In addition, Iron-On can be used on non-fabric materials such as wood, corkboard and cardstock; however, the application is different from that of fabric.
The beauty of Smart Iron-On is that it doesn't need a cutting mat, which makes it a lot faster to cut, plus you make longer designs. Layer it on to clothing and press – simple, customised clothes in minutes! It can even be used to cover stains, so you can get a more wear out of your favourite jeans or a beloved concert T-Shirt. Prepare the material by removing dust and stray threads with a lint remover. A garment with Iron-On is machine washable for up to 50 washes.
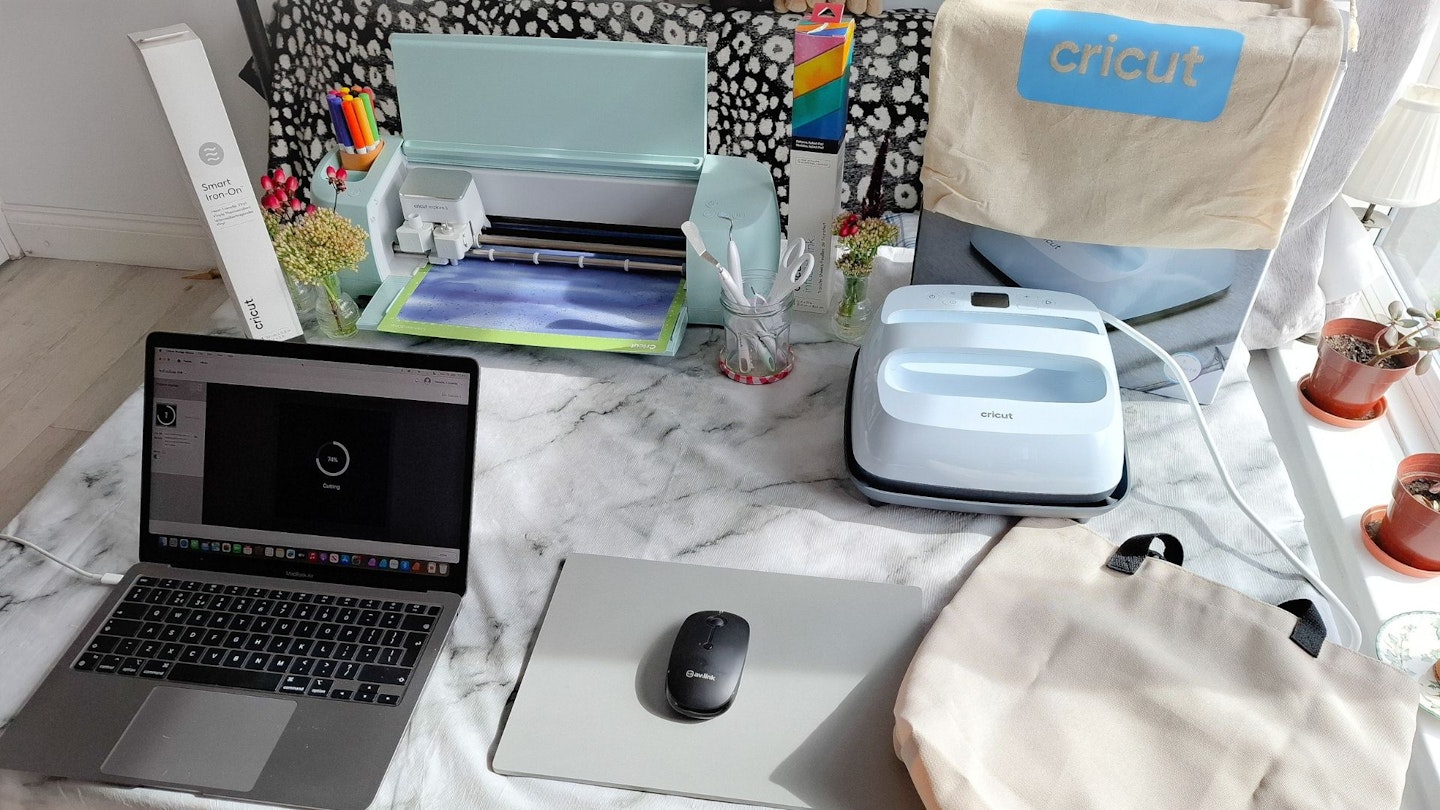
While it is likely that your design will start out life in Design Space and cut using a Cricut machine, using any type of Cricut heat press is an entirely separate process. I advise doing the design and weeding stage, then take a tea break and re-set your work space. It can be a pickle to have a laptop, Cricut machine, app and heat press – PLUS, tools and materials all on the go at once.
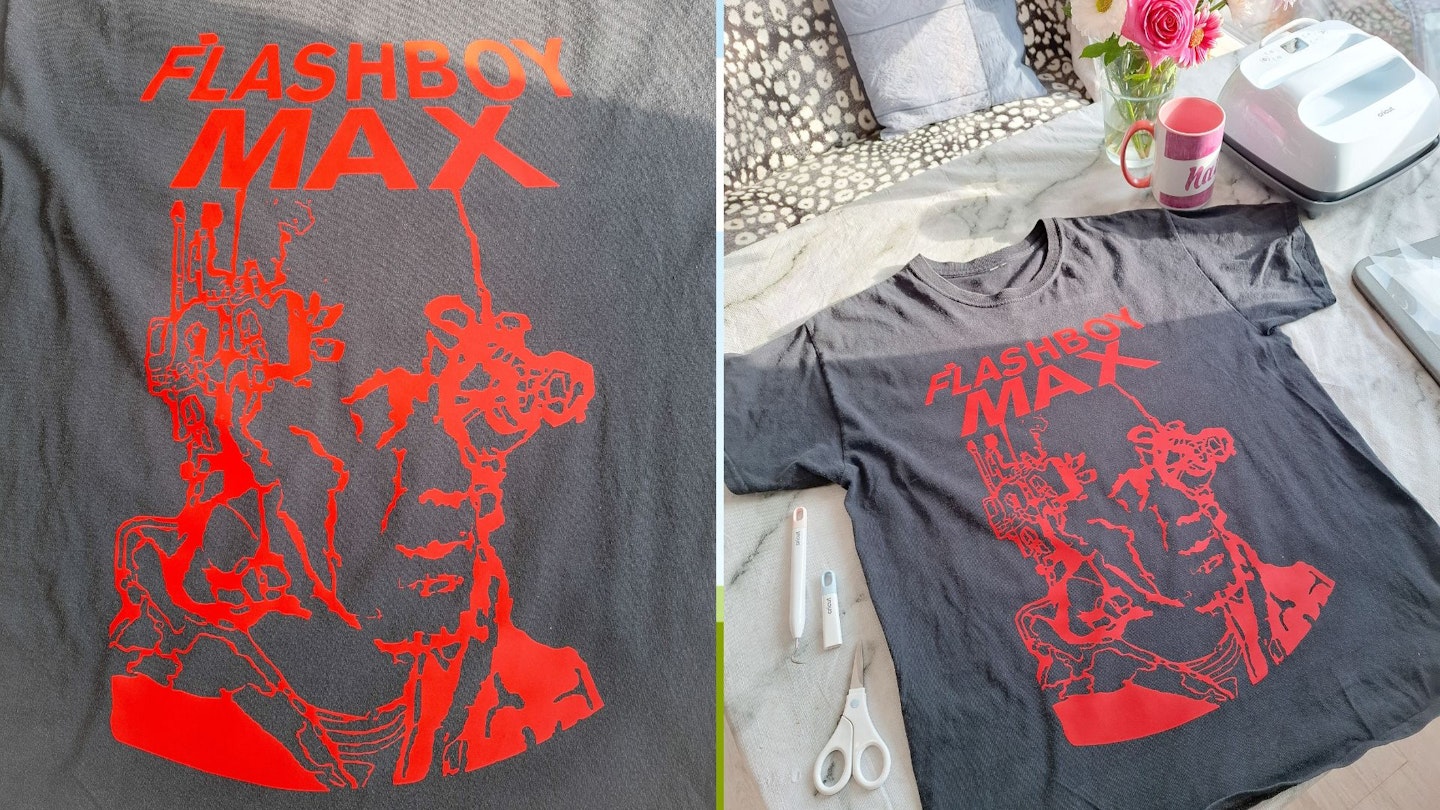
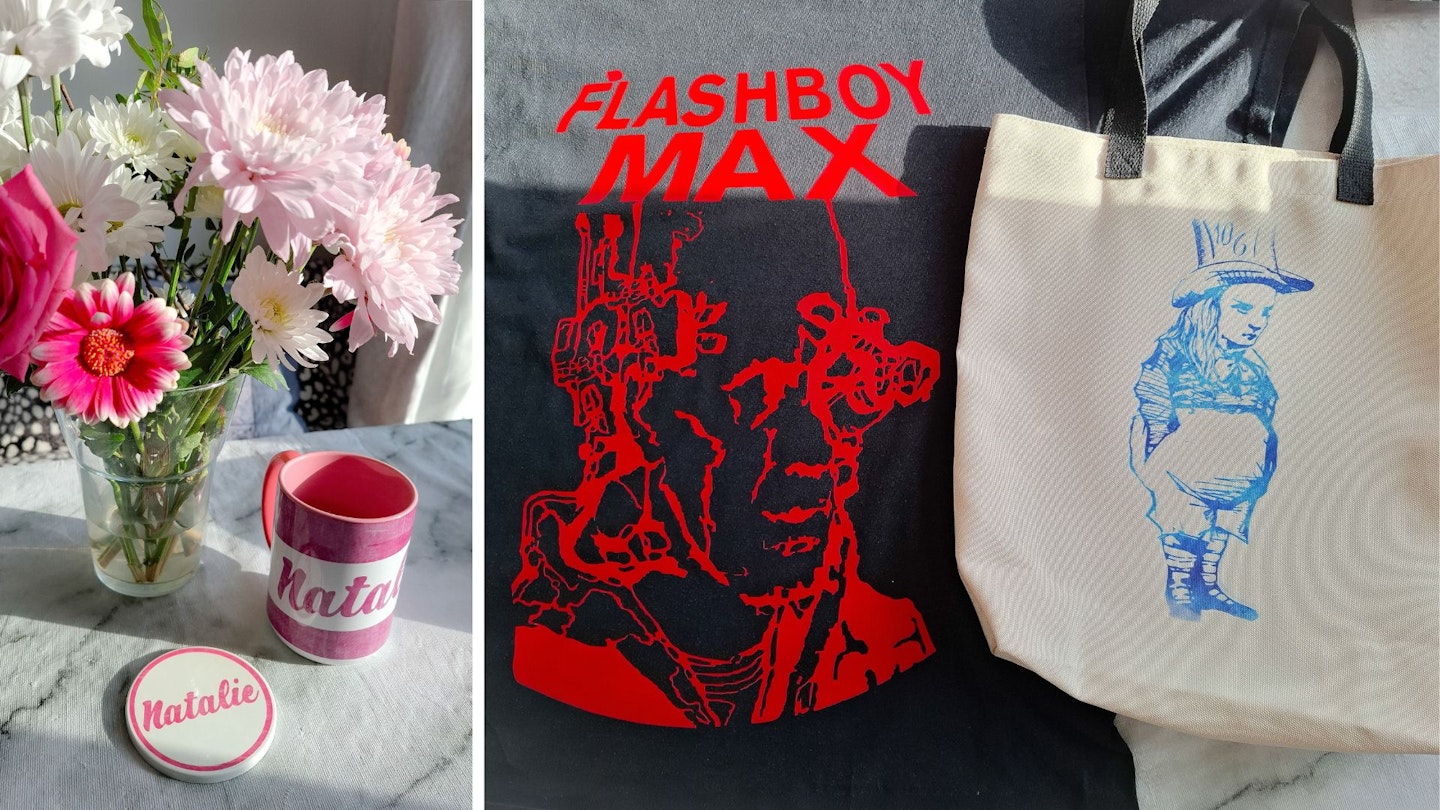
I customised my partner's old T-shirt with one of my designs. Smart Iron-On doesn't require a mat, so my 51cm (in length) design was doable. Without a doubt, Cricut's Smart Materials are easier to use than 'non-Smart', plus it frees you to create designs that are longer than a cutting mat... you can go up to three metres long with an Explore or Maker machine, if you fancy.
The Flashboy Max retro-videogame inspired design was complex, but the Smart Iron-On was very easy to weed. If your design is intricate, I recommend cutting away the peeled vinyl in sections. Smart Iron-On has a thick transparent backing, like acetate. The Iron-On peels straight off. As such, your design is all-in-one-piece without the need for Transfer Tape.
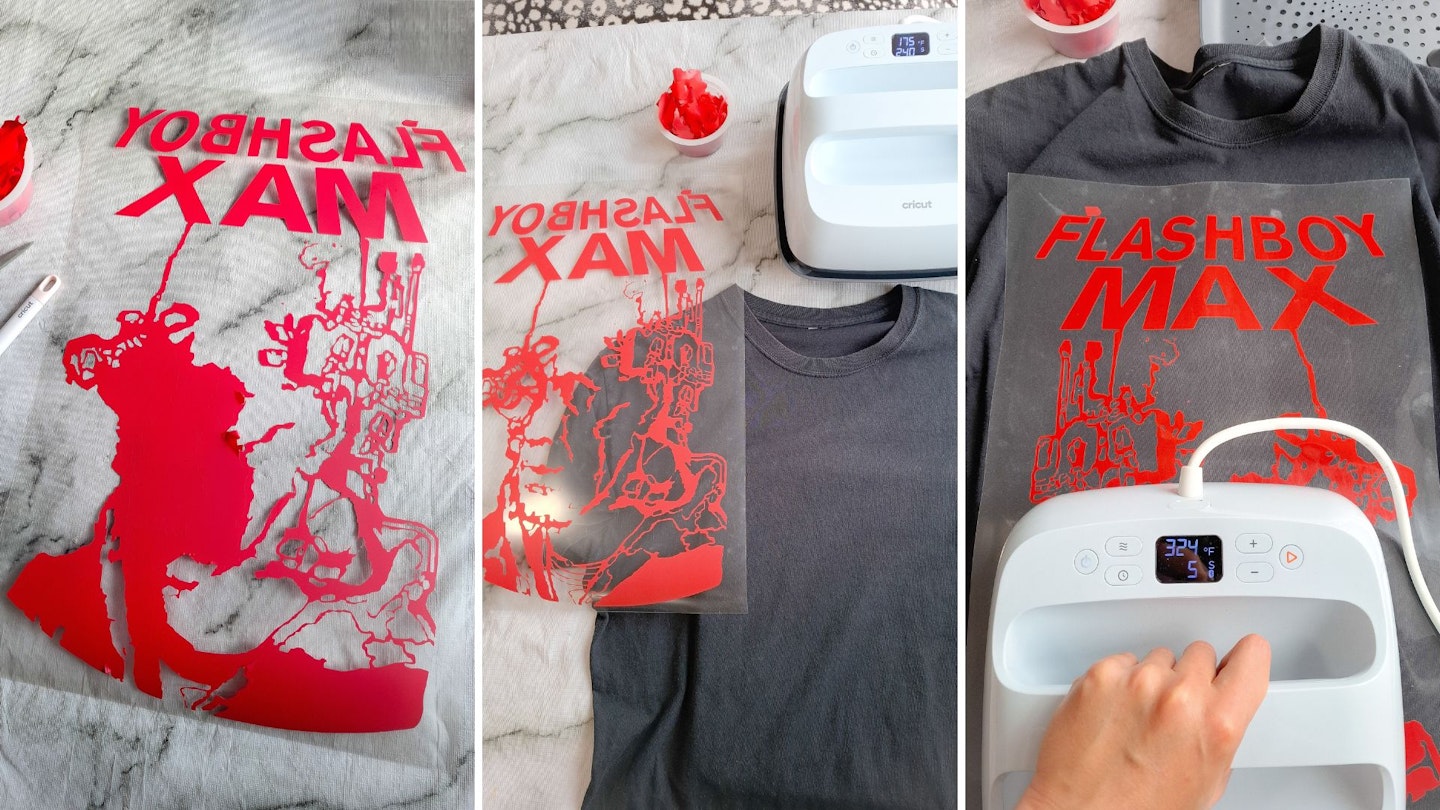
Now, I had some hesitation about the size of my design in relation to the EasyPress 3. In the Cricut Heat app there are precise instructions to follow about the length of time that you need to apply heat. I had to do mine in two goes. But, happily the Smart Iron-On adhered to the cotton T-Shirt with flawless results. It's a very thin layer of vinyl, so garments retain their flexibility and are smooth to touch. I was impressed and my partner didn't seem to mind that I'd purloined one of his T-shirts after seeing the results. I look forward to attempting a design that has more than one colour.
Making a tote bag with Infusible Ink Transfer Sheets
Using Infusible Ink is a form of sublimation printing where the ink melts into the material. Infusible Ink requires a higher temperature, therefore a household iron won't work. Also, it only works with a limited range of materials. There is a hack on TikTok where it's possible to use Infusible Ink on other materials if you apply a layer of White Glitter Iron-On first. In addition, Infusible Ink can be used on black material. What makes it an attractive choice is the texture of the material shows through the ink.
Cricut blanks give the best results, meaning branded blank T-shirts, tote bags, coasters etc. that have been tested to ensure they give a flawless finish. Infusible Ink Transfer Sheets and Infusible Ink Pens can also be used on 100% polyester clothing. The quality of the polyester is important, Infusible Ink must be applied to a material that has a high polyester content.
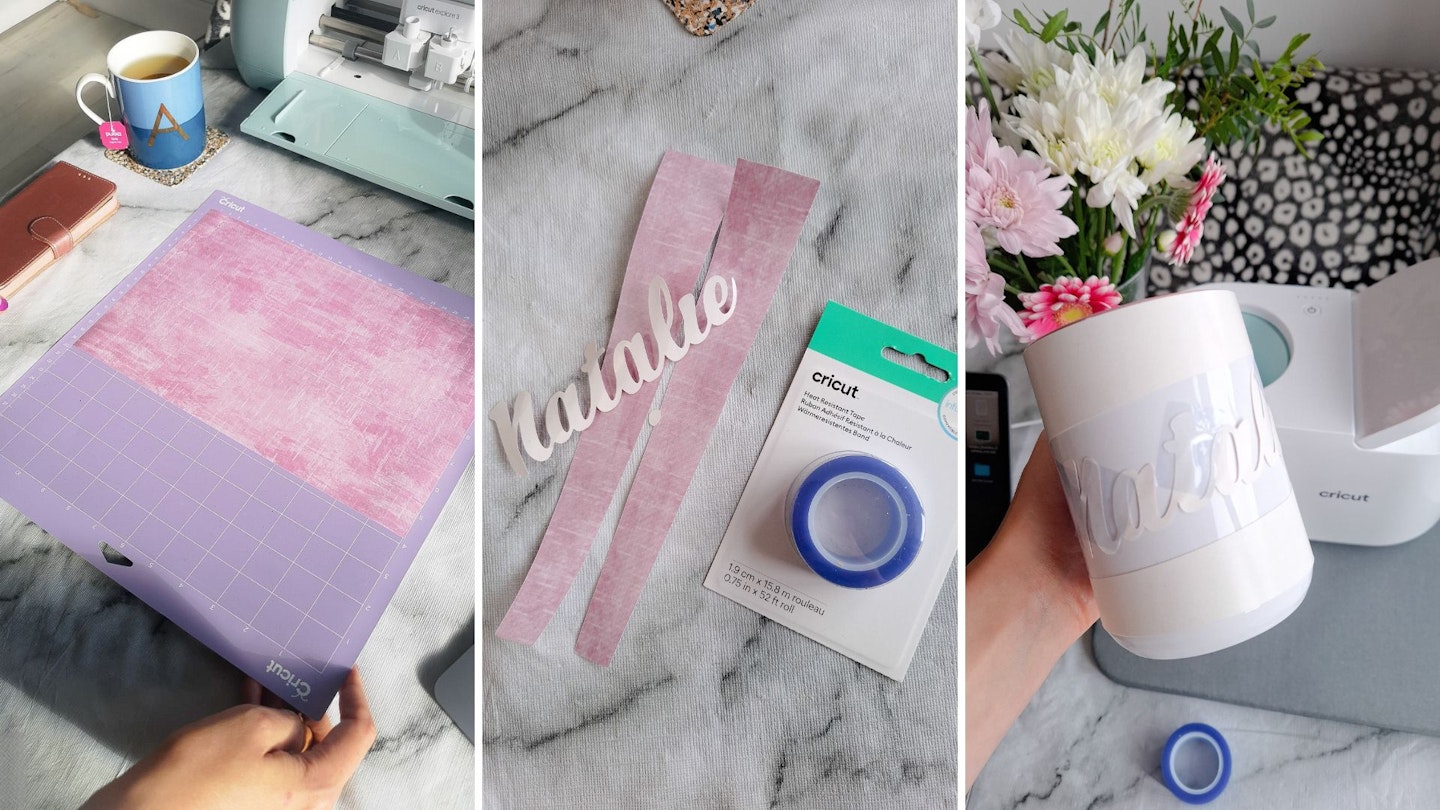
The Infusible Ink Transfer Sheets are rolled and look like study paper on plastic backing. Don't be alarmed if it looks paler than expected, like watercolour, the colour becomes more vibrant when heat is applied. The first stage is to create and cut a design using Design Space and a Cricut machine. Load a sheet of Infusible Ink on a Strong Grip cutting mat. I advise smoothing the sheet out a bit first, as it's tricky to line-up and adhere it if it's straight off the roll and curling.
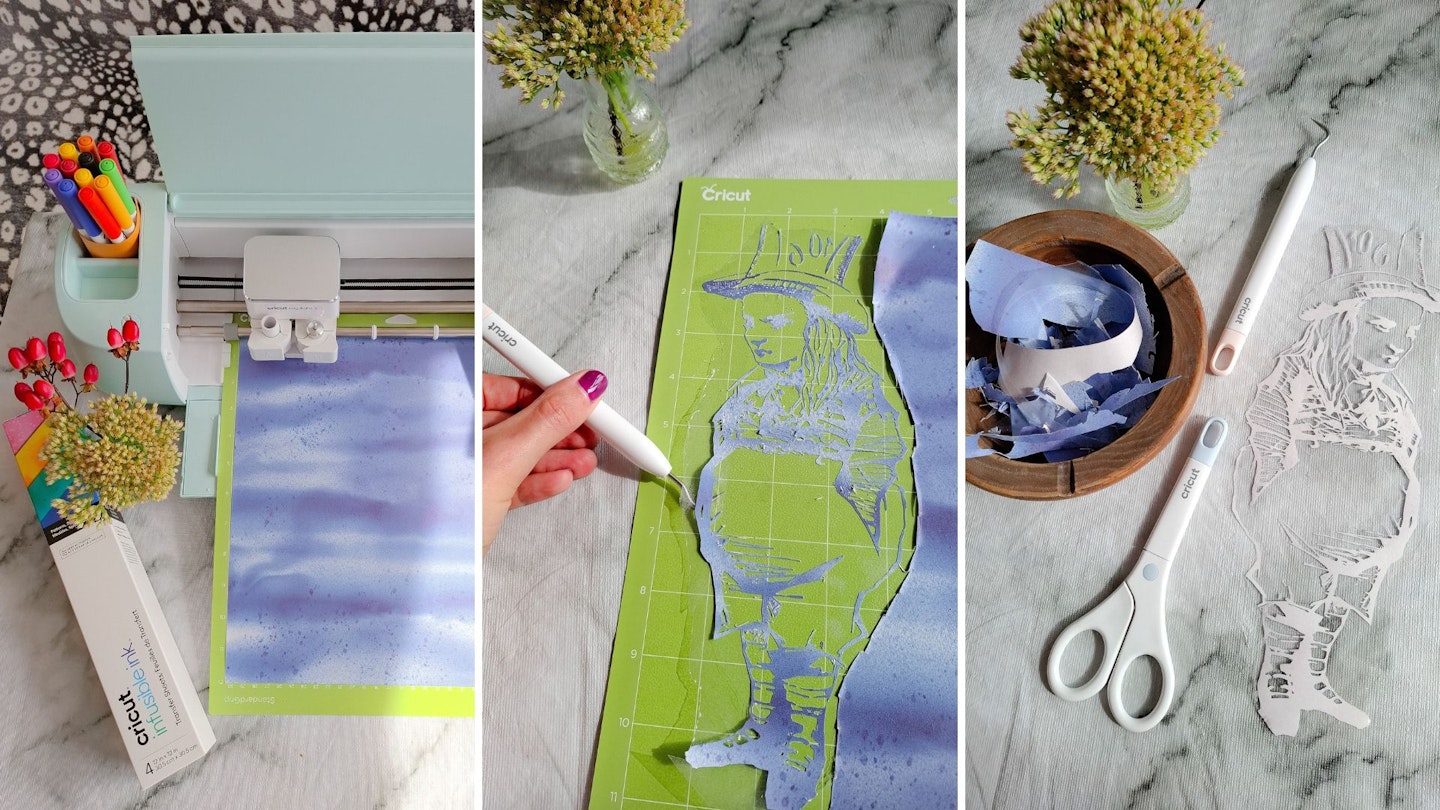
Make sure the 'Mirror' is turned on in Design Space and the material is ink-side up. Bear in mind – especially if you're working with text – your design will be back-to-front so that it adheres to the surface the right way round.
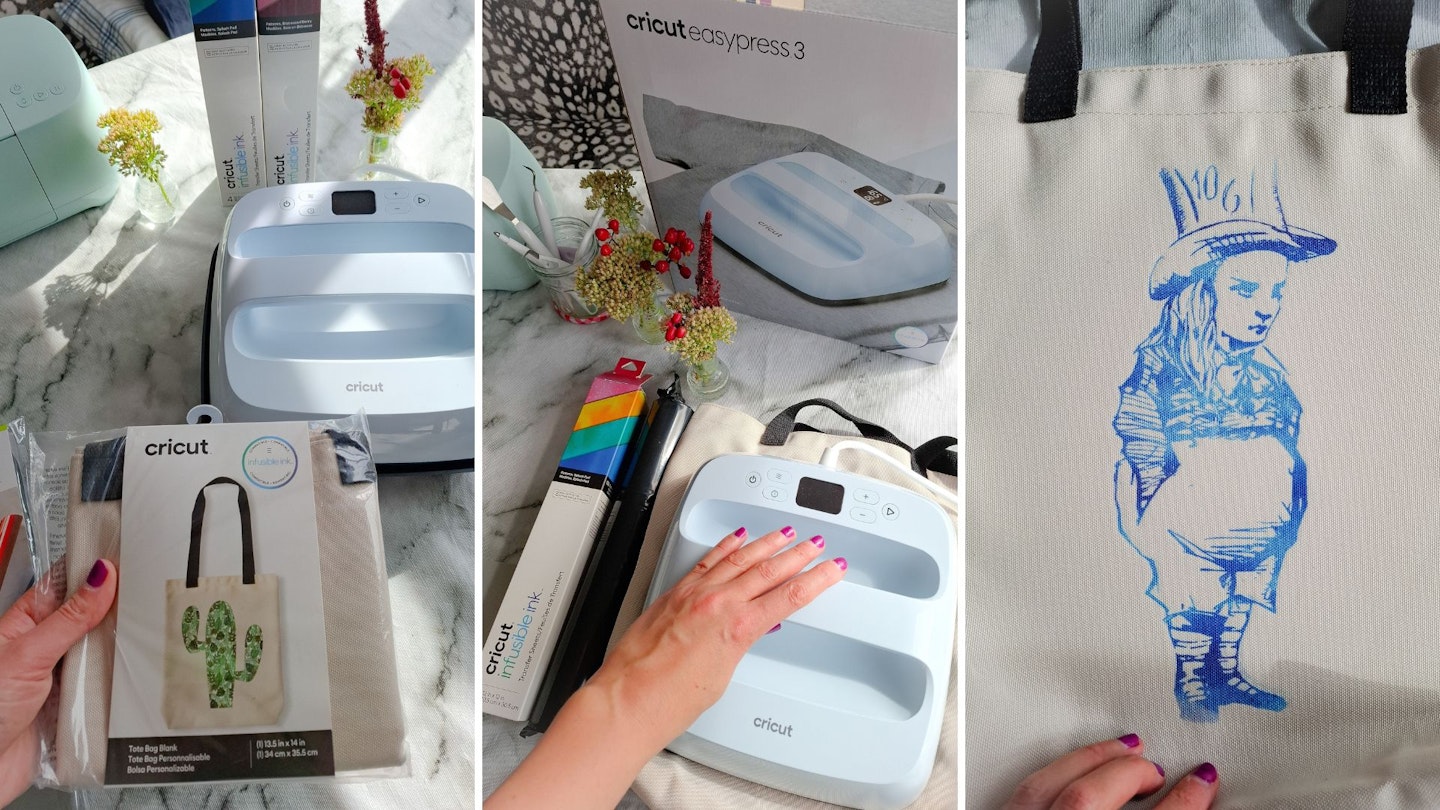
I used a Cricut Blank Tote Bag, which is very good quality and has a textured weave like canvas. Have your phone handy and select the item from the list of materials in the Cricut Heat app. The app sends the recommended time and temperature to the EasyPress 3. The on-screen prompts tell you how much pressure to apply and for how long.
It was successful, albeit there were two things I took away from my first attempt with Infusible Ink Transfer Sheets: One, my design was complex and, therefore, very tricky to weed. Secondly, the design was slightly larger than the heat press, so the very top and bottom didn't transfer as well as the rest of the design. It is a magical process, and the ink is much more vivid than it looks on the sheet. It gives a very different appearance to Iron-On as it actually sinks into the material. However, it is more difficult to use.
Usability
The first thing you have to get your head around is that using the EasyPress and Cricut Heat app is a separate process to using a Cricut machine and Design Space. However, you need both in order to cut a design on Iron-On or Infusible Ink sheets. Then, with your cut and weeded design you use the heat press to transfer it on to a material. So, make sure you've got a Cricut machine before you invest in a Cricut heat press.
Secondly, Cricut is an American brand, so get used to measurements being in inches and the temperature being in Fahrenheit. A number of times I was taken back by thinking I was holding an object that was the equivalent temperature to a pizza oven!
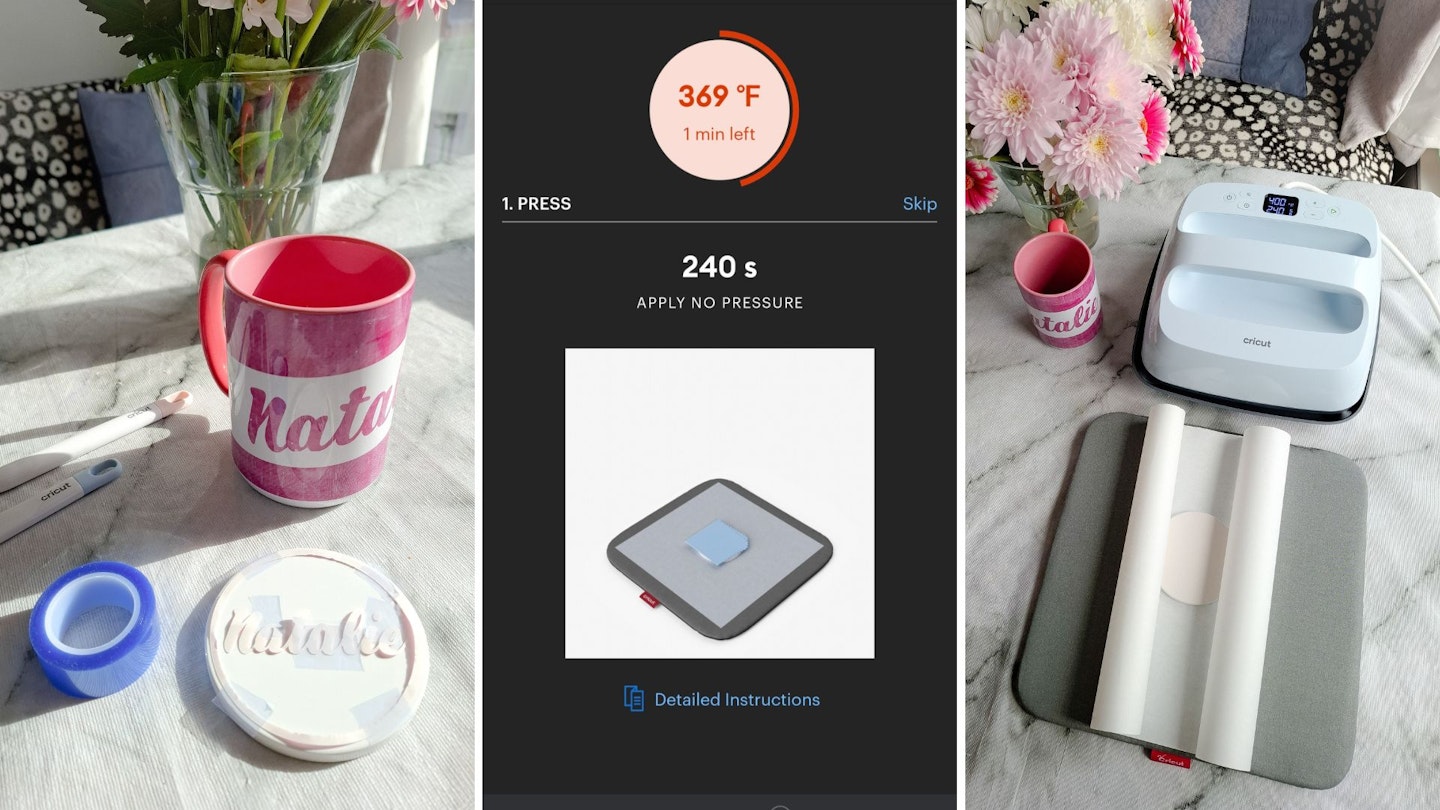
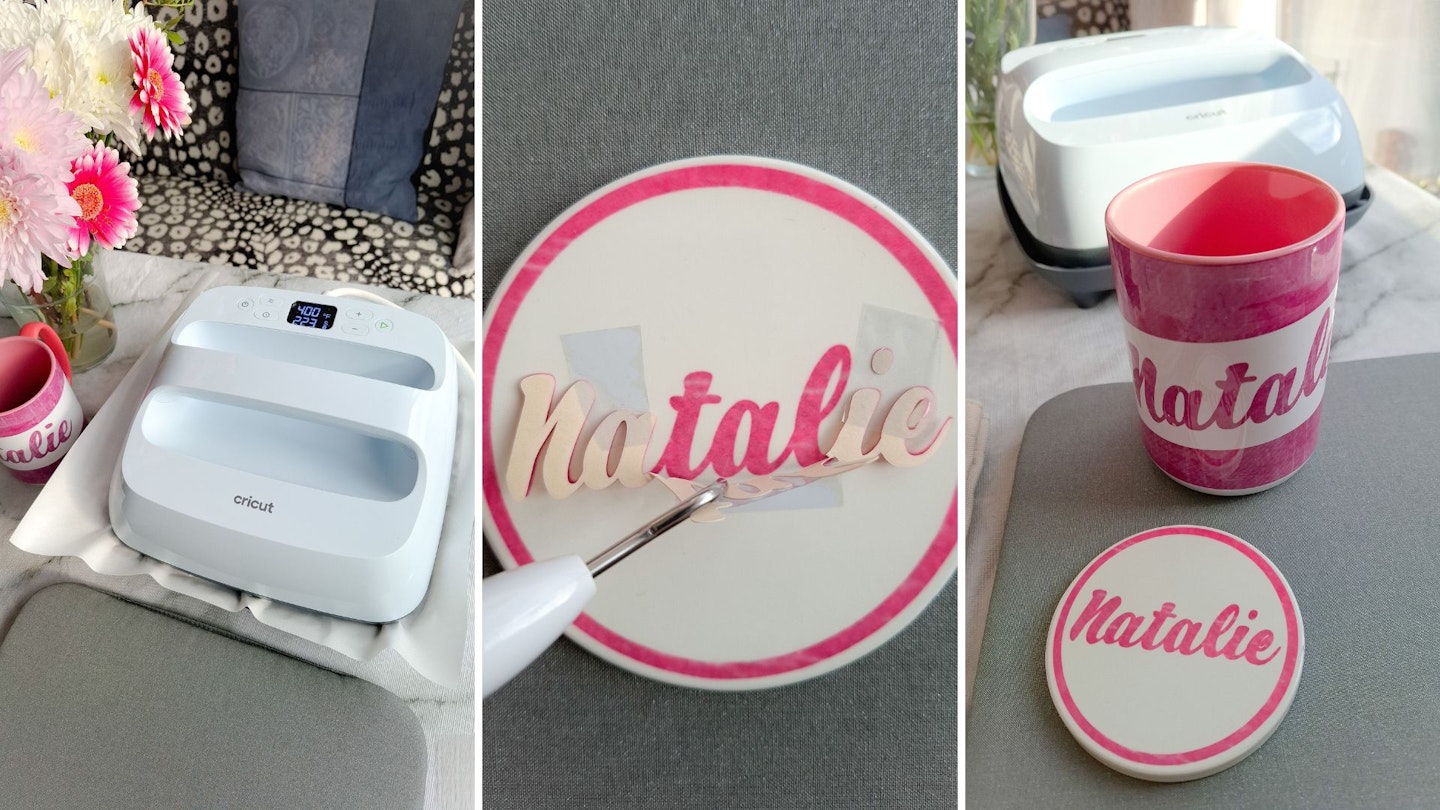
Making a coaster using Infusible Ink
I wanted to make a matching ceramic coaster for a mug I made in the Cricut Mug Press (see below). The method in the Cricut Heat app described using butcher paper (special heat-resistant paper) and turning the coaster upside down. I left the EasyPress 3 on the coaster according to the length of time the app said. But it didn't work! I was running short on time, so as a try-and-see, I turned the coaster design side up and placed a layer of butcher paper on top. Then, I repeated the temperature and timer settings. It worked perfectly.
I might have been over-awed by the instructions at the same time as holding an extremely hot heat plate and misinterpreted the steps. Plus, I was caught out as there's a lot of extras such as butcher paper and copier paper that you're told to use. So, have these prepared in advance.
The best thing about the Cricut Heat app is that it automatically sends temperature readings to the EasyPress 3 and it is a comprehensive guide for newcomers. However, in terms of usability you need to be very good a multi-tasking in order to juggle a phone and a heat press. I think you quickly get to a stage where the EasyPress 3 becomes intuitive to use and you rely less on the app. So, don't be worried if you're not following the pressure or timings exactly. As the coaster demonstrates, I achieved perfect results whilst deviating from the instructions.
Final Verdict on the Cricut EasyPress 3
Making your own personalised objects and garments is a buzz. My advice is not to be too prescriptive about the method that the Cricut Heat app goes into when transferring Iron-On vinyl or Infusible Ink to a surface. Rely on your intuition and experience of using an houeshold iron on clothing.
I think the Cricut Heat app is worth a cursory look to get the idea of how to use the EasyPress 3, but after a couple of goes with the heat press, you realise it's very intuitive and you don't necessarily need all the tutorials and information in the app. Don't get me wrong, it's a fantastic resource, but it can be tricky to juggle your phone and the EasyPress 3 when you're dealing with high temperatures.
Another piece of advice is to ventilate the area you're working in, especially if you're using Infusible Ink as it emits fumes.
What the Cricut EasyPress 3 offers over other heat presses is precision temperature control and even heat to transfer designs onto textiles. It's a means to achieving professional-looking personalised items in the comfort of your own home.
All-in-all, whether your putting your creative mark on clothes or repurposing a bulk lot of material to be used as decorations, the EasyPress 3 will be an indispensable craft room tool.
Rating 4/5
Shop this product
Similar product to consider
Tested
Best Cricut accessory for making personalised mugs


If you're expanding your array of Cricut accessories, consider the Cricut Mug Press as a means of creating your own personalised mugs. Use a Cricut machine and Design Space to prepare your design. There are mug templates available with a Cricut Access subscription. Use an Infusible Ink sheet on a Strong Grip Cutting Mat, then cut and weed your design. Heat up the Mug Press and in the meantime, attach your design to a blank mug using Heat Transfer Tape. Place in the Mug Press and wait for the magic reveal!
Pros
- Achieve professional, personalised mugs in minutes
- Dishwasher-safe and peel-proof
- Beautiful range of Infusible Inks and Pens to work with
Cons
- On first use it requires connecting to a computer using a USB cable, if you own a Mac you'll need to use an adaptor
| Size of compatible mugs: | 350-470ml (straight sides) 82-86mm diameter |
- One touch settings
- Auto-off safety
- Compatible with Infusible Ink Transfer Sheets, Pens, or Markers & Cricut mug blanks (sold separately)

Here's how to create a personalised mug step-by-step:
The Mug Press only needs to be connected to a computer for its initial set-up. This registers the Mug Press to your Cricut Design Space account and does a firmware update. The Mug Press connects to a computer via a USB cable (supplied).
The first time using it, it's worth watching a few tutorials so you know how to attach your design to the mug using Heat Transfer Tape. Also, make sure you've got a heat mat handy and that you position the Mug Press next to an open window as their will be fumes.
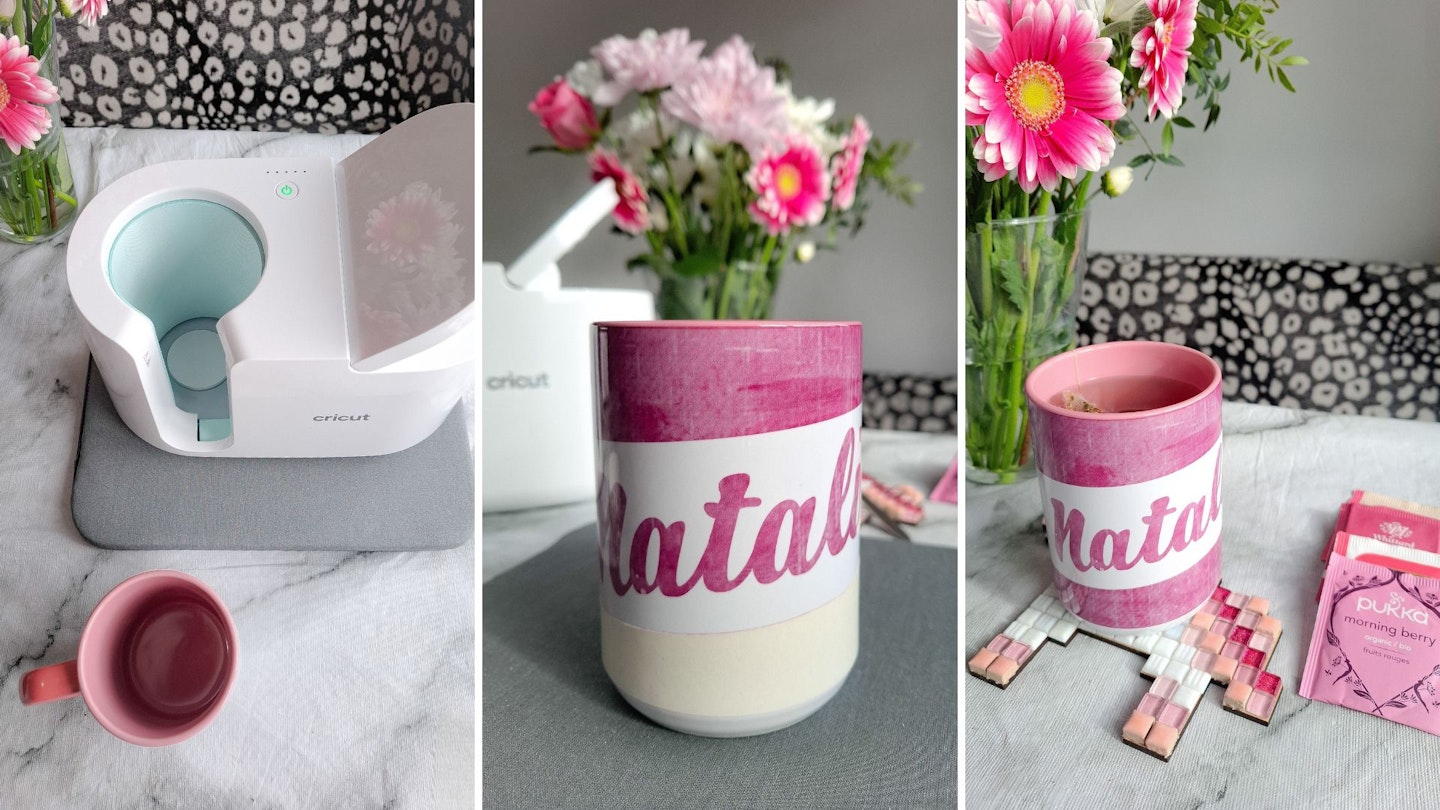
When you switch it on, the power button light will be orange. This means the Mug Press is heating up. After a few minutes the power button light turns green and there is a beep. Put your mug in the press with the lever up.
Press the lever down and the Mug Press begins the process of bonding the Infusible Ink to the ceramic mug using heat. Be aware the Mug Press gets very hot so take care and protect your work surface with a heat-proof mat.
It takes about six minutes to press a mug, indicated by a progress bar of lights above the power button. When it's finished the Mug Press beeps again.
Lift the lever up, carefully remove your mug and place on a heat-proof mat. Use the handle to manoeuvre it as the rest of the mug will be extremely hot.
Let the mug cool down, then remove the heat transfer tape and backing paper of the Infusible Ink.
I was blown-away with the results, with one caveat: Be sure to thoroughly clean a blank mug before pressing as something as insignificant as lint can cause spotting on an otherwise perfect and professional looking design.
Ask the expert
Patricia Hutny, UK & IE Marketing Manager for Cricut, answers frequently asked questions about the EasyPress 3 and heat press-compatible materials.
What materials can I use with a Cricut EasyPress?
With the Easy Press 3™, you can use Iron-On and all its subcategories, i.e. Everyday Iron-On™, Glitter, Holographic, Smart Iron-On, Mesh, Mosaic, Smart Glitter, Smart Holographic, UV activated, Reflective, and Patterned. So basically, any type of Iron-On that Cricut has created, works. But not only that, Infusible Ink also works really well with the EasyPress machines. You can use both the Transfer Sheets, and Infusible Ink Pens to create your designs . (Tip: while Iron-On will work with a household iron, Infusible Ink will not, as it requires higher temperatures.)
Can I transfer Iron-On to cotton t-shirts?
Yes, all types of Iron-On works really well on standard cotton t-shirts, as well as stretchier material with a bit more give. In fact, it works so well, we’ve gone that one step further by developing SportFlex Iron-On, which is ideal for creating personalised gym gear.
What other materials can Cricut Iron-On be applied to?
As a general rule of thumb, Iron-On should be used on softer material and vinyl should be applied to harder material. You can experiment with Iron-On and heat resistant materials. Smooth wood, faux leather and thick card are three prime examples of materials that are really easy to customise with Iron-On and the Easy Press Mini on the lowest setting. Whichever material you choose, you will need to do a bit of testing and experimenting to start with, but that’s all part of the fun! And if you’re in need of a little inspiration, the Cricut Heat app is the perfect place to get all the information you need.
What projects is Iron-On best for?
Iron-On can be used on customised apparel, home furnishings and accessories. For awkwardly-shaped items, such as plimsolls, headbands and stuffed animals use the Easy Press Mini to apply it.
Is using Infusible Ink™ the same as sublimation printing?
Infusible Ink uses dye sublimation, but it doesn’t involve printing. You can apply solid colours or patterns with Infusible Ink Transfer Sheets or you (and/or the kids!) can use Infusible Ink Pens to create your own designs. You can also use your Cricut to draw your designs for you too.
When is it best to use Infusible Ink for a project?
For the best results, Infusible Ink should always be used with Cricut blanks, which are made from 100% high quality polyester for the most vibrant and smooth results and have been specifically made for Infusible Ink. Cricut’s current range of Infusible Ink blanks includes: coasters (square and round), mugs, tote bags, cosmetic bags, throw pillowcases and bottle bags. Our Infusible Ink range also works exceptionally well with high quality with aluminium sheets, as well as polyester and aluminium sheets. For further information and practical guidance on using Infusible Ink, take a look at the tutorials within Cricut’s Design Space.
Natalie Knowles is a Homes & Garden Product Writer for Yours, specialising in craft and home appliances. When she's not testing sparkling water makers, she flexes her creative flair as an artist. Find out more about Natalie's art work. Follow @natalieknowlesart on Instagram for new designs and exhibitions.